

The Sky Rover Bandana is a small triangular crochet accessory built around a charted openwork design and completed with braided ties. Its compact size makes it an approachable project, but the construction includes several details that are worth following carefully: the central beginning, the progression through A.1 to A.6, the additional pattern repetitions, the measured growth of the triangle, the special finishing along the longest side, and the final braided strings.
This guide takes a checkpoint-based approach to the project. Instead of simply moving from one instruction to another, each section explains what to look for before moving forward. The purpose is to make the original construction easier to follow without changing any of its technical instructions.

Sky Rover Bandana Project Details
The pattern is DROPS 265-8, with the DROPS design identified as Pattern vs-137. The project belongs to yarn group B and uses DROPS BELLE from Garnstudio.
- Pattern: DROPS 265-8
- DROPS design: Pattern vs-137
- Yarn: DROPS BELLE from Garnstudio
- Yarn group: B
- Yarn quantity: 50 g
- Listed colours: Colour 15, Jeans Blue; 04, Dandelion; 26, Pearl
- Crochet hook: DROPS CROCHET HOOK SIZE 3.5 mm
- Finished length: approximately 44 cm without string
- Finished height: approximately 21 cm
- Main construction: worked back and forth from the middle and outwards
- Fastening: cable ties at each end of the long side
The specified crochet tension is 20 treble crochets in width and 10 rows vertically with pattern A.1 to A.6 on a 3.5 mm hook, measuring 10 x 10 cm.
Why a Checkpoint Method Helps With This Pattern
When a crochet project uses several diagrams, it can be tempting to focus only on the next symbol in front of you. The Sky Rover Bandana benefits from a slightly different approach because the pattern develops in stages.
The first stage establishes the centre. The second expands the fabric through A.2 to A.6. The third measures the growing piece and prepares the longest side. The fourth creates the A.7 border. The final stage changes from crochet to yarn braiding.
Each stage has a different purpose. Understanding that purpose makes it easier to notice whether your work is developing correctly without changing the original instructions.
Checkpoint One: Prepare the Correct Materials
Begin by preparing DROPS BELLE from Garnstudio and a DROPS CROCHET HOOK SIZE 3.5 mm. The pattern calls for 50 g of yarn. The listed colours are colour 15, Jeans Blue; 04, Dandelion; and 26, Pearl.
Keep the yarn information and hook size together with the pattern while you work. This is especially useful if you are making the project over several sessions, because the finishing ties also use DROPS Belle.
The project is worked with British crochet terminology. In this guide, the terminology follows the source, including treble crochet, double crochet, chain stitch, and slip stitch.
Checkpoint Two: Check Your Crochet Tension
The stated crochet tension is 20 treble crochets in width and 10 rows vertically with pattern A.1 to A.6 on a 3.5 mm hook, measuring 10 x 10 cm.
This measurement provides a useful reference before committing to the full project. If you have too many stitches in 10 cm, the pattern advises changing to a larger hook. If you have too few stitches in 10 cm, change to a smaller hook.
The 3.5 mm hook is therefore the specified hook size, while the tension determines whether that hook produces the intended gauge in your hands. Crochet tension varies between makers, so the pattern’s own adjustment advice is important.
Checkpoint Three: Understand the Chart Before Starting
The main instructions are presented through diagrams A.1 to A.7. The charts show the stitch placement and the direction of the work, allowing the triangular shape and edge details to be followed visually.
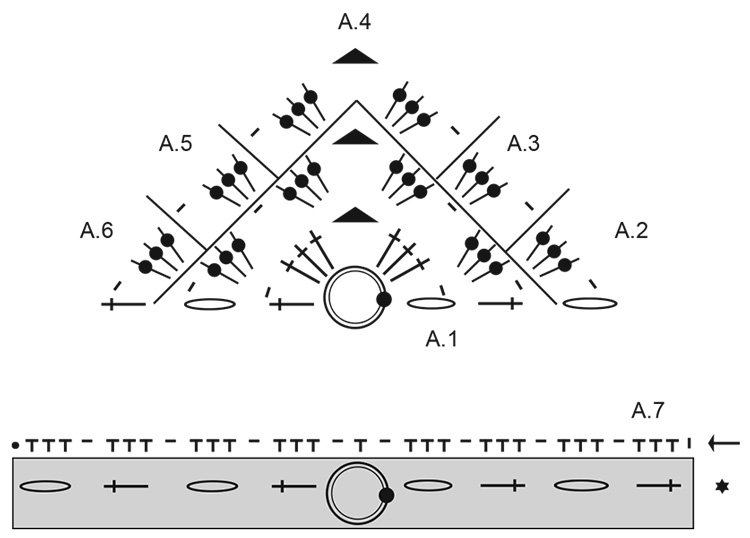
One detail becomes especially important near the end of the project. When working A.7, the grey fields show chain stitches and treble crochets that have already been worked at the beginning and end of A.1 to A.6. They are included to make A.7 along the edge easier to see.
The diagrams also distinguish between stitches worked around chain spaces, stitches worked into stitches below, and previously worked rows shown only to clarify the row above.
Learning the Symbols Used in the Pattern
The diagram uses several symbols that repeat throughout the project. Knowing their meanings before beginning can reduce interruptions while crocheting.
- Starting ring: Begin with 4 chain stitches and join into a ring with 1 slip stitch in the first chain stitch; continue left.
- Beginning of row: 3 chain stitches at the beginning of the row.
- Chain: 1 chain stitch.
- Treble crochet: 1 treble crochet around the chain stitch ring or 1 treble crochet in the 3rd chain stitch from the row below, according to the chart position.
- Chain space: 3 chain stitches.
- Treble around chain space: 1 treble crochet around the chain below or around the chain space below.
- Previous row: A row already worked, shown to help clarify the row being worked above it.
- Crochet direction: Indicates the direction of the work.
- Double crochet: 1 double crochet in the stitch below or 1 double crochet around the chain stitch ring below.
- Slip stitch: 1 slip stitch at the end of the row below.
Checkpoint Four: Establish the Centre With A.1
The main kerchief begins with A.1. Start by making 4 chain stitches and joining them into a ring with 1 slip stitch in the first chain stitch. Continue left as indicated by the diagram.
The first centre is small, so it is not necessary to judge the eventual shape from this opening section. Instead, concentrate on accurate joining and stitch placement.
The central ring provides the foundation for the expanding structure. As you continue, the stitches placed around the ring and into the indicated chain stitches create the first part of the openwork pattern.
Use the chart as the primary reference for the exact placement of each symbol. The written explanation here is intended to help you understand the construction rather than replace the diagram.
Checkpoint Five: Move Into A.2 Through A.6
Once A.1 has been worked, continue with A.2 to A.6 over A.1. This is the main growth stage of the bandana.
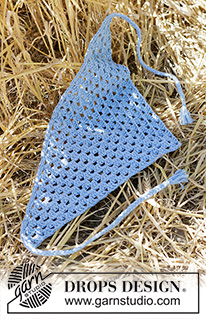
The project is worked back and forth from the middle and outwards. As the pattern progresses, the fabric becomes wider and the triangular shape begins to emerge more clearly.
There is one particularly important repeat instruction: every time A.2 to A.6 are worked vertically, there is room for 2 repetitions more of A.3/A.5 on each side.
This relationship between the diagrams should be treated as a fixed part of the construction. If the fabric seems to be developing differently, check the chart and the placement of these repeats before changing anything else.
Checkpoint Six: Watch the Symmetry of the Growing Fabric
Because the bandana grows from the middle, visual symmetry is a useful progress check. The two sides should develop according to the charted structure rather than being adjusted by eye.
If one side appears different from the other, return to the most recent completed section and compare the stitches with the diagram. Pay particular attention to the additional repetitions of A.3 and A.5 specified for each side when A.2 to A.6 are worked vertically.
Do not add or remove stitches simply to make the triangle appear more balanced. The safest approach is to identify where the chart and your work differ and follow the original pattern instructions.
Checkpoint Seven: Measure the Middle
Continue working back and forth until the piece measures approximately 21 cm along the middle, or until your desired length has been reached.
The approximately 21 cm measurement is a key point in the main construction. It should be treated separately from the approximately 44 cm finished length without string and the approximately 21 cm finished height.
Measure the work calmly and avoid pulling the fabric excessively. The objective is to compare the developing kerchief with the stated measurement while keeping the crocheted fabric in its natural form.
Do Not Cut the Yarn Yet
Once the main kerchief reaches approximately 21 cm along the middle or the desired length, keep the yarn attached. The yarn is needed for the next stage along the longest side.
This is an easy point at which to make an unnecessary finishing cut, especially if you normally finish one section before starting another. In this pattern, however, the instructions specifically continue into the edge work.
Keeping the yarn attached makes the transition into the long-side finishing straightforward.
Checkpoint Eight: Identify the Longest Side
The completed main piece is triangular. Its longest side forms the outer edge that will receive the finishing treatment.
Before starting the border, place the piece flat and identify this longest side clearly. The next instruction is to work a row with double crochets and chain stitches along that side.
This finishing row is different from the main patterned sections. It creates the foundation for the A.7 treatment and gives the long edge a defined structure.

Checkpoint Nine: Work the Double-Crochet and Chain-Stitch Row
Along the longest side, work the specified row with double crochets and chain stitches. This is the transition between the main triangle and the decorative edge.
Once this row is complete, rotate the piece so you can continue from the same side along the long edge.
At this stage, avoid treating the border as if it were another repetition of A.2 to A.6. It is a separate finishing operation, and the pattern introduces A.7 specifically for the long side.
Checkpoint Ten: Work A.7 Along the Entire Long Side
With the piece rotated as instructed, work A.7 along the entire long side.
The A.7 diagram shows the beginning, middle, and end of the edge. More rows are worked on the triangle than are shown in the diagram, so the chart should be interpreted as a guide to the edge construction rather than as a complete visual representation of every row in the triangle.
The grey fields are especially helpful here. They show chain stitches and treble crochets already worked at the beginning and end of A.1 to A.6. Their purpose is to make the relationship between the existing fabric and A.7 easier to see.
When A.7 has been completed along the entire long side, cut and fasten the yarn.
Checkpoint Eleven: Inspect the Finished Crochet Edge
Before adding the ties, take a moment to inspect the completed crocheted section. The main triangle should lead into the finished longest edge without an obvious interruption.
Check the edge from one end to the other and confirm that A.7 has been worked along the entire long side. This is also a useful opportunity to check that the yarn has been securely fastened after the edge work.
The project is now ready for its final construction stage: the two braided fastening strings.
Checkpoint Twelve: Measure and Cut the Tie Strands
Each tie starts with 6 strands of DROPS Belle. Cut each strand approximately 80 cm long.
The six strands are then pulled halfway through the piece at the edge of one long side. Because each strand is folded through the edge, you will have 12 strands of the same length.
This folded-strand method is important because the instructions specify six original strands, not twelve separately cut strands.
Checkpoint Thirteen: Divide the Twelve Strands Correctly
Once the six strands have been pulled halfway through the bandana, separate the resulting 12 strands into 3 piles.
Each pile should contain 4 strands. These three groups form the three sections of the braid.
This is a simple step, but the grouping is worth checking before you start plaiting. A quick count of four strands in each of the three piles ensures that the tie follows the original construction.
Checkpoint Fourteen: Plait the First Tie
Plait the three groups until approximately 3 cm of strand remains at the end. Once you reach this point, tie a knot around one end of the braid and fasten it tightly.
The approximately 3 cm measurement is part of the original finishing instruction. Keeping a small amount of strand at the end gives the braid a defined finishing point while allowing the knot to secure the plait.
Checkpoint Fifteen: Repeat the Tie on the Other Side
Make another string in the same way at the other end of the bandana.
Again, use 6 strands of DROPS Belle, each approximately 80 cm long. Pull them halfway through the edge to create 12 strands of the same length, divide those strands into 3 piles of 4, and plait until approximately 3 cm remains.
Finish with a knot around one end of the braid and fasten it tightly.
A Visual Way to Understand the Complete Construction
The finished project can be understood as a sequence of connected layers. At the centre is the initial ring. Around it, A.1 establishes the first patterned structure. A.2 to A.6 then extend that structure outward and create the triangular kerchief.
Once the central measurement reaches approximately 21 cm, the work changes direction conceptually: instead of continuing to expand the triangle, you prepare the longest side for finishing. A row of double crochets and chain stitches is followed by A.7.
Finally, the crochet work is complete and the two yarn ties are created from folded strands and braided into fastening strings.
Practical Advice for Reading the Pattern Without Altering It
One of the best ways to work with a charted pattern is to separate interpretation from modification. If a section looks unfamiliar, first identify the symbol, then locate where it appears in the chart, and finally compare that placement with the fabric.
This approach is particularly helpful with the Sky Rover Bandana because the pattern combines chain spaces, treble crochets, double crochets, and slip stitches. The grey areas in A.7 can also initially appear unusual until you understand that they represent stitches already worked.
Rather than rewriting the chart mentally, use each symbol for its intended purpose and follow the direction indicated by the diagram.
What to Check If the Finished Shape Looks Different
If the triangle seems too narrow or too wide, begin with the crochet tension. The stated gauge is 20 treble crochets in width and 10 rows vertically with pattern A.1 to A.6 on a 3.5 mm hook, measuring 10 x 10 cm.
If the tension is correct, examine the charted pattern progression. In particular, check the way A.2 to A.6 are worked over A.1 and the instruction allowing 2 repetitions more of A.3/A.5 on each side when A.2 to A.6 are worked vertically.
Also check the middle measurement. The main kerchief is worked until approximately 21 cm is measured along the middle, or until the desired length is reached.
What to Check Before Starting A.7
- The main kerchief is triangular.
- The main section has been worked back and forth from the middle and outwards.
- A.1 has been completed.
- A.2 to A.6 have been worked over A.1.
- The specified additional repetitions of A.3/A.5 have been followed.
- The middle measures approximately 21 cm or has reached the desired length.
- The yarn is still attached.
- The longest side has been identified.
Once these points are satisfied, continue with the double-crochet and chain-stitch row and then A.7 as instructed.
What to Check Before Making the Ties
After A.7 is complete, make sure the yarn has been cut and fastened securely. Then inspect the longest side and identify the two areas where the fastening strings will be attached.
Prepare the first set of 6 strands, approximately 80 cm each. After folding them through the edge, count 12 strands and divide them into three piles of four. The same preparation will be used on the opposite end.
Colour Notes for DROPS Belle
The source lists colour 15, Jeans Blue; 04, Dandelion; and 26, Pearl. These colour names belong to the original project information and should be retained when recording the pattern details.
The stated yarn quantity is 50 g, and the yarn is DROPS BELLE from Garnstudio, belonging to yarn group B.
Colour selection does not change the construction. The same 3.5 mm crochet hook, stated tension, measurements, chart sequence, edge finishing, and braided tie instructions apply to the project.
Finished Project Reference
When completed, the Sky Rover Bandana measures approximately 44 cm in length without the string and approximately 21 cm in height.
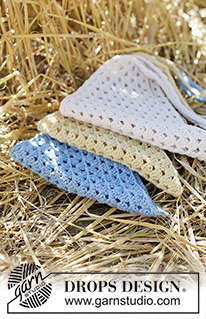
The accessory’s final character comes from the combination of the triangular body, the open patterned crochet structure, the finished long edge, and the two braided fastening strings.
The finished appearance should be evaluated as a complete piece rather than judging the centre alone. The main triangle, edge treatment, and ties work together to create the final kerchief.
Quick Reference: Main Crochet Sequence
- Prepare 50 g of DROPS BELLE from Garnstudio.
- Use a DROPS CROCHET HOOK SIZE 3.5 mm.
- Check the stated gauge of 20 treble crochets in width and 10 rows vertically over 10 x 10 cm.
- Begin with 4 chain stitches and join them into a ring with 1 slip stitch in the first chain stitch.
- Work A.1.
- Continue with A.2 to A.6 over A.1.
- When A.2 to A.6 are worked vertically, allow for 2 repetitions more of A.3/A.5 on each side.
- Work back and forth from the middle and outwards.
- Continue until approximately 21 cm is measured along the middle, or until the desired length is reached.
- Keep the yarn attached.
- Work a row with double crochets and chain stitches along the longest side.
- Rotate the piece to continue from the same side along the long side.
- Work A.7 along the entire long side.
- Cut and fasten the yarn.
Quick Reference: Tie Sequence
- Cut 6 strands of DROPS Belle approximately 80 cm long.
- Pull the strands halfway through the piece at the edge of one long side.
- Use the folded strands to create 12 strands of the same length.
- Divide the 12 strands into 3 piles with 4 strands each.
- Plait the three piles together.
- Continue until approximately 3 cm remains at the end.
- Tie a knot around one end of the braid and fasten tightly.
- Make another string in the same way at the other end.
Frequently Asked Questions
What crochet hook is recommended for this bandana?
The pattern specifies a DROPS CROCHET HOOK SIZE 3.5 mm.
What yarn does the Sky Rover Bandana use?
The project uses DROPS BELLE from Garnstudio, which belongs to yarn group B. The stated quantity is 50 g.
What colours are listed in the pattern?
The listed colours are colour 15, Jeans Blue; 04, Dandelion; and 26, Pearl.
How is the main piece constructed?
The main kerchief is worked back and forth from the middle and outwards. It begins with A.1 and continues through A.2 to A.6 over A.1.
How many additional repetitions are made?
Every time A.2 to A.6 are worked vertically, there is room for 2 repetitions more of A.3/A.5 on each side.
When is the main crochet section finished?
Continue until approximately 21 cm is measured along the middle, or until the desired length has been reached. The yarn should not be cut at this point.
What happens along the longest side?
First work a row with double crochets and chain stitches along the longest side. Rotate the piece to continue from the same side, then work A.7 along the entire long side. After A.7 is complete, cut and fasten the yarn.
How are the fastening strings made?
Each string begins with 6 strands of DROPS Belle approximately 80 cm long. Pull them halfway through the piece to create 12 strands, divide them into 3 piles of 4 strands each, and plait until approximately 3 cm remains. Finish with a tight knot and repeat on the opposite end.
Final Finishing Checklist
- Yarn: DROPS BELLE, 50 g.
- Hook: 3.5 mm.
- Gauge: 20 treble crochets x 10 rows = 10 x 10 cm with A.1 to A.6.
- Main measurement: approximately 21 cm along the middle, or desired length.
- Finished dimensions: approximately 44 cm long without string and approximately 21 cm high.
- Main charts: A.1 to A.6.
- Edge chart: A.7.
- Long-edge foundation: double crochets and chain stitches.
- Each tie: 6 strands approximately 80 cm long.
- Resulting tie strands: 12.
- Braid grouping: 3 piles of 4 strands.
- Braid stopping point: approximately 3 cm of strand remaining.
- Finishing: knot around one end of each braid and fasten tightly.
Conclusion
The Sky Rover Bandana is a useful project for practising several aspects of crochet construction within one compact design. The work begins at the centre, expands through a sequence of charted patterns, develops into a triangle, and then changes into a dedicated edge-finishing stage. The final braided ties provide the practical fastening that completes the kerchief.
The key to a successful result is not rushing through the stages. Check the yarn and hook first, establish the starting ring carefully, follow A.1, continue through A.2 to A.6 with the specified additional repetitions, and monitor the tension as the triangle grows. When the middle reaches approximately 21 cm or your desired length, keep the yarn attached and move into the long-edge finishing.
After the double-crochet and chain-stitch row and the complete A.7 edge have been worked, the final step is straightforward: prepare the two braided strings using the exact strand lengths and grouping specified in the pattern.
By treating the project as a series of clear stitch and construction checkpoints, you can follow the original Sky Rover Bandana pattern with greater confidence while keeping its yarn information, measurements, gauge, chart sequence, edge construction, and finishing instructions unchanged.