
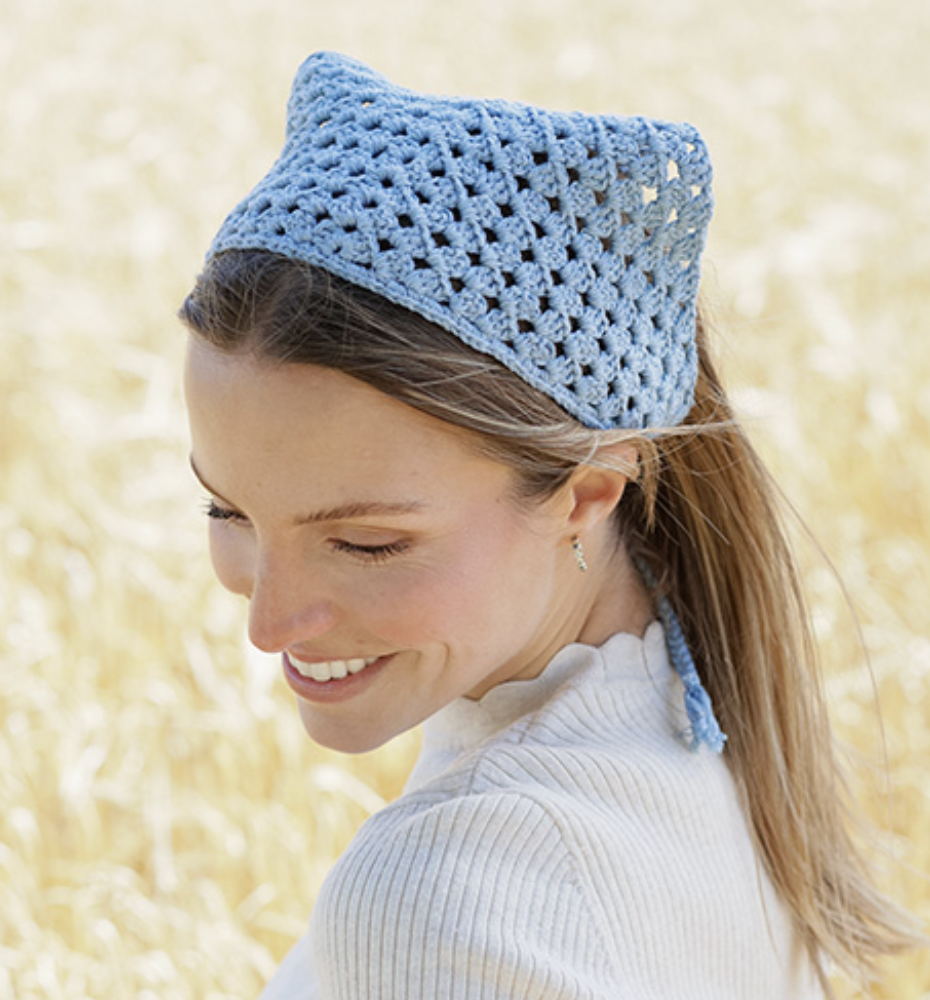
The Sky Rover Bandana is a charming triangular crochet kerchief designed around a repeating openwork pattern and finished with simple braided ties. Although the finished accessory is compact, the project includes several important stages: establishing the centre, expanding the fabric through the charted sections, measuring the growing triangle, finishing the longest edge, and creating the braided fastening strings.
This photo-guided tutorial is designed to make those stages easier to understand while keeping the original DROPS 265-8 instructions intact. The project uses DROPS BELLE from Garnstudio and a 3.5 mm crochet hook. The main kerchief is worked back and forth from the middle and outwards, while the final edge is worked separately using A.7.
Sky Rover Bandana at a Glance
Before beginning the project, take a moment to review the original specifications. This makes it easier to prepare everything before the first stitch and provides useful checkpoints during the work.
- Pattern: DROPS 265-8
- DROPS design: Pattern vs-137
- Yarn: DROPS BELLE from Garnstudio
- Yarn group: B
- Quantity: 50 g
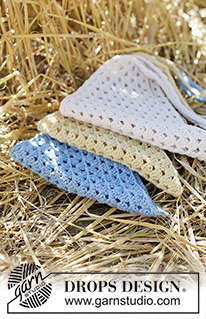
- Listed colours: Colour 15, Jeans Blue; 04, Dandelion; 26, Pearl
- Crochet hook: DROPS CROCHET HOOK SIZE 3.5 mm
- Finished length: approximately 44 cm without string
- Finished height: approximately 21 cm
- Construction: worked back and forth from the middle and outwards
- Fastening: braided cable ties at each end of the long side
The pattern also specifies a crochet tension of 20 treble crochets in width and 10 rows vertically with pattern A.1 to A.6 on a 3.5 mm hook, measuring 10 x 10 cm.
Before You Begin: Understanding the Crochet Direction
One of the most useful things to understand about this project is the direction in which the fabric grows. The Sky Rover Bandana does not begin as a large rectangle that is later shaped into a triangle. Instead, the kerchief is built from the middle and worked outwards.
This construction means that the shape develops gradually as the pattern sections are repeated. At the beginning, the small centre may not immediately resemble the finished bandana. As you continue through A.2 to A.6, the triangular form becomes increasingly recognizable.
Keeping this construction in mind can make it easier to judge your progress. Rather than expecting the finished proportions from the first few rows, concentrate on accurate chart reading, consistent tension, and the correct progression through the diagrams.
Materials: Yarn, Hook, and Colour Information
The original pattern calls for 50 g of DROPS BELLE from Garnstudio. This yarn belongs to yarn group B. The listed colour information includes colour 15, Jeans Blue; 04, Dandelion; and 26, Pearl.
The recommended crochet hook is a DROPS CROCHET HOOK SIZE 3.5 mm. Remember that the hook size is given as a suggestion for achieving the stated crochet tension. The pattern advises changing hook size according to your gauge: if you have too many stitches in 10 cm, switch to a larger hook; if you have too few stitches in 10 cm, switch to a smaller hook.
For this reason, the hook size and tension should be considered together rather than separately. The objective is to work the pattern at the stated gauge while maintaining the intended structure of the crocheted fabric.
Getting Comfortable with the Diagrams
The pattern is built around diagrams A.1 to A.7. These charts provide the visual instructions for the centre, the expanding main fabric, and the finishing edge. If you are comfortable with crochet diagrams, you can use them directly as your primary visual reference while using this tutorial as a construction guide.
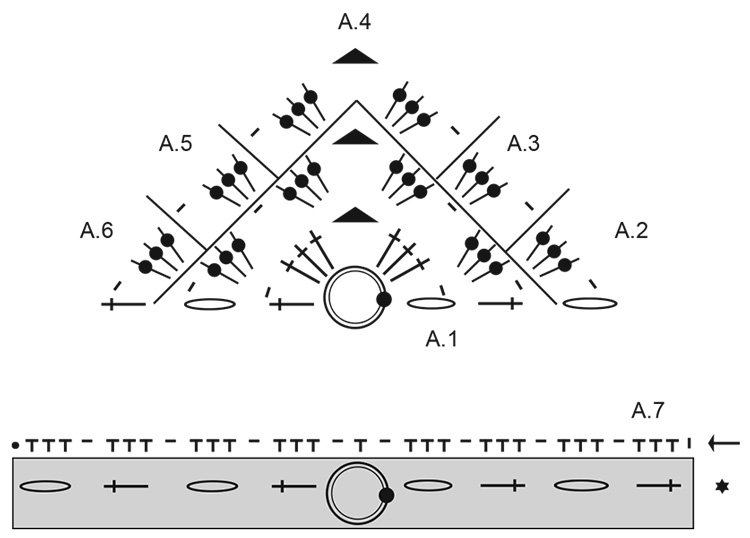
A particularly important detail appears when you reach A.7. The grey fields in the A.7 diagram show chain stitches and treble crochets that were already worked at the beginning and end of A.1 to A.6. They are included to make the construction of A.7 along the edge easier to see.
The diagram also shows the beginning, middle, and end of the edge section. More rows are worked on the triangle than are shown in the diagram, so the chart should be read in relation to the actual long edge rather than interpreted as a literal picture of the complete number of rows.
Step 1: Form the Starting Ring
The first structural step is to establish the small centre from which the rest of the bandana will grow. According to the diagram symbols, begin with 4 chain stitches and join them into a ring with 1 slip stitch in the first chain stitch. Continue to the left.
The beginning structure is important because later stitches are built around this centre. Take your time with the initial ring and make sure the joining slip stitch is completed as shown in the diagram.
The chart also identifies 3 chain stitches at the beginning of a row, 1 chain stitch, treble crochets, chain spaces, double crochets, and slip stitches. These symbols work together to create the open patterned fabric of the kerchief.
Step 2: Work A.1
Using the 3.5 mm hook and DROPS Belle, work A.1. This first chart establishes the foundation for the patterned body of the bandana.
At this stage, focus on reading the symbols rather than trying to estimate the eventual triangular shape. The chart tells you where the treble crochets, chain stitches, chain spaces, and other stitches belong.
Some of the diagram symbols refer to treble crochets worked around a chain stitch ring, while others refer to treble crochets placed in the 3rd chain stitch from the row below. The distinction is part of the original chart instructions and should be followed according to the position shown.
Step 3: Continue with A.2 to A.6
After A.1 has been completed, continue with A.2 to A.6 over A.1. This is where the main body begins to expand and the triangular character of the project becomes clearer.
One of the most important construction details is the relationship between A.2 to A.6 and the additional repeats of A.3 and A.5. Every time A.2 to A.6 are worked vertically, there is room for 2 repetitions more of A.3/A.5 on each side.
This is an important checkpoint because the additional repetitions are part of the original structure. Do not substitute a different number of repeats simply to make the piece appear wider or narrower.
Step 4: Maintain the Intended Crochet Tension
The stated tension for the main pattern is 20 treble crochets in width and 10 rows vertically with pattern A.1 to A.6 on a 3.5 mm hook, measuring 10 x 10 cm.
Gauge is especially useful here because the project has a stated finished height of approximately 21 cm and a finished length of approximately 44 cm without the string. If your tension is significantly different, the proportions of the finished kerchief can also differ.
If you have too many stitches in 10 cm, the source recommends switching to a larger hook. If you have too few stitches in 10 cm, switch to a smaller hook.
Do not change the pattern’s stitch counts or construction simply because your fabric initially looks different. First consider whether the difference is caused by your crochet tension.
Step 5: Continue Until the Middle Measures Approximately 21 cm
Continue working back and forth through the pattern sections until the piece measures approximately 21 cm along the middle, or until you reach the desired length.
The measurement along the middle is the important progress measurement specified at this stage. The finished length of the complete kerchief is approximately 44 cm without the string, while the main construction instruction asks you to work until approximately 21 cm is measured along the middle.
Once the desired length has been reached, do not cut the yarn. Keeping the yarn attached allows you to continue directly into the finishing stage along the longest side.
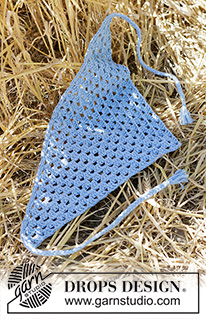
Step 6: Recognize the Completed Main Triangle
The main kerchief is triangular, and its longest side will eventually receive the decorative finishing treatment. Before moving on, look over the complete body and confirm that the patterned structure has been maintained consistently.
This is also a good moment to check the middle measurement and the overall balance of the fabric. If you have been following the stated tension and the original diagram, the triangle should provide a clear foundation for the final edge.
Remember that the final appearance of the accessory depends not only on the main patterned fabric but also on the edge and braided ties. The project is therefore best viewed as three connected construction stages: the main triangle, the finished long edge, and the fastening strings.
Step 7: Add the Double Crochet and Chain-Stitch Edge Row
Because the main piece is triangular, the longest side is clearly defined once the central section is complete. Along this longest side, work a row with double crochets and chain stitches.
This row creates the transition between the main patterned body and the A.7 finishing section. Follow the chart and the stitch placement carefully, especially where the edge interacts with the existing chain spaces and treble crochets.
After completing this row, rotate the piece so you can continue from the same side along the long side.
Step 8: Work A.7 Across the Entire Long Side
Now work A.7 along the entire long side of the triangle. The source diagram shows the beginning, middle, and end of this edge. Since the triangle contains more rows than are shown in the diagram, the visual chart should be used to understand how the edge is formed rather than as a representation of every row on the entire triangle.
The grey areas are particularly helpful during this stage. They show the chain stitches and treble crochets already worked at the beginning and end of A.1 to A.6. Their purpose is to make the A.7 edge easier to understand visually.
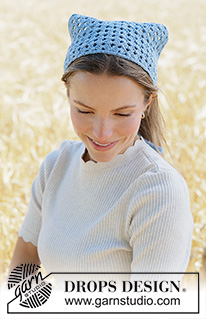
When A.7 has been worked along the entire long side, cut and fasten the yarn. The crocheted portion of the bandana is now complete.
Step 9: Prepare the First Braided Tie
The final construction stage uses yarn strands rather than additional crochet rows. To create the first string, cut 6 strands of DROPS Belle, each approximately 80 cm long.
Pull these strands halfway through the piece at the edge of one long side. Because each strand is folded through the edge, this produces 12 strands of the same length.
At this point, keep the strands organized so that the braid can be formed evenly. Divide the 12 strands into 3 piles, with 4 strands in each pile.
Step 10: Plait the First String
With the 12 strands divided into three groups of four, plait the three piles together. Continue the braid until approximately 3 cm of strand remains at the end.
Once the braid reaches this point, tie a knot around one end of the braid and fasten it tightly. The knot secures the plait and completes the first fastening string.
There is no need to introduce a different braid structure or a different number of strands. The original instructions specifically call for three piles containing four strands each.
Step 11: Make the Second String
Repeat the same process at the opposite end of the bandana. Cut another 6 strands of DROPS Belle, approximately 80 cm long. Pull them halfway through the piece at the other end of the long side, creating 12 strands of the same length.
Again, divide the strands into 3 piles of 4 strands each. Plait until approximately 3 cm of strand remains, then tie a knot around one end of the braid and fasten it tightly.
Using the same process for both sides helps the finished bandana maintain a balanced appearance.
Visual Inspection of the Finished Accessory
With both braided ties attached, place the bandana flat and inspect the entire project. The centre should lead naturally into the expanding triangular fabric. The longest side should have the completed edge treatment, and the two braided strings should be positioned at opposite ends of that edge.
Check that the knots are tight and that there are no obvious loose sections along the finished edge. The main body should retain the openwork structure created by A.1 through A.6.
Understanding the Most Important Diagram Symbols
The source diagram uses several symbols that appear repeatedly throughout the project. Keeping their meanings available while working can make chart reading more comfortable.
- 4 chain stitches and a slip stitch: form the beginning ring.
- 3 chain stitches: appear at the beginning of a row.
- 1 chain stitch: forms part of the openwork structure.
- Treble crochet: may be worked around a chain stitch ring, in the 3rd chain stitch from the row below, or around a chain space according to the chart position.
- 3 chain stitches: form a chain space.
- Double crochet: is worked in the stitch below or around the chain stitch ring below where shown.
- Slip stitch: is used at the end of a row where indicated.
- Previously worked row: appears in the diagram to clarify the placement of the new row.
- Crochet direction: indicates the direction in which the chart is followed.
Beginner Checkpoints for the Main Body
For a beginner, it can be easier to divide the main crochet section into small checkpoints. After completing A.1, pause and compare the centre with the chart. Once you move into A.2 to A.6, check that the expanding pattern is developing symmetrically.
When the vertical work of A.2 to A.6 calls for additional repetitions of A.3 and A.5, remember that there is room for 2 repetitions more on each side. This is one of the details worth checking before continuing to the next stage.
As the fabric grows, periodically check the tension and the measurement along the middle. These checks are more useful than trying to judge the finished dimensions by appearance alone.
Beginner Checkpoints for the Edge
The edge is a separate finishing stage and should be approached after the main triangle has reached approximately 21 cm along the middle or your desired length.
First work the row containing double crochets and chain stitches along the longest side. Then rotate the piece and continue from the same side along the long edge using A.7.
Remember that the A.7 chart includes grey areas representing stitches already worked. This can prevent confusion when the chart appears to show stitches that are not actually being crocheted again.
Beginner Checkpoints for the Braids
The braided ties have a very precise construction even though the technique itself is simple. Start with 6 strands of approximately 80 cm. Pull them halfway through the edge to obtain 12 strands. Divide those strands into three groups of four.
Keep the three groups separate while plaiting. Continue until approximately 3 cm remains, then secure the braid with a tight knot. Repeat the same construction on the opposite end.
Common Problems and Practical Checks
The Crochet Gauge Is Too Tight
If you have too many stitches in 10 cm, the original pattern recommends changing to a larger hook. This can help bring your tension closer to the stated 20 treble crochets in width and 10 rows vertically over 10 x 10 cm.
The Crochet Gauge Is Too Loose
If you have too few stitches in 10 cm, switch to a smaller hook according to the source instructions. The goal is to achieve the stated tension rather than simply using the hook size without checking the fabric.
The Triangle Looks Uneven
Review the charted construction, particularly A.2 to A.6 and the specified additional repetitions of A.3 and A.5. Since the project grows from the middle outward, consistent placement on both sides is important to the visual balance of the triangle.
The Edge Seems Confusing
Separate the finishing process into two parts: first the row with double crochets and chain stitches, then A.7 along the entire long side. Use the grey fields in the diagram as a visual reference for the stitches that were already worked.
The Tie Does Not Look Like a Three-Part Braid
Check the strand grouping. Twelve strands should be divided into 3 piles, with 4 strands in each pile. The three piles are then plaited together.
Colour Information for Your Project Notes
The source lists three colour options for DROPS Belle: colour 15, Jeans Blue; 04, Dandelion; and 26, Pearl. Recording the colour information together with the pattern name can be helpful if you plan to prepare the project in advance or make another version later.
The yarn quantity remains 50 g. The colour information does not change the construction instructions, hook size, measurements, gauge, or finishing method.
Finished Size and Final Proportions
The completed Sky Rover Bandana is approximately 44 cm in length without the string and approximately 21 cm in height. These measurements describe the finished project and provide useful reference points when evaluating the completed accessory.
The main crochet section is worked until approximately 21 cm is measured along the middle, or until the desired length is reached. The braided strings are then added to the finished long edge, meaning the final fastening strings are not included in the approximately 44 cm length measurement given without string.
Complete Project Checklist
- Prepare 50 g of DROPS BELLE from Garnstudio.
- Choose from the listed colours: colour 15 Jeans Blue, 04 Dandelion, or 26 Pearl.
- Use a DROPS CROCHET HOOK SIZE 3.5 mm.
- Check the stated tension of 20 treble crochets in width and 10 rows vertically over 10 x 10 cm.
- Begin with 4 chain stitches and join them into a ring with 1 slip stitch in the first chain stitch.
- Work A.1.
- Continue with A.2 to A.6 over A.1.
- When A.2 to A.6 are worked vertically, allow for 2 repetitions more of A.3/A.5 on each side.
- Work back and forth from the middle and outwards.
- Continue until approximately 21 cm is measured along the middle, or until the desired length is reached.
- Keep the yarn attached.
- Work the row of double crochets and chain stitches along the longest side.
- Rotate the piece and work A.7 along the entire long side.
- Cut and fasten the yarn.
- Cut 6 strands of DROPS Belle approximately 80 cm long for the first tie.
- Pull the strands halfway through the piece to create 12 strands.
- Divide the strands into 3 piles of 4 strands each.
- Plait until approximately 3 cm remains.
- Tie a knot around one end of the braid and fasten tightly.
- Repeat the same process at the opposite end.
Frequently Asked Questions About the Sky Rover Bandana
Is the Sky Rover Bandana crocheted in one main piece?
The main kerchief is worked as one triangular crocheted piece, back and forth from the middle and outwards. The longest side is then finished separately with a row of double crochets and chain stitches followed by A.7, and the braided ties are added afterward.
What is the stated crochet tension?
The stated tension is 20 treble crochets in width and 10 rows vertically with pattern A.1 to A.6 on a 3.5 mm hook, measuring 10 x 10 cm.
How large is the finished bandana?
The finished length is approximately 44 cm without the string, and the finished height is approximately 21 cm.
Do I cut the yarn after finishing the main triangle?
No. The original instructions specifically say not to cut the yarn at that point because the work continues with the finishing process along the longest side.
How many strands are used for each tie?
Each tie begins with 6 strands of DROPS Belle, each approximately 80 cm long. Once pulled halfway through the piece, they form 12 strands, which are divided into 3 piles of 4 strands each.
How long should the braid be?
Plait each tie until approximately 3 cm of strand remains at the end, then secure the braid with a tight knot.
Final Thoughts on Making the Sky Rover Bandana
The Sky Rover Bandana is a compact project, but its construction offers several useful crochet skills in one design. You work from a small centre into an expanding triangle, use charted stitch patterns, monitor crochet tension and measurements, create a dedicated finishing edge, and complete the accessory with simple yarn braids.
The most reliable approach is to treat each stage as its own checkpoint. Begin carefully with A.1, follow A.2 to A.6 while respecting the specified repetitions of A.3 and A.5, and continue until the middle reaches approximately 21 cm or the desired length. Keep the yarn attached, complete the longest-side finishing with the double-crochet and chain-stitch row followed by A.7, and then add the two braided strings.
With the original hook size, yarn information, gauge, measurements, stitch structure, chart instructions, and finishing details kept intact, this photo-guided workflow provides a clear way to follow the Sky Rover Bandana from its first centre stitches to its finished triangular form.