
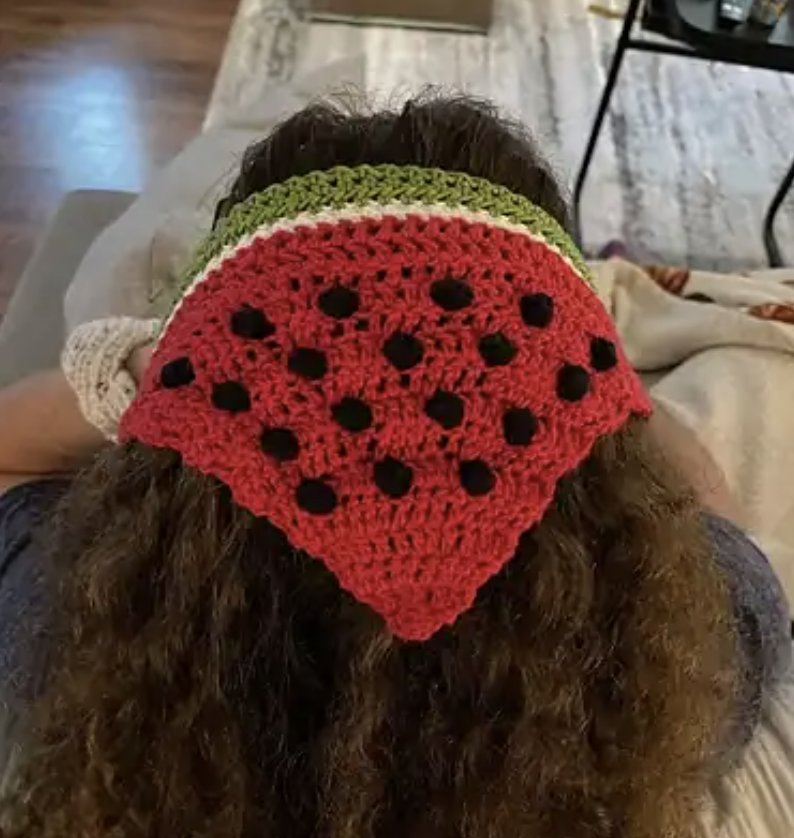
This watermelon bandana crochet pattern combines a simple triangular construction with colorful watermelon-inspired details, making it a fun project for crocheters who enjoy working with color changes, puff stitches, and clean finishing techniques. The finished design begins with a red triangular section decorated with black puff stitches, continues with a white border, and ends with a green band and adjustable ties.

The project is worked using US crochet terminology and uses red, black, white, and green yarn to create the watermelon effect. The triangular portion grows through carefully placed increases, while selected right-side rows contain black puff stitches that represent watermelon seeds. After the red triangle is completed, the design changes to white single crochet rows and then green half double crochet rows before the final chain ties are created.
This guide presents the complete construction in a beginner-friendly format while keeping every technical instruction, stitch count, color change, and row number faithful to the supplied pattern.
Project Overview
The bandana is constructed in four main visual stages. The first stage is the expanding red triangle. The second stage introduces the black puff stitches that create the watermelon seed pattern. The third stage adds the white section. The fourth stage creates the green band and adjustable ties.
The triangle grows from only three stitches at Row 1 to forty-five stitches at Row 15. The increases are arranged evenly so that the shape expands consistently. The black puff stitches appear only on right-side rows, specifically Rows 6, 8, 10, and 12.
After Row 15, the red yarn is fastened off and white is introduced. Rows 16–18 are worked in single crochet. Green is then introduced for Rows 19–20, which are worked in half double crochet. The green yarn remains attached so the final tie can be created directly from Row 21.
Materials and Pattern Information
- Yarn: Lion Brand 24/7 Cotton
- Hook: 4.0 mm crochet hook
- Color A: Red
- Color B: Black
- Color C: White
- Color D: Green
The supplied pattern does not provide a total yardage or meterage requirement, a gauge measurement, or a fixed finished-size measurement. These details should therefore not be substituted with estimates. The pattern instead gives a specific instruction for the tie length in Row 19–20 and Row 21: chain until you reach your desired length, approximately 14 inches.
The design uses a 4.0 mm hook with Lion Brand 24/7 Cotton yarn. Keeping the same hook and yarn information is important because changing the hook size or yarn can affect the proportions of the triangle and the final appearance.
US Crochet Abbreviations
- ch: chain
- sl st: slip stitch
- dc: double crochet
- sc: single crochet
- hdc: half double crochet
- ps: puff stitch / 5 hdc
- WS: wrong side
- RS: right side
There are two especially important pattern notes. First, puff stitches are made only on the right side. Second, the chain 2 at the beginning of each row is not counted as a stitch throughout the triangular section. Beginning with Rows 16–21, the pattern uses chain 1, which also does not count as a stitch.
Understanding the Triangle Before You Begin
The easiest way to approach the first fifteen rows is to think of them as a controlled increase sequence. Each of the early rows adds three stitches to the previous row. The stitch counts progress from 3 to 6, 9, 12, 15, 18, 21, 24, 27, 30, 33, 36, 39, 42, and finally 45 stitches.
This regular growth gives you a useful checkpoint after every row. If your stitch count is incorrect, it is much easier to identify the problem immediately rather than discovering a shape problem several rows later.
For the increasing rows without puff stitches, the repeated structure gradually becomes wider. Rows 2–5 use the following patterns:
- Row 2: 6 stitches
- Row 3: 9 stitches
- Row 4: 12 stitches
- Row 5: 15 stitches
From there, the seed rows begin to introduce the black puff stitches while maintaining the same three-stitch increase per row.

Rows 1–5: Building the Red Foundation
Begin with red (A) and chain 3.
Row 1 — 3 Stitches
ROW 1 (WS): 3 dc in the third chain from the hook (3 sts).
This first row establishes the small foundation from which the triangular shape grows. Because the row contains only three stitches, take a moment to confirm the placement before moving forward.
Row 2 — 6 Stitches
ROW 2 (RS): ch 2, turn, 2 dc in each st (6 sts).
Remember that the ch 2 is not counted as a stitch. The increase happens by working 2 dc into every stitch across the row.
Row 3 — 9 Stitches
ROW 3 (WS): ch 2, turn, [2 dc in next st, 1 dc in next st] three times (9 sts).
Row 4 — 12 Stitches
ROW 4 (RS): ch 2, turn, [2 dc in next st, 1 dc in next 2 sts] three times (12 sts).
Row 5 — 15 Stitches
ROW 5 (WS): ch 2, turn, [2 dc in next st, 1 dc in next 3 sts] three times (15 sts).
At the end of Row 5, the red triangle has reached 15 stitches. This is an excellent point to check the edges. The triangle should be growing evenly rather than leaning to one side.
Rows 6–12: Creating the Watermelon Seeds
The most distinctive section begins with Row 6. The black yarn is used for puff stitches while red remains the main color. The puff stitches are worked only on RS rows, and each one is made as a ps, meaning a puff stitch consisting of 5 hdc.
When switching colors for a puff stitch, work the color change exactly where the source specifies it. After completing the black puff stitch, switch back to red. These transitions are part of the visual construction, so avoid simplifying or repositioning them.
Row 6 — 18 Stitches
ROW 6 (RS): ch 2, turn, 2 dc in next st, 1 dc in next 2 sts, [switch to black (B), 1 ps in next st, switch to red (A)], 1 dc in next st, 2 dc in next st, 1 dc in next st, [switch to black (B), 1 ps in next st, switch to red (A)], 1 dc in next 2 sts, 2 dc in next st, [switch to black (B), 1 ps in next st, switch to red (A)], 1 dc in next 3 sts (18 sts).
There are three black puff stitches in this row. Because Row 6 is a right-side row, it is also the first row where the watermelon-seed effect becomes visible.
Row 7 — 21 Stitches
ROW 7 (WS): ch 2, turn, [2 dc in next st, 1 dc in next 5 sts] three times (21 sts).
Row 7 returns to the regular red increase structure. The wrong-side row does not contain puff stitches.
Row 8 — 24 Stitches
ROW 8 (RS): ch 2, turn, 2 dc in next st, 1 dc in next 2 sts, [switch to black (B), 1 ps in next st, switch to red (A)], 1 dc in next 3 sts, [1 dc in next st, switch to black (B), 1 ps in same st, switch to red (A)], 1 dc in next 4 sts, [switch to black (B), 1 ps in next st, switch to red (A)], 1 dc in next st, 2 dc in next st, 1 dc in next st, [switch to black (B), 1 ps in next st, switch to red (A)], 1 dc in next 4 sts (24 sts).

Row 9 — 27 Stitches
ROW 9 (WS): ch 2, turn, [2 dc in next st, 1 dc in next 7 sts] three times (27 sts).
Row 10 — 30 Stitches
ROW 10 (RS): ch 2, turn, 2 dc in next st, 1 dc in next 2 sts, [switch to black (B), 1 ps in next st, switch to red (A)], 1 dc in next 4 sts, [switch to black (B), 1 ps in next st, switch to red (A)], 2 dc in next st, 1 dc in next 2 st, [switch to black (B), 1 ps in next st, switch to red (A)], 1 dc in next 4 sts, [switch to black (B), 1 ps in next st, switch to red (A)], 2 dc in next st, 1 dc in next 2 sts, [switch to black (B), 1 ps in next st, switch to red (A)], 1 dc in next 5 sts (30 sts).
Row 10 contains five puff stitches. Pay close attention to the source wording, including the specified color changes and stitch sequence.
Row 11 — 33 Stitches
ROW 11 (WS): ch 2, turn, [2 dc in next st, 1 dc in next 9 sts] three times (33 sts).
Row 12 — 36 Stitches
ROW 12 (RS): ch 2, turn, 2 dc in next st, 1 dc in next 2 sts, [switch to black (B), 1 ps in next st, switch to red (A)], 1 dc in next 4 sts, [switch to black (B), 1 ps in next st, switch to red (A)], 1 dc in next 2 sts, 2 dc in next st, 1 dc in next st, [switch to black (B), 1 ps in next st, switch to red (A)], 1 dc in next 4 sts, [switch to black (B), 1 ps in next st, switch to red (A)], 1 dc in next 3 sts, 2 dc in next st, 1 dc in next st, [switch to black (B), 1 ps in next st, switch to red (A)], 1 dc in next 4 sts, [switch to black (B), 1 ps in next st, switch to red (A)], 1 dc in next 4 sts (36 sts).
After completing Row 12, fasten off black (B). The black yarn is no longer needed for the remainder of the triangular section.
Rows 13–15: Completing the Red Triangle
The final three red rows return to the simple increase structure. No black puff stitches are added in these rows.
Row 13 — 39 Stitches
ROW 13 (WS): ch 2, turn, [2 dc in next st, 1 dc in next 11 sts] three times (39 sts).
Row 14 — 42 Stitches
ROW 14 (RS): ch 2, turn, [2 dc in next st, 1 dc in next 12 sts] three times (42 sts).
Row 15 — 45 Stitches
ROW 15 (WS): ch 2, turn, [2 dc in next st, 1 dc in next 13 sts] three times (45 sts).
Once Row 15 is complete, switch to white (C) and fasten off red (A). The red triangular portion is now complete with 45 stitches.

Rows 16–18: Adding the White Section
The white section creates a clear transition between the red watermelon triangle and the green band.
For Rows 16–18, use white (C).
ROW 16–18: ch 1, turn, 1 sc in each st across (45 sts).
The chain 1 does not count as a stitch. Each row contains 45 stitches, so the stitch count should remain unchanged through all three rows.
This is a useful checkpoint because the stitch count no longer increases. If the row begins with 45 stitches, the goal is to finish with 45 stitches. Maintaining the same count helps preserve the width established by the triangular section.
Rows 19–20: Building the Green Band
After completing the three white rows, switch to green (D) and fasten off white (C).
ROW 19–20: ch 1, turn, 1 hdc in each st across (45 sts). DO NOT FASTEN OFF. Chain until you reach your desired length (approximately 14 inches).
Again, the chain 1 does not count as a stitch. Each row contains 45 stitches. The instruction not to fasten off is important because the working green yarn is needed immediately for the final tie construction.
The approximately 14-inch chain is a desired-length instruction rather than a replacement for the source’s wording. The pattern specifically tells you to chain until you reach your desired length, approximately 14 inches.
Row 21: Creating the First Tie
Row 21 turns the green section into the wearable tie.
ROW 21: sl st in second ch from hook, sl st across the chain, 1 sc across bandana body, chain to desired length, turn, sl st across chain, sl st into side of bandana (into the hdc of previous row).
This row uses slip stitches along the chain and connects the tie back into the side of the bandana. Work carefully around the connection point so the tie remains attached securely to the bandana body.
Once Row 21 is complete, fasten off green (D) and weave in ends.
Color-Change Tips for a Cleaner Finish
The watermelon appearance depends heavily on clean transitions between red and black. During Rows 6, 8, 10, and 12, keep the color changes exactly where the pattern specifies them.
Because the puff stitches are placed only on RS rows, they form the visible seed details on the appropriate side of the work. Avoid adding puff stitches to WS rows simply because a previous RS row contained them.
When switching between black and red, keep the unused yarn controlled without pulling it excessively. The goal is to maintain the shape of the triangle while avoiding loose loops that could become visible around the puff stitches.
Stitch Count Checkpoints
- Row 1: 3 sts
- Row 2: 6 sts
- Row 3: 9 sts
- Row 4: 12 sts
- Row 5: 15 sts
- Row 6: 18 sts
- Row 7: 21 sts
- Row 8: 24 sts
- Row 9: 27 sts
- Row 10: 30 sts
- Row 11: 33 sts
- Row 12: 36 sts
- Row 13: 39 sts
- Row 14: 42 sts
- Row 15: 45 sts
- Rows 16–18: 45 sts
- Rows 19–20: 45 sts
Checking the stitch count at the end of each row is one of the simplest ways to keep the project on track. The repeated increase of three stitches through Row 15 makes the progression particularly easy to monitor.
Common Construction Mistakes to Watch For
Counting the Beginning Chain as a Stitch
The ch 2 at the beginning of the triangular rows is not counted as a stitch. Treating it as a stitch can change the total stitch count and affect the shape.
Adding Puff Stitches to the Wrong Side
Puff stitches are only made on the right side. The seed rows are Rows 6, 8, 10, and 12, all of which are RS rows.
Forgetting the Color Switch
The black puff stitches require specific changes from red to black and back to red. Follow each bracketed instruction carefully rather than assuming the color changes happen at identical positions in every seed row.
Fastening Off Green Too Early
The pattern specifically says not to fasten off after Rows 19–20. Green remains attached because it is used for Row 21 and the tie construction.
Losing the 45-Stitch Width
Rows 16–20 all maintain 45 stitches. If your stitch count changes during this section, review the previous row before continuing.
Finishing and Weaving in Ends
After Row 21, fasten off green (D) and weave in ends. Take time to secure the loose yarn ends neatly so that the finished accessory has a clean appearance and the color transitions remain tidy.
Do not pull the woven ends so tightly that they distort the fabric. A balanced finish should secure the yarn while allowing the crochet fabric to retain its natural shape.
Final Finishing Checklist
- Confirm the triangular section reaches 45 stitches at Row 15.
- Confirm black puff stitches were worked only on the specified RS rows.
- Confirm black was fastened off after Row 12.
- Confirm red was fastened off when switching to white after Row 15.
- Confirm Rows 16–18 contain 45 sc stitches each.
- Confirm white was fastened off before beginning green.
- Confirm Rows 19–20 contain 45 hdc stitches each.
- Confirm green was not fastened off after Rows 19–20.
- Confirm the chain length is made to the desired length, approximately 14 inches.
- Complete Row 21 as written.
- Fasten off green after Row 21.
- Weave in all ends neatly.
Beginner-Friendly Ways to Stay Organized
If this is your first project involving multiple colors, keep the four yarn colors separated before beginning. Red is color A, black is color B, white is color C, and green is color D. Thinking of the colors by their pattern letters can make the instructions easier to follow because the color changes are written using those labels.
It can also help to pause at every right-side seed row and identify the puff-stitch locations before moving forward. The puff stitches are the decorative feature of the red triangle, so careful attention at these rows will have a noticeable effect on the final appearance.
Another useful habit is to record your stitch count after each completed row. The progression from 3 to 45 stitches gives you a built-in system of checkpoints, making it easier to locate an error close to where it happened.
Frequently Asked Questions
What crochet terminology does this pattern use?
The pattern uses US crochet terminology, including double crochet, single crochet, half double crochet, slip stitch, and puff stitch.
Does the beginning ch 2 count as a stitch?
No. The ch 2 at the beginning of each triangular row is not counted as a stitch throughout the pattern.
When are the puff stitches made?
Puff stitches are made only on the right side. They appear in Rows 6, 8, 10, and 12.
What does ps mean?
Ps means puff stitch, and the pattern defines the puff stitch as 5 hdc.
When is the black yarn finished?
Black (B) is fastened off after Row 12.
When does the pattern change from red to white?
After Row 15, switch to white (C) and fasten off red (A).
How many stitches are in Rows 16–20?
Rows 16–20 each contain 45 stitches.
When should the green yarn be fastened off?
Do not fasten off green after Rows 19–20. Green remains attached for Row 21. After Row 21 is complete, fasten off green (D) and weave in ends.
How long should the tie be?
The pattern instructs you to chain until you reach your desired length, approximately 14 inches.
Why the Construction Works So Well
The design has a clear visual progression. The red section provides the main watermelon field, while the black puff stitches create the seed details. The white rows form a clean transition, and the green rows finish the bandana with a contrasting band that also becomes the tie structure.
Technically, the project remains approachable because the triangle follows a consistent increase rhythm. Even when the black puff stitches are introduced, the total stitch count continues to rise by three stitches per row through Row 15.
Once the red triangle reaches 45 stitches, the construction becomes more straightforward because the stitch count remains stable. The white section uses single crochet, followed by half double crochet in green, and then the final slip-stitch and single-crochet work creates the tie.
Final Project Review
Before considering the bandana complete, look at the entire piece as a single construction rather than focusing only on individual rows. The red triangle should form the main body, the black puff stitches should create the watermelon-seed details, the white section should provide the transition, and the green section should finish the wearable edge and ties.
Every section has a specific purpose, and following the original row sequence is the safest way to preserve the intended shape and color placement. If an earlier row seems uneven, it is usually better to correct the issue before continuing rather than compensating for it in a later row.
The final result is a playful crochet accessory with a distinctive watermelon theme and a construction that gives beginners useful practice with increasing, right-side and wrong-side awareness, color changes, puff stitches, single crochet, half double crochet, slip stitches, and finishing.
Pattern Credit and Final Note
This watermelon bandana pattern was designed by @creativewasteland.art on Instagram. The supplied pattern notes that it is free to use and encourages donating at least $5 to Operation Olive Branch, Doctors Without Borders, Save The Children, World Central Kitchen, or a local student encampment.
The source was last updated 5/13/24. When making the project, use the supplied pattern as the technical reference and preserve its row sequence, stitch counts, color changes, and finishing instructions exactly.
With the red triangle complete, the black puff-stitch seeds positioned correctly, the white transition added, and the green band and ties finished, the watermelon bandana is ready to wear and enjoy.