
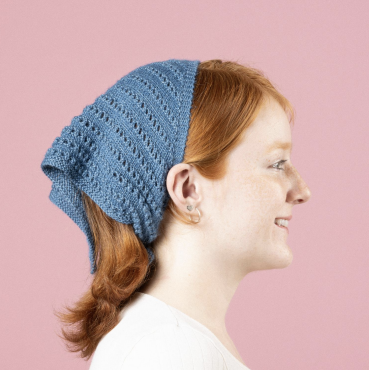
The Mammatus Bandana is a beautifully shaped knitted accessory designed around a simple but effective idea: begin with a tiny central section, then allow the fabric to grow through carefully positioned increases until a graceful triangular bandana takes shape. Inspired by mammatus clouds, the design combines a soft fabric with rows of open texture that become especially visible as the piece expands.
Designed by Sys Fredens for Hobbii Design, this project is worked flat on a circular needle. That detail is worth emphasizing from the beginning: although the needle is circular, the bandana is not worked in the round. The long cable simply provides a comfortable way to hold the growing number of stitches.
The construction is particularly satisfying because you can watch the geometry develop. The project begins with 5 stitches and a small garter-stitch square. Stitches are then picked up along two sides to create 15 stitches, after which the central shaping begins. Four increases are made on the relevant increase rows: one at each edge area and one on each side of the middle stitch.

Project Overview
The Mammatus Bandana is available in two sizes, S/M and L/XL. Its final dimensions change considerably after washing and blocking, which is an important characteristic of this particular design.
Before washing and blocking, the approximate width is 50 (55) cm / 19.7’’ (21.7’’), and the length is 27 (30) cm / 10.6’’ (11.8’’). After washing and blocking, the approximate width becomes 60 (65) cm / 23.6’’ (25.6’’), while the length becomes 33 (36) cm / 13’’ (14.2’’).
The bandana can be worn around the neck or around the head. The finished shape is broad enough to create a useful head covering while retaining the pointed silhouette associated with a classic bandana.
The pattern is rated as intermediate on the Hobbii pattern page. The stitch techniques themselves are familiar knitting operations, but the combination of yarnovers, knitting yarnovers through the back loop, increases, markers, and repeated pattern rows requires careful attention.
Materials You Need
The original pattern uses Hobbii Alpaca Silk in Vienna (12). The quantity is 1 (2) skeins, depending on the size being made.
- Yarn: Alpaca Silk, Hobbii
- Fiber content: 70 % Alpaca, 30 % Mulberry Silk
- Skein size: 50 g (1.75 oz)
- Length per skein: 166 m (182 yds)
- Color: Vienna (12)
- Quantity: 1 (2) skeins
- Circular needle: 3 mm (US 2.5), 80 cm (32’’)
- Stitch markers: 4
Because the pattern relies on a specific gauge and changes significantly during blocking, using the specified yarn and needle gives you the closest basis for reproducing the original proportions.
Gauge, Sizes, and Finished Measurements
The specified gauge is 27 sts x 40 rows in stockinette stitch = 10 cm (4’’).
The size options are:
- S/M
- L/XL
Before washing and blocking, the approximate measurements are:
- Width: 50 (55) cm / 19.7’’ (21.7’’)
- Length: 27 (30) cm / 10.6’’ (11.8’’)
After washing and blocking:
- Width: 60 (65) cm / 23.6’’ (25.6’’)
- Length: 33 (36) cm / 13’’ (14.2’’)
Whenever two measurements are given, keep the original order in mind: the first number is for S/M and the second number is for L/XL.
Knitting Abbreviations Used in the Pattern
The following abbreviations appear in the original instructions and are useful to keep beside you while working:
- st(s) = stitch(es)
- k = knit
- p = purl
- tbl = through the back loop
- RS = right side
- WS = wrong side
- inc(s) = increase(s)
- yo(s) = yarnovers
- k2tog = knit 2 stitches together
- co = cast on
- bo = bind off
Two abbreviations deserve special attention: yo and tbl. The pattern makes its increases by creating yarnovers on WS rows and then knitting those yarnovers through the back loop on RS rows. This is part of the original shaping method and should be followed exactly.
The Construction Strategy
Before starting the detailed rows, it helps to understand the architecture of the bandana.
The first stage creates a small square. Five stitches are cast on, and 10 rows are worked in garter stitch. Without turning, stitches are then picked up along the left side and along the cast-on edge. This creates the starting group of 15 stitches.
The next stage expands that small center. Four yarnovers are introduced on the WS increase rows. On the corresponding RS rows, the yarnovers are knitted through the back loop. The pattern therefore increases the stitch count while establishing the decorative structure.
Once the first six rows have been completed, the main pattern begins. The main sequence contains Rows 1–8 and is repeated according to the selected size. After the specified full repeats, Rows 1–6 are worked once more. The project then moves into the five-row garter-stitch edge with increases, followed by a loose bind-off.
Step 1: Create the Small Starting Square
Begin by working flat on the 80 cm (32’’) circular needle.
Cast on 5 stitches.
Work 10 rows in garter stitch. The original instructions specifically tell you not to turn at this point.
Instead, pull out the cable using the magic loop technique and pick up 5 stitches along the left side. Do not turn.
Then pull out the cable again using the magic loop technique and pick up 5 stitches along the cast-on edge.
You should now have:
15 stitches.
Next, place your four stitch markers after 5, 7, 8 and 10 stitches.
This starting arrangement is an important foundation for the rest of the project. Before continuing, check both the stitch count and marker positions. A small mistake here can make the later increase instructions much harder to follow.

Step 2: Establish the First Increases
The first six rows form the transition between the small starting square and the larger decorative section.
Row 1 — Wrong Side
Row 1, WS: K5, yo, p2, yo, p1, yo, p2, yo, k5 = 4 yos.
There are four yarnovers in this row. These are the increases that will be worked through the back loop on the next right-side row.
Row 2 — Right Side
Row 2, RS: K5, k yo tbl, k2, k yo tbl, k1, k yo tbl, k2, k yo tbl, k5 = 19 sts.
After completing Row 2, the stitch count should be 19 stitches.
The four yarnovers created on Row 1 are now knitted through the back loop. The five knit stitches at each end remain an important visual border.
Row 3 — Wrong Side
Row 3, WS: K5, yo, p4, yo, p1, yo, p4, yo, k5 = 4 yos.
Again, four yarnovers are created.
Row 4 — Right Side
Row 4, RS: K5, k yo tbl, k4, k yo tbl, k1, k yo tbl, k4, k yo tbl, k5 = 23 sts.
The stitch count is now 23 stitches.
Row 5 — Wrong Side
Row 5, WS: K5, yo, p6, yo, p1, yo, p6, yo, k5 = 4 yos.
Row 6 — Right Side
Row 6, RS: K5, k yo tbl, k6, k yo tbl, k1, k yo tbl, k6, k yo tbl, k5 = 27 sts.
The stitch count after Row 6 is 27 stitches.
This completes the opening section. From here, the instructions introduce the main pattern.
Step 3: Enter the Main Pattern
The main pattern is built as an eight-row sequence. Keeping track of the row number is essential because the wrong-side and right-side instructions perform different functions.
The main section also introduces a yo, k2tog repeat on Main Pattern Row 2. This is what helps create the open texture that becomes characteristic of the finished bandana.
Main Pattern Row 1
Row 1, WS: K5, yo, p8, yo, p1, yo, p8, yo, k5 = 4 yos.
This row follows the familiar increase structure: five knit stitches at the beginning, yarnovers around the center, and five knit stitches at the end.
Main Pattern Row 2
Row 2, RS: K5, k yo tbl, repeat *yo, k2tog* until the yo before the middle st, k yo tbl, k1, k yo tbl, repeat *k2tog, yo* until the yo before the edge st, k yo tbl, k5 = 31 sts.
This row is more involved than the opening rows. Read the full instruction before beginning so that the location of the middle stitch and the two repeated sections are clear.
At the end of this row, the pattern gives a checkpoint of 31 stitches.
Main Pattern Row 3
Row 3, WS: K5, yo, k yos and sts until the middle st, yo, p1, yo, k yos and sts until the marker before the edge sts, yo, k5 = 4 yos.
This row continues the expansion while working across the yarnovers and stitches established in the previous row.
Main Pattern Row 4
Row 4, RS: K5, k yo tbl, k until the yo before the middle st, k yo tbl, k1, k yo tbl, k until the yo before the edge sts, k yo tbl, k5 = 35 sts.
After Row 4, the stitch count is 35 stitches.
Main Pattern Row 5
Row 5, WS: K5, yo, p until the middle st, yo, p1, yo, p until the marker before the edge sts, yo, k5.
This wrong-side row continues the four-yarnover increase structure.
Main Pattern Row 6
Row 6, RS: K5, k yo tbl, k until the yo before the middle st, k yo tbl, k1, k yo tbl, k until the yo before the edge st, k yo tbl, k5 = 39 sts.
The stitch count is now 39 stitches.
Main Pattern Row 7
Row 7, WS: K5, yo, p until the middle st, yo, p1, yo, p until the marker before the edge sts, yo, k5.
Although the row does not provide a final stitch count in the source, the instruction maintains the same increase framework.
Main Pattern Row 8
Row 8, RS: K5, k yo tbl, k until the yo before the middle st, k yo tbl, k1, k yo tbl, k until the yo before the edge st, k yo tbl, k5 = 43 sts.
After Row 8, the written stitch count is 43 stitches.

How to Keep the Eight-Row Repeat Organized
Once the first eight rows of the main pattern are complete, the pattern instructs you to repeat Rows 1–8 a total of 11 (13) times.
After those repeats, work Rows 1–6 once more.
For a project with a repeating section, one of the simplest ways to prevent mistakes is to record every completed eight-row repeat. You can use a row counter, a written checklist, or a series of marks on paper. The important thing is to distinguish between the number of individual rows and the number of completed eight-row repeats.
Do not replace the specified repeat with a different number of repeats. The original instructions give 11 (13) repeats, followed by Rows 1–6.
Why the Stitch Markers Matter
The four stitch markers placed at the beginning of the project provide useful landmarks as the fabric expands. The written pattern repeatedly refers to the middle stitch and to the marker before the edge stitches.
Because the bandana grows outward, the distance between these reference points changes as additional stitches are created. The markers help you identify the structural areas without having to count the entire row from the beginning every time.
The edge areas are also easy to recognize because the written rows repeatedly begin and end with K5. Maintaining these edge stitches helps preserve the clean border around the decorative center.
If you ever feel uncertain about where you are in a row, stop rather than continuing from memory. Identify the middle stitch, locate the relevant marker, and then return to the written row instruction.
Understanding the Decorative Openwork
The Mammatus texture is created through a combination of yarnovers and decreases. Yarnovers add stitches and create openings in the fabric, while k2tog combines two stitches. When these techniques are positioned in a repeated sequence, they create the rows of small openings visible across the finished piece.
The design does not rely on a separate color-change sequence. The original pattern uses one color, Vienna (12), throughout. The visual interest comes from the stitch construction itself and from the way the fabric opens during blocking.
The close-up images of the finished bandana show how the small openings form repeated vertical and diagonal-looking lines within the triangular fabric. This texture is especially useful for understanding why accurate yarnovers and k2tog instructions matter.
Step 4: Finish the Bandana Edge
After completing the required main-pattern repeats and the additional Rows 1–6, the bandana moves into its final edge section.
The instructions are:
Work 5 rows in garter stitch (with increases).
This is an important finishing section because the five rows are not simply plain garter stitch. The source explicitly specifies that they are worked with increases.
After the five rows are finished:
BO loosely.
A loose bind-off is part of the original instructions. The goal is to finish the outer edge without making the final row unnecessarily tight.

Washing and Light Blocking
The final instruction in the pattern is to wash and lightly block the bandana.
This step should not be treated as an optional decoration. The original pattern provides separate measurements before and after washing and blocking, showing that the finished fabric changes substantially during this stage.
Before washing and blocking, the S/M size is approximately 50 cm wide and 27 cm long, while the L/XL size is approximately 55 cm wide and 30 cm long.
After washing and blocking, the S/M size is approximately 60 cm wide and 33 cm long, while the L/XL size is approximately 65 cm wide and 36 cm long.
The source specifically says to block the bandana lightly. The purpose is to help the knitted fabric settle into its finished form rather than forcing it into an unrelated shape.
Blocking as Part of the Design
The open areas created by the yarnovers can become more apparent after the fabric is washed and lightly blocked. This is one reason the final photographs show a distinctly airy surface compared with what you may see while the piece is still on the needles.
When checking the finished dimensions, remember that the post-blocking measurements are the ones that represent the intended final size. Comparing the unblocked piece directly with the final dimensions can make the fabric appear too small before the finishing process has been completed.
Wearing the Mammatus Bandana
The completed design is intended to be versatile. It can be worn around the neck or around the head, making it useful as both a decorative accessory and a lightweight head covering.
When worn around the neck, the triangular point naturally sits toward the front. The broad upper section wraps around the neck while the decorative stitch pattern remains visible.
The same triangular geometry can be positioned around the head. The finished photographs show the bandana covering the back and sides of the head, with the point extending downward.

Stitch Count Checkpoints
Keeping track of the stitch counts can make this project much more manageable. The following checkpoints come directly from the written instructions:
- After picking up the starting stitches: 15 sts
- After Row 2: 19 sts
- After Row 4: 23 sts
- After Row 6: 27 sts
- After Main Pattern Row 2: 31 sts
- After Main Pattern Row 4: 35 sts
- After Main Pattern Row 6: 39 sts
- After Main Pattern Row 8: 43 sts
These numbers are useful checkpoints rather than replacements for the written instructions. If a checkpoint does not match, it is better to stop and review the previous row than to continue and hope the discrepancy disappears later.
Practical Tips for a Smooth Knitting Session
Read Each Row Before Starting
The longer right-side rows are easier to execute when you understand their structure first. Pay attention to the middle stitch, the yarnovers, the repeated section, and the edge stitches before placing the needle into the first stitch.
Respect the RS and WS Instructions
The increase technique depends on which side of the work you are knitting. Yarnovers are worked on the WS rows, while the yarnovers are knitted through the back loop on the RS rows. Mixing up these operations can change the intended structure.
Use the Markers as Landmarks
Do not remove the four markers simply because the fabric has become larger. They help you identify the structural sections described in the written instructions.
Watch the Edge Stitches
The repeated appearance of K5 at the beginning and end of the rows provides a clear border. Keeping these stitches correct helps maintain a neat edge as the triangular shape grows.
Count Before Moving On
When the pattern supplies a stitch-count checkpoint, use it. The counts of 19, 23, 27, 31, 35, 39 and 43 stitches provide particularly useful opportunities to confirm that the increase structure is working as expected.
Quick Reference: Complete Construction Order
- Use the 3 mm (US 2.5) circular needle measuring 80 cm (32’’).
- Cast on 5 stitches.
- Work 10 rows in garter stitch.
- Do not turn.
- Pick up 5 stitches along the left side using the magic loop technique.
- Do not turn.
- Pick up 5 stitches along the cast-on edge using the magic loop technique.
- Confirm that you have 15 stitches.
- Place markers after 5, 7, 8 and 10 stitches.
- Work Rows 1–6 of the opening bandana section.
- Confirm the stitch counts of 19, 23 and 27 stitches at the appropriate checkpoints.
- Begin the main pattern.
- Work Main Pattern Rows 1–8.
- Repeat Rows 1–8 a total of 11 (13) times.
- Repeat Rows 1–6.
- Work 5 rows in garter stitch with increases.
- Bind off loosely.
- Wash and lightly block the bandana.
Finished Project Inspiration
One of the strongest features of this project is the contrast between its construction process and its final appearance. The knitting begins with a very small group of stitches, but the repeated increase structure gradually transforms it into a wide triangular accessory.
The finished fabric has a soft, textured appearance, with rows of openings running through the main section. The photographs also demonstrate that the design remains recognizable from several angles: worn around the neck, worn around the head, or held open to reveal its full triangular shape.
The edge and corner details are particularly useful visual references when checking your own finished piece. The point should develop naturally from the center of the increase structure, while the outer borders remain visually distinct.

Final Project Checklist
- Size: S/M (L/XL)
- Yarn: 1 (2) skeins of Alpaca Silk, Vienna (12)
- Fiber: 70 % Alpaca, 30 % Mulberry Silk
- Skein: 50 g (1.75 oz) = 166 m (182 yds)
- Needle: Circular 3 mm (US 2.5), 80 cm (32’’)
- Gauge: 27 sts x 40 rows in stockinette stitch = 10 cm (4’’)
- Starting cast-on: 5 sts
- Initial garter stitch: 10 rows
- Stitches after pickup: 15 sts
- Markers: After 5, 7, 8 and 10 sts
- Main increase method: Yos on WS rows and knitting yos tbl on RS rows
- Increase structure: 4 increases
- Main repeat: Rows 1–8 repeated 11 (13) times
- Additional rows: Rows 1–6
- Final edge: 5 rows garter stitch with increases
- Finishing: Loose bind-off, then wash and lightly block
Final Thoughts on the Mammatus Bandana
The Mammatus Bandana is a strong example of how a relatively compact knitted accessory can use thoughtful construction to create an eye-catching result. Its defining feature is not a complicated collection of separate pieces, but the gradual expansion of one continuous piece from a tiny central square.
The most important part of the project is understanding the increase system. Four increases are created through yarnovers on the wrong-side rows, and those yarnovers are knitted through the back loop on the right-side rows. Once this rhythm becomes familiar, the growing triangular shape becomes much easier to manage.
The stitch markers and repeated edge stitches provide additional structure, while the eight-row main pattern introduces the openwork texture that gives the finished bandana its distinctive appearance. The supplied stitch counts offer reliable checkpoints as the work progresses.
For S/M and L/XL, the pattern provides clear measurements both before and after washing and blocking. Because the finished dimensions increase during the finishing process, the final light blocking stage is an important part of achieving the intended result.
Once complete, the Mammatus Bandana can be worn around the neck or head. Its soft triangular silhouette and decorative surface make it a versatile accessory, while the construction offers an engaging knitting experience for anyone comfortable working with yarnovers, k2tog, increases, and patterned rows.
Follow the original row sequence carefully, preserve the stated stitch counts and repeat numbers, and use the markers as your structural guide. With those details under control, the project progresses in a logical sequence from a five-stitch beginning to a finished, wearable bandana.