
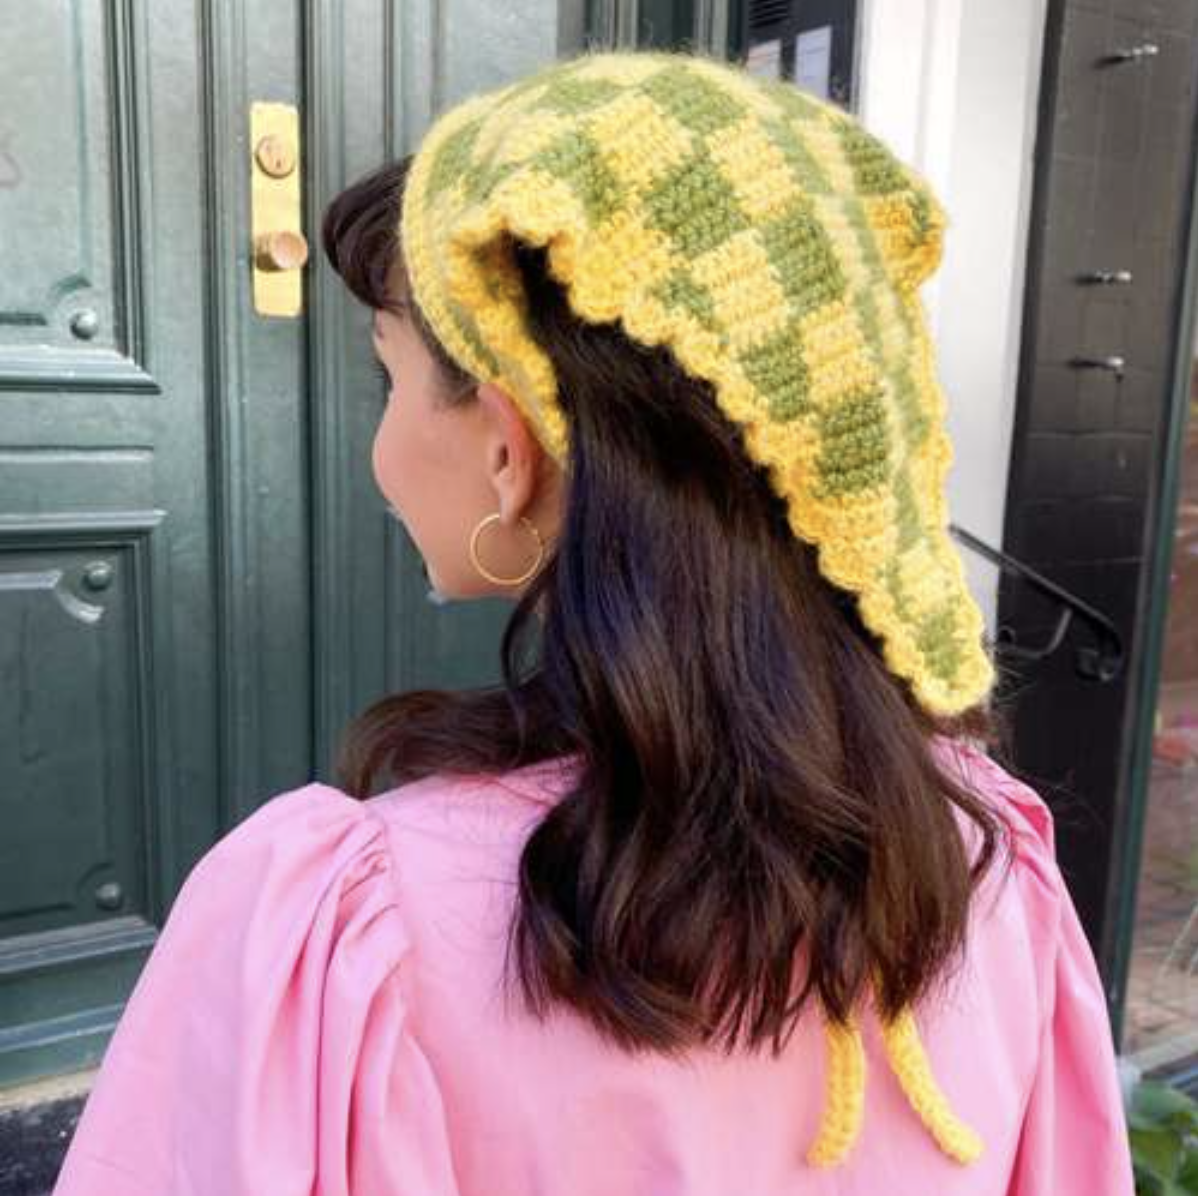
If you love crochet accessories that feel both practical and playful, the Bonnie Bandana is a beautiful project to add to your handmade wardrobe. Instead of the lightweight look associated with a traditional bandana, this design has been created with the colder season in mind. Its combination of cotton and fluffy yarn gives the finished piece a thick yet soft texture, while the contrasting yellow-and-green checkerboard effect gives it a distinctive handmade character.

The Bonnie Bandana pattern was designed by Laura Hjertefryd / Laura Takahashi Christiansen for Hobbii Design. The original pattern identifies the project as an intermediate crochet design. The bandana is worked in one main piece, followed by a waved edging and crocheted tie strings. This construction makes the project especially interesting because the shaping, color changes, edging, and ties all come together to create the final silhouette.
What Makes the Bonnie Bandana Special?
The most noticeable feature of this crochet bandana is its checkerboard color effect. Rather than using a single strand of ordinary yarn, the project combines one strand of Friends Cotton 8/4 with two strands of Diablo. The result is a fabric that has both structure and softness.
The design uses two coordinated color combinations. The yellow combination consists of one strand of Friends Cotton 8/4 in Lemon Curd (22) together with two strands of Diablo in Primrose (51). The green combination consists of one strand of Friends Cotton 8/4 in Olive (109) together with two strands of Diablo in Olive (20).
One important detail in the original instructions is that the two Diablo strands are worked from both ends of the same skein at the same time. This is not an optional variation in the pattern; it is part of the specified yarn setup. Keeping the strands together throughout the work is important for maintaining the intended thickness and texture.
Materials You Need
Before starting, prepare all of the materials listed in the original pattern so that the color changes can be made smoothly during the project.
- 1 skein of Friends Cotton 8/4 in Lemon Curd (22)
- 1 skein of Friends Cotton 8/4 in Olive (109)
- 1 skein of Diablo in Primrose (51)
- 1 skein of Diablo in Olive (20)
- 5.5 mm crochet hook
Friends Cotton 8/4 by Hobbii is 100% cotton. One 50 g (1.75 oz) skein contains 160 m (174 yds).
Diablo by Hobbii is composed of 40% acrylic, 30% mohair, and 30% polyamide. One 25 g (0.8 oz) skein contains 225 m (246 yds).
The original pattern does not list a separate yardage requirement beyond the skeins specified above, so it is best to follow the material list exactly rather than trying to substitute quantities.
Gauge and Finished Measurements
The stated gauge for the Bonnie Bandana is:
10 x 10 cm (4 x 4 inches) = 16 sl st x 17 rows.
The pattern is available in one size, with a stated width of 34 cm / 13.4 inches.
Because the bandana is made from a combination of three strands in total—one strand of Friends Cotton 8/4 and two strands of Diablo—the fabric has a noticeably fuller character. Checking your gauge before beginning is therefore a useful preparation step, particularly if your natural crochet tension differs from the pattern gauge.
Abbreviations Used in the Pattern
The pattern uses the following crochet abbreviations:
- Ch = chain
- Sl st = slip stitch
- Sc = single crochet
- Dc = double crochet
- Hdc = half double crochet
The original instructions use these terms throughout the construction, so keeping this short abbreviation list nearby can make the pattern easier to follow while working.
Understanding the Color Setup
Before making the first chain, organize the yarn into the two combinations used throughout the checkerboard section.
Yellow: one strand of Friends Cotton 8/4 Lemon Curd (22) plus two strands of Diablo Primrose (51).
Green: one strand of Friends Cotton 8/4 Olive (109) plus two strands of Diablo Olive (20).
The visual effect comes from working these combinations in blocks. The pattern begins with yellow and then alternates five stitches of yellow and five stitches of green. As the rows progress, the color placement changes so that the blocks shift and form the checkerboard appearance.
Because each color combination contains three strands, take care not to accidentally lose one of the strands while crocheting. The original pattern specifically notes that the two strands of Diablo should come from both ends of the same skein at the same time.
Starting the Bonnie Bandana
The main bandana is worked in one piece. Start with the yellow color combination.
Foundation: Ch 55, 1 turning chain (55).
This foundation establishes the wide upper edge of the bandana. From this point, the shape is created by decreasing one stitch at the beginning of every row.
The Important Decreasing Rule
There is one instruction that is especially important to remember while working the main section: when starting each row, skip the first stitch. The pattern explains that this decreases the stitch count by one stitch for every row.
This simple instruction controls the triangular shape of the bandana. Rather than adding separate shaping pieces, the project gradually becomes narrower as the rows are completed.
It can be helpful to pause at the beginning of each row and make sure the first stitch has been skipped before continuing. This is particularly important when concentrating on the color pattern, because the checkerboard effect can draw your attention away from the shaping.
Building the Checkerboard Pattern
The first row establishes the initial color blocks.
Row 1: Work alternately 5 sc yellow and 5 sc green until the end of the row.
The five-stitch blocks create the first visual rhythm of the design. At this point, the project begins to look like a striped or blocked piece, but the checkerboard effect develops as the color placement changes in later rows.
Rows 2–5: Skip the first stitch, then work alternately yellow over yellow and green over green. The stitch counts are 54, 53, 52, and 51.
These rows maintain the color alignment established in the previous row while continuing the decrease. The gradual reduction is what begins narrowing the bandana from its original width.
Row 6: Skip the first stitch, and now work over yellow and yellow over green to create the chequered pattern. The stitch count is 50.
This row marks an important visual transition. The color placement shifts rather than simply continuing directly over the same color. This change is what allows the blocks to interlock visually and creates the distinctive checkerboard effect.
Rows 7–10: Skip the first stitch, and work alternately green over green and yellow over yellow.
After these rows, the pattern continues in the same general manner, with the colors changing every five rows until only one stitch remains. Fasten off when the final stitch is reached.

A Simple Way to Keep Track of the Main Section
The combination of shaping and color changes makes this project easier to manage when you treat them as two separate checkpoints. First, remember that every row begins by skipping the first stitch. Second, pay attention to the color placement described for the current section.
The stitch counts provided by the pattern are useful checkpoints. After the initial 55-chain foundation, Row 1 is worked across 55 stitches. Rows 2–5 finish with 54, 53, 52, and 51 stitches respectively. Row 6 has 50 stitches. These numbers give you a practical way to check your progress without changing the original construction.
As the pattern continues, the stitch count keeps decreasing until one stitch remains. The original instructions do not provide a separate numerical list for every subsequent row, so there is no need to invent additional counts. Simply follow the stated decrease instruction and the color-change sequence until the final stitch.
Keeping the Edges Even
The triangular shape depends on the repeated decrease at the beginning of each row. If the first stitch is accidentally worked instead of skipped, the shaping will not follow the instructions. Likewise, skipping more than the intended first stitch can make the piece narrow too quickly.
A useful habit is to identify the first stitch before beginning each new row. Once it has been skipped, continue with the prescribed color arrangement. This keeps the shaping and checkerboard design working together.
Since the fabric uses multiple strands, it is also worth checking periodically that all three strands remain together when they should. Consistent tension helps the stitches maintain a cohesive appearance across the color blocks.
Adding the Waved Edging
Once the main bandana has been completed and fastened off, the next stage is the decorative waved edging.
The edging is worked with yellow. With the right side of the work facing, join the yarn in the side of Row 1.
Work 1 sc, then repeat the following sequence along the side:
(3 dc in one row, 2 sc)
Continue this repeat until you reach the tip at the final row. Then continue along the other side. Finish with one sc in the first row, on the opposite side from where you started.
The combination of three double crochets worked into one row followed by two single crochets creates the gently waved border visible around the sides of the finished bandana. Because the edging is crocheted directly onto the bandana, it becomes part of the overall silhouette rather than functioning as a separately attached trim.
Why the Wavy Border Matters
The main body of the project has a strong geometric checkerboard structure. The waved edging introduces a softer decorative element around that geometry. The contrast between the block pattern and the scalloped-looking movement of the border is one of the features that gives the Bonnie Bandana its distinctive appearance.
When working this section, keep the right side facing as instructed and follow the placement carefully. The edging travels along both sides of the triangular piece and finishes back at the opposite side of the first row.
Creating the Tie Strings
The final construction stage is the tie strings. These are also crocheted directly onto the bandana rather than being made separately and sewn on later.
Use yellow for the tie strings.
First tie section: Ch 80.
Continue along the wrong side of the bandana and work 1 sc in each stitch along the opposite side of Row 1.
Then make another Ch 80 and turn.
Now work 1 hdc in each stitch.
The original pattern gives the total as 80 + 55 + 80 = 215. Fasten off and weave in the ends.

Finishing the Bonnie Bandana
After the final hdc section is complete, fasten off and weave in the ends. Take a moment to inspect the edges and the transition between the body, waved edging, and tie strings.
The finished bandana is designed to be worn during the colder season. The combination of Friends Cotton 8/4 and two strands of Diablo gives the project the thick yet soft feeling described in the original pattern. The texture also helps emphasize the alternating yellow and green blocks.
The stated finished width is 34 cm / 13.4 inches. The pattern is one size, and no additional size variations are specified in the source.
Beginner-Friendly Project Checkpoints
Although the original pattern is classified as intermediate, several checkpoints can make the process more manageable.
- Before starting: Prepare the yellow and green three-strand combinations.
- Foundation: Start with Ch 55 and 1 turning chain (55).
- Every row: Remember to skip the first stitch.
- Color blocks: Begin with alternating groups of 5 sc yellow and 5 sc green.
- Rows 2–5: Maintain the specified color-over-color arrangement while decreasing.
- Row 6: Follow the color crossover that creates the checkerboard effect.
- Rows 7–10: Continue the specified alternating color arrangement.
- Remaining body: Continue changing colors every 5 rows until 1 stitch remains.
- Edging: Work the yellow waved edging along both sides.
- Ties: Make the two Ch 80 sections and complete the hdc return as written.
- Final step: Fasten off and weave in ends.
Common Things to Watch While Crocheting
Forgetting the First-Stitch Decrease
The most important shaping instruction is to skip the first stitch at the beginning of each row. Because this happens repeatedly, it is easy to overlook once you become focused on the color sequence. Keeping this instruction in mind at every row helps preserve the intended triangular shape.
Separating the Diablo Strands
The pattern calls for two strands of the same Diablo color to be used simultaneously. Both strands come from the same skein, using both ends. Make sure the two Diablo strands remain together with the corresponding Friends Cotton 8/4 strand.
Losing the Five-Stitch Color Rhythm
The checkerboard effect depends on the specified five-stitch color blocks and the later color shift. Avoid changing the sequence based on how the fabric looks at one particular moment. Follow the written instructions for each row and each five-row color section.
Changing the Pattern Counts
The stitch counts are part of the original construction. They should be treated as checkpoints rather than adjusted to make the pattern fit a personal preference. The stated foundation and row counts should remain exactly as written.
Styling the Finished Bandana
The photographs of the finished Bonnie Bandana show how the triangular shape sits around the head, with the tie strings hanging down at the back. The checkerboard fabric provides a strong focal point, while the waved edging adds a decorative finish around the sides.
The design can work particularly well as a statement accessory because the color combination is already built into the project. The yellow and green palette creates a cheerful contrast, while the fluffy Diablo yarn gives the piece a softer visual quality than a basic cotton-only accessory.
Because the original pattern specifically describes the Bonnie Bandana as a cold-season design, its heavier texture is an important part of its character. It is not simply a traditional lightweight bandana recreated in crochet; it is intended to provide a warmer, softer accessory.
Quick Reference for the Complete Construction
- Prepare the Lemon Curd and Primrose combination for yellow.
- Prepare the Olive and Olive combination for green.
- Use one strand of Friends Cotton 8/4 and two strands of Diablo.
- Start with yellow.
- Ch 55 and make 1 turning chain (55).
- Work Row 1 with alternating groups of 5 sc yellow and 5 sc green.
- For each new row, skip the first stitch.
- Work Rows 2–5 with yellow over yellow and green over green.
- Work Row 6 with the specified color crossover to create the checkerboard.
- Work Rows 7–10 as instructed.
- Continue changing colors every 5 rows until 1 stitch remains.
- Fasten off.
- With yellow, add the waved edging along both sides.
- Make Ch 80 for the first tie section.
- Work 1 sc in each stitch along the opposite side of Row 1.
- Make Ch 80 for the second tie section and turn.
- Work 1 hdc in each stitch.
- Fasten off and weave in the ends.
Frequently Asked Questions
What size is the Bonnie Bandana?
The pattern is one size and gives a width of 34 cm / 13.4 inches.
What crochet hook is required?
The original pattern specifies a 5.5 mm crochet hook.
What yarn is used for the Bonnie Bandana?
The project uses Friends Cotton 8/4 and Diablo by Hobbii. The yellow combination uses Lemon Curd (22) with Primrose (51), while the green combination uses Olive (109) with Olive (20).
How many strands are crocheted together?
The bandana is worked with one strand of Friends Cotton 8/4 and two strands of Diablo. The two Diablo strands are taken from both ends of the same skein at the same time.
What is the gauge?
The stated gauge is 10 x 10 cm (4 x 4 inches) = 16 sl st x 17 rows.
Is this pattern suitable for beginners?
The original source classifies the Bonnie Bandana as an intermediate crochet pattern. The construction is straightforward once the color changes and repeated first-stitch decrease are understood, but the project benefits from careful attention to the written sequence.
How is the checkerboard effect made?
The design begins with alternating five-stitch yellow and green groups. The colors initially remain over the corresponding colors, then the placement changes at Row 6 to create the checkerboard effect. The pattern continues with color changes every five rows until one stitch remains.
How is the edging attached?
The waved edging is crocheted directly onto the bandana. Using yellow and with the right side facing, join the yarn at the side of Row 1, work 1 sc, then repeat 3 dc in one row followed by 2 sc along the side. Continue to the tip and then along the other side.
How are the ties made?
The ties are also crocheted directly onto the bandana. With yellow, Ch 80, work 1 sc in each stitch along the opposite side of Row 1, then Ch 80 and turn. Finish by working 1 hdc in each stitch. The original pattern gives the total as 80 + 55 + 80 = 215.
Final Thoughts
The Bonnie Bandana is a distinctive crochet accessory built around a simple but effective idea: combine a structured checkerboard pattern with a soft, fluffy yarn blend and finish it with a decorative waved edge. The result is a cozy triangular accessory that feels very different from a lightweight traditional bandana.
The project is also a useful exercise in maintaining several techniques at once. You will work with multiple strands, alternate colors in defined blocks, decrease consistently at the beginning of every row, create a color crossover for the checkerboard effect, and then add both a decorative edging and crocheted ties.
For the best result, keep the technical checkpoints from the original pattern close at hand: the 5.5 mm hook, the specified yarn combinations, the 55-chain foundation, the repeated first-stitch decrease, the five-stitch color blocks, the Row 6 color shift, the continued five-row color changes, and the exact tie-string construction.
Once the final ends are woven in, the Bonnie Bandana is ready to become a colorful cold-season accessory. Its yellow and green checkerboard fabric, soft texture, waved border, and long ties give the finished piece a cheerful handmade look while staying faithful to the original design.
Pattern: Bonnie – Bandana, No. 1059-231-7799
Designer: Laura Hjertefryd / Laura Takahashi Christiansen
Design: Hobbii Design
Size: One size
Width: 34 cm / 13.4 inches
Happy crocheting!