
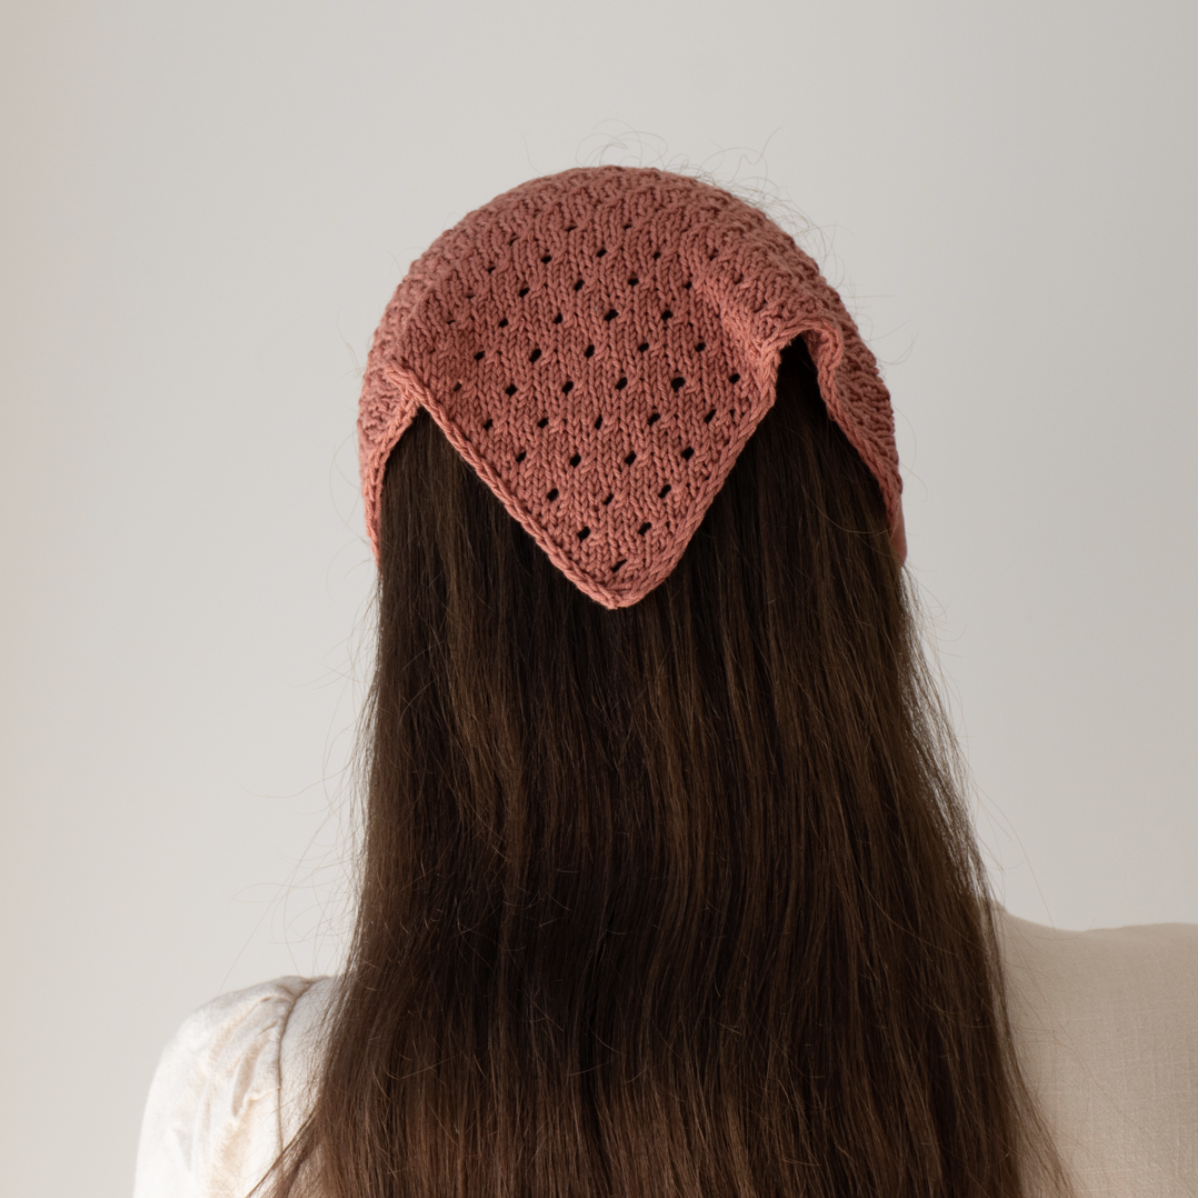
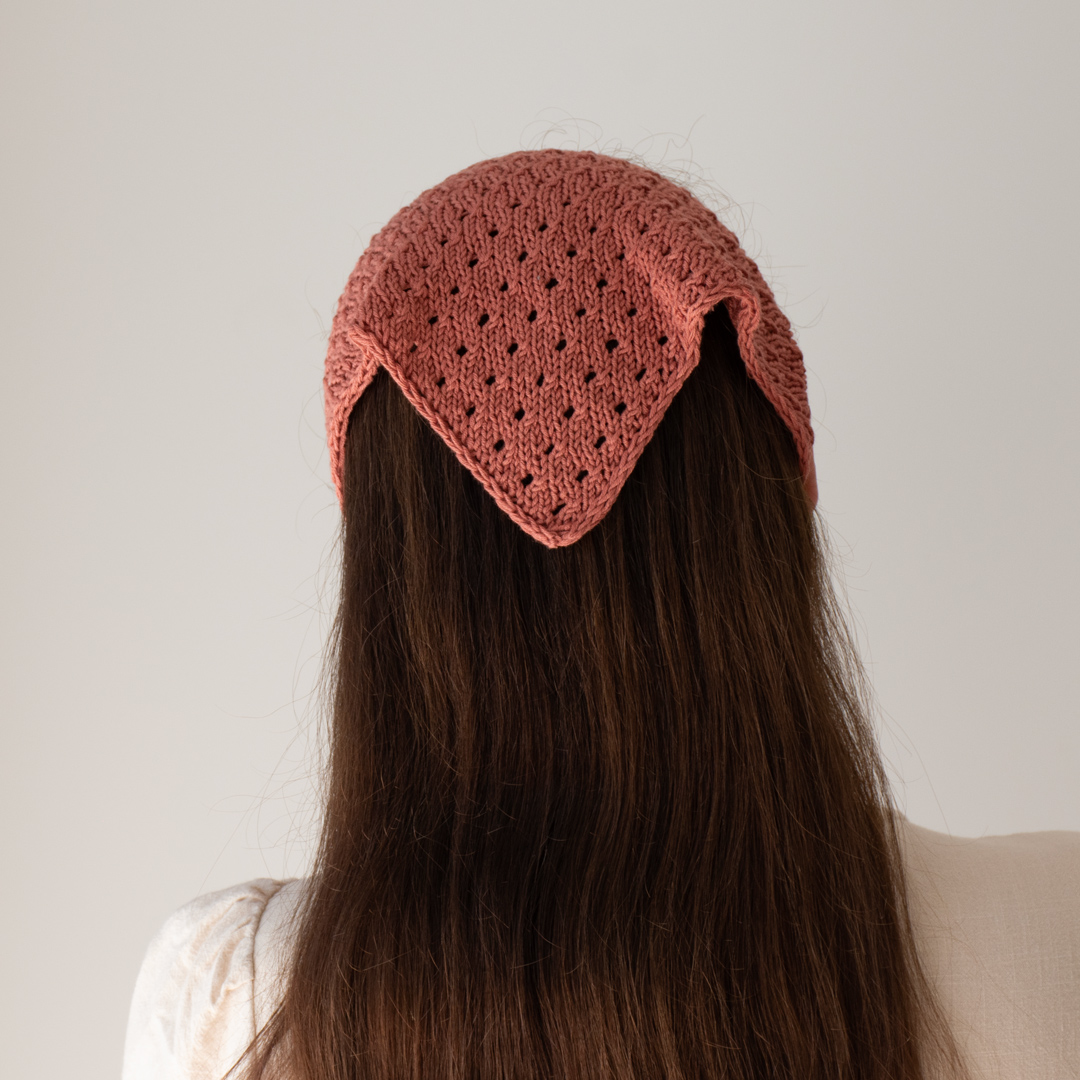
The Canyon Clay Bandana is a compact knitting project designed around a simple triangular construction, a lightweight sport-weight cotton yarn, and an attractive staggered eyelet stitch. Although the finished accessory is relatively small, the pattern introduces several useful knitting techniques that are valuable beyond this particular project. You will work yarnovers, right-leaning decreases, i-cord edges, and i-cord ties while building the triangular fabric from the bottom upward.
The bandana is worked back and forth rather than in the round. Its shape develops through increases on the right side of the work, while the first and last two stitches create an i-cord-style edging throughout the main section. This gives the finished fabric a tidy outline and helps prevent the edges from curling.
One of the most useful features of this design is that the size can be modified. The original pattern gives a one-size finished measurement, but the construction allows repeats to be added or subtracted when a different length is wanted. The important point is to preserve the actual stitch instructions and repeat structure while making any adjustment.
This guide walks through the project as a complete construction process. Instead of treating the pattern as a collection of isolated rows, it focuses on what each stage is accomplishing, where to check your work, and how the triangle, edging, and ties eventually become one finished accessory.
Project Snapshot
- Project: Canyon Clay Bandana
- Size: One size
- Finished length without ties: 42cm / 16.5in
- Finished height: 22cm / 8.75in
- Gauge: 24 stitches x 32 rows in stockinette stitch over 10 x 10 cm (4 x 4in), after blocking
- Yarn: Drops Safran in red clay (uni color 59), 1 ball
- Main needles: 3mm (US 2.5) knitting needles
- Tie needles: A pair of 3mm (US 2.5) DPNs
- Notions: Tapestry needle, measuring tape, scissors
The yarn and needle combination creates a light fabric appropriate for a small summer accessory. Because the finished measurements are given after the project has been blocked, it is useful to keep blocking in mind when evaluating the final size.
What Makes the Construction Work?
The bandana begins with only four stitches. From that narrow starting point, the fabric grows through carefully placed increases. The body eventually develops into a wider triangle, and the staggered eyelet pattern adds an open decorative texture.
The first and last two stitches are treated differently from the center of the work. On every row, the first two stitches are knitted and the last two stitches are slipped with the yarn in front. Together, these stitches create the i-cord edging.
The edge is an important structural feature rather than merely a decorative detail. The source instructions specifically note that the edge stitches should not be tightened. Keeping them relaxed allows the edging to form correctly and prevents the outer edge from becoming unnecessarily restrictive.
After the triangular body is complete, the project moves into the ties. The first i-cord tie is worked separately, then joined directly to the live stitches of the bandana. The live bandana stitches are incorporated one by one using ssk decreases until the entire edge has been connected. The second tie is then worked from the remaining stitches.
Materials and Tools Before You Start
Gather all of the required materials before beginning. Having the correct needles available is especially useful because the main bandana and the i-cord ties use different needle arrangements even though both use 3mm (US 2.5) sizing.
- 1 ball of Drops Safran in red clay, uni color 59
- 3mm (US 2.5) knitting needles
- A pair of 3mm (US 2.5) DPNs for the ties
- Tapestry needle
- Measuring tape
- Scissors
Keep the measuring tape nearby throughout the project. It is particularly useful when checking the finished height and when measuring each i-cord tie to approximately 30 cm.
Abbreviations to Keep Beside the Pattern
- k – knit
- k2tog – knit 2 stitches together
- p – purl
- RS – right side
- sl – slip stitch as if to purl with yarn in front
- ssk – slip 1 stitch knitwise, slip the next stitch knitwise, return the 2 stitches back to the left needle, knit those 2 stitches together through the back loops
- WS – wrong side
- yo – yarn over
- *-* – repeat the instructions in between the asterisks the number of times specified
The definition of ssk is particularly important during the joining section. This is not simply a generic decrease instruction: the source specifically describes slipping one stitch knitwise, slipping the next stitch knitwise, returning both stitches to the left needle, and knitting them together through the back loops.
Understand the I-Cord Edge First
Before beginning the triangle, it helps to understand the edge rule that remains active throughout the bandana body.
The first two stitches of every row are knitted. The last two stitches of every row are slipped with yarn in front. These four edge stitches are what create the i-cord edging.
The source specifically instructs you not to tighten the edge stitches. This is an easy detail to overlook, particularly if you naturally pull your yarn firmly when changing between knit and slipped stitches. Let the edge stitches remain relaxed so that the border can develop evenly.
Building the Triangle from Four Stitches
The main bandana begins with a cast-on of only four stitches. This small foundation is the starting point for the entire triangular fabric.
Cast on 4 stitches.
The first section is the set-up sequence. These rows gradually establish the center portion of the fabric and prepare the stitch arrangement for the repeating eyelet pattern.
Set-Up Rows 1–11
- Row 1 (WS): k2, sl2.
- Row 2 (RS): k2, yo, sl2 (5sts).
- Row 3: k2, p1, sl2.
- Row 4: k2, yo, k1, yo, sl2 (7sts).
- Row 5: k2, p to last 2 sts, sl2.
- Row 6: k2, yo, k3, yo, sl2 (9sts).
- Row 7: k2, p to last 2 sts, sl2.
- Row 8: k2, yo, k1, k2tog, yo, k2, yo, sl2 (11sts).
- Row 9: k2, p to last 2 sts, sl2.
- Row 10: k2, yo, k to last 2 sts, yo, sl2 (13sts).
- Row 11: k2, p to last 2 sts, sl2.
There are several useful stitch-count checkpoints in this short sequence. After Row 2 the count is 5 stitches. After Row 4 it is 7 stitches. After Row 6 it is 9 stitches. After Row 8 it is 11 stitches. After Row 10 it is 13 stitches.
These counts are excellent places to pause and compare your work with the pattern. If your stitch count does not match one of these checkpoints, it is better to investigate immediately rather than continuing into the main repeat.
The Staggered Eyelet Section
Once the set-up rows are complete, the project moves into the main pattern. The eyelet texture is produced with yarnovers and right-leaning decreases. The result is a repeated openwork structure that gives the bandana its distinctive appearance.
The Four-Row Pattern Repeat
- Row 1 (RS): k2, yo, k1, *k2tog, yo, k2* to last 2 sts, yo, sl2 (2 sts increased).
- Row 2 (WS): k2, p to last 2 sts, sl2.
- Row 3: k2, yo, k to last 2 sts, yo, sl2 (2 sts increased).
- Row 4: k2, p to last 2 sts, sl2.
Repeat rows 1–4 16 more times or until you reach your desired length.
The four rows work together as a repeat. The right-side rows contain the increases and eyelet activity, while the wrong-side rows provide the straightforward purling across the center and preserve the two-stitch edge treatment.

How to Read the Eyelet Repeat Without Losing Your Place
The main repeat is easier to manage if you treat each four-row sequence as one complete unit. Rather than thinking about the entire bandana as one long list of rows, mark each completed group of four.
Row 1 is a right-side row and contains the internal k2tog and yo sequence. Row 2 is worked on the wrong side. Row 3 is another right-side increase row. Row 4 is the second wrong-side row.
The source specifies that the repeat is worked 16 more times or until the desired length is reached. If you are working toward the stated finished dimensions, use the measuring information as your final reference rather than assuming that a particular row count automatically guarantees the finished measurement.
For a modified size, the pattern itself allows repeats to be added or subtracted. The key is to make the adjustment through the repeat structure rather than randomly changing individual rows. This preserves the rhythm of the stitch pattern.
Check the Fabric as You Work
Counting stitches is only one way to monitor progress. Look at the fabric itself as well. The eyelets should appear as part of a consistent staggered design, and the two-stitch borders should remain visually distinct from the center pattern.
If one eyelet appears unexpectedly crowded or a decrease seems to have shifted the texture, stop and compare the row you are working against the exact written instruction. The pattern combines k2tog and yarnovers, so an accidental omission or addition can affect both the decorative pattern and the stitch count.
On wrong-side rows, the center is worked in purl stitches up to the final two stitches. These rows are comparatively simple, which makes them useful opportunities to verify the edge stitches before turning to the next right-side row.
Reaching the Desired Bandana Length
Continue the four-row repeat until you have worked the required number of repeats or reached your desired length. The original instructions state: repeat rows 1–4 16 more times or until you reach your desired length.
When the body is complete, break the yarn while leaving a 10cm (4″) long tail. Set the bandana aside with the stitches remaining on the needle as they are.
Do not discard or bind off the live bandana stitches at this point. They are needed for the i-cord edging connection.
Making the First I-Cord Tie
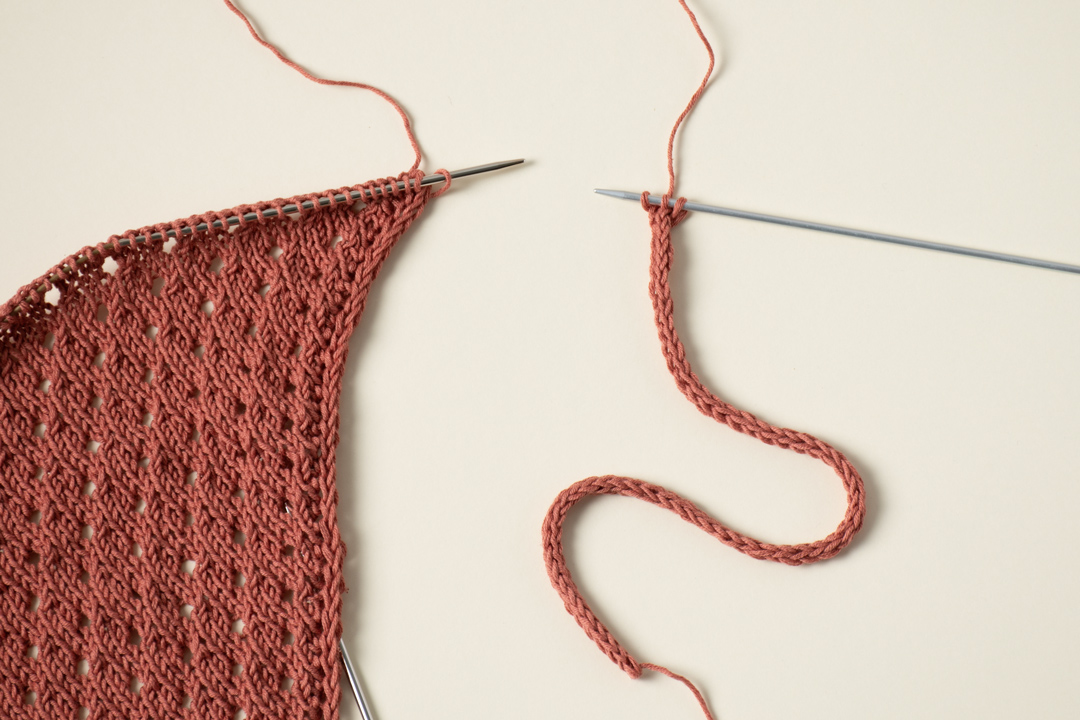
The ties are made separately using a three-stitch i-cord. For this part, use the pair of 3mm (US 2.5) DPNs.
Cast on 3 stitches, do not turn.
Then work the following sequence:
*Slip the 3 stitches to the right side of the needle. Knit 3.*
Continue working the i-cord until the tube measures approximately 30 cm. Do not cut the yarn.
Leaving the yarn attached is essential because the next stage uses these three live i-cord stitches to connect the tie directly to the live stitches of the bandana.
Connecting the Tie to the Bandana
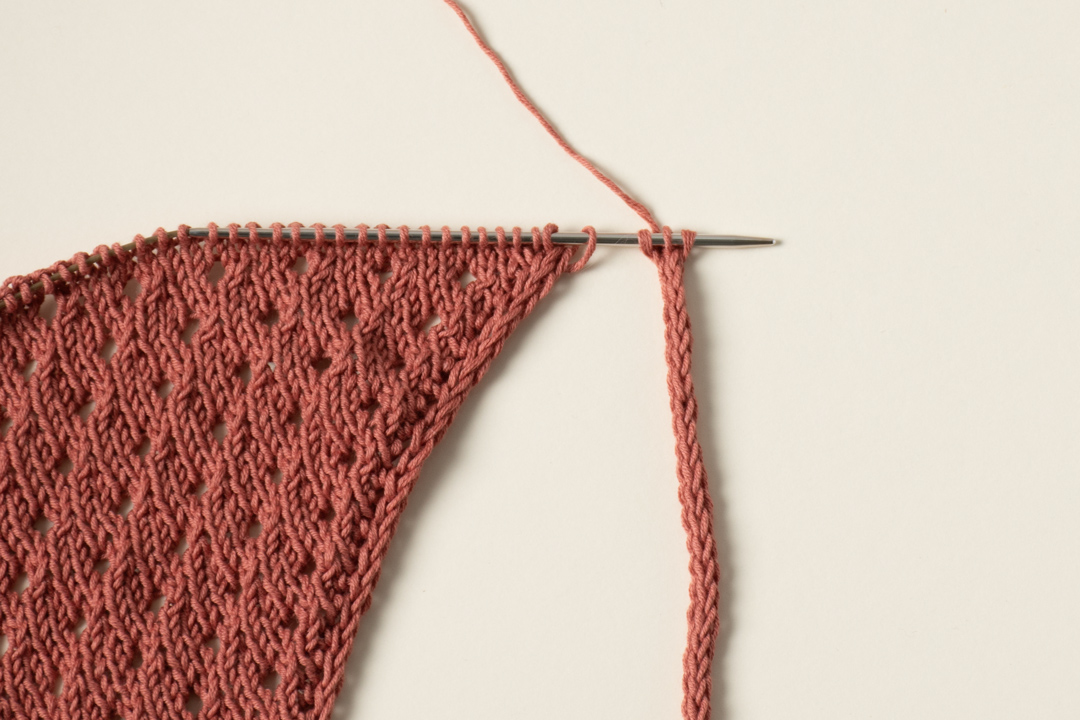
This is the construction stage where the separate pieces become one continuous accessory. Bring the three i-cord stitches to the needle while holding the live bandana stitches.
The first connection is:
Knit the first two i-cord stitches, ssk (knit last i-cord stitch together with first bandana stitch).
After this, transfer the first three stitches to the needle while holding the live bandana stitches.
Continue with the following sequence:
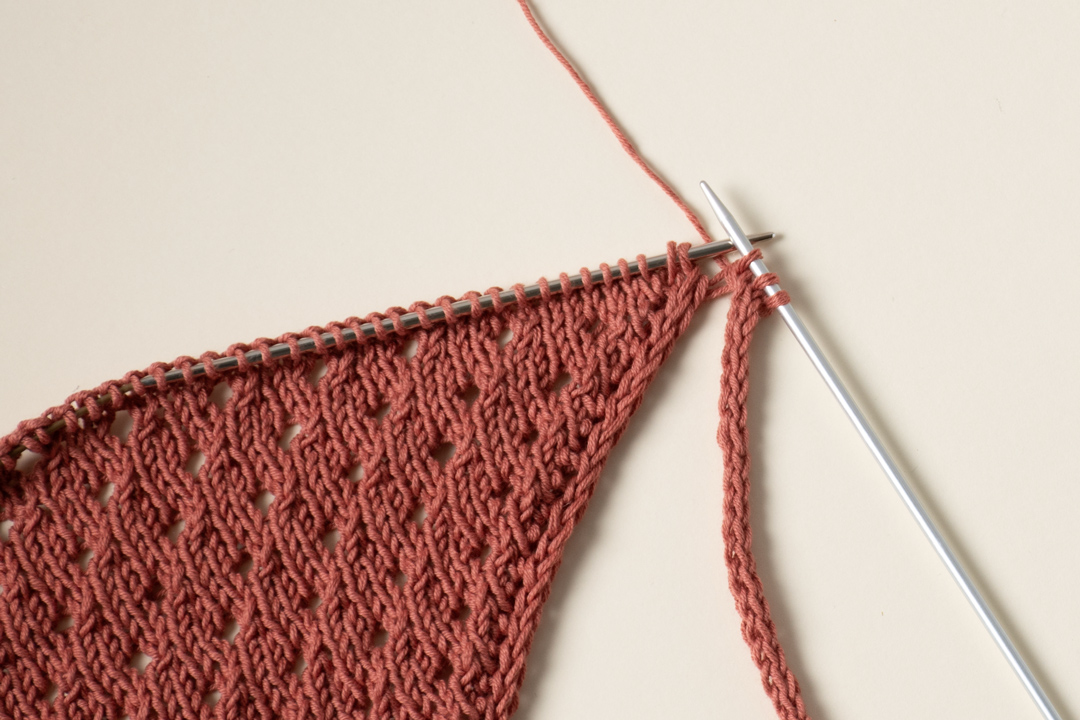
*k2, ssk, transfer 3 stitches to the needle, holding the live bandana stitches*, until 3 stitches left.
The ssk is the joining mechanism. It consumes the last stitch of the i-cord together with the next live stitch of the bandana. Repeating the process gradually works across the edge while maintaining a three-stitch i-cord structure.
A Useful Way to Think About the I-Cord Edging
The edging may initially look complicated because you are managing stitches from two sections at once. It becomes easier if you focus on the repeating three-part rhythm: knit two i-cord stitches, work the joining ssk, then transfer the three stitches back to the needle while keeping the live bandana stitches available.
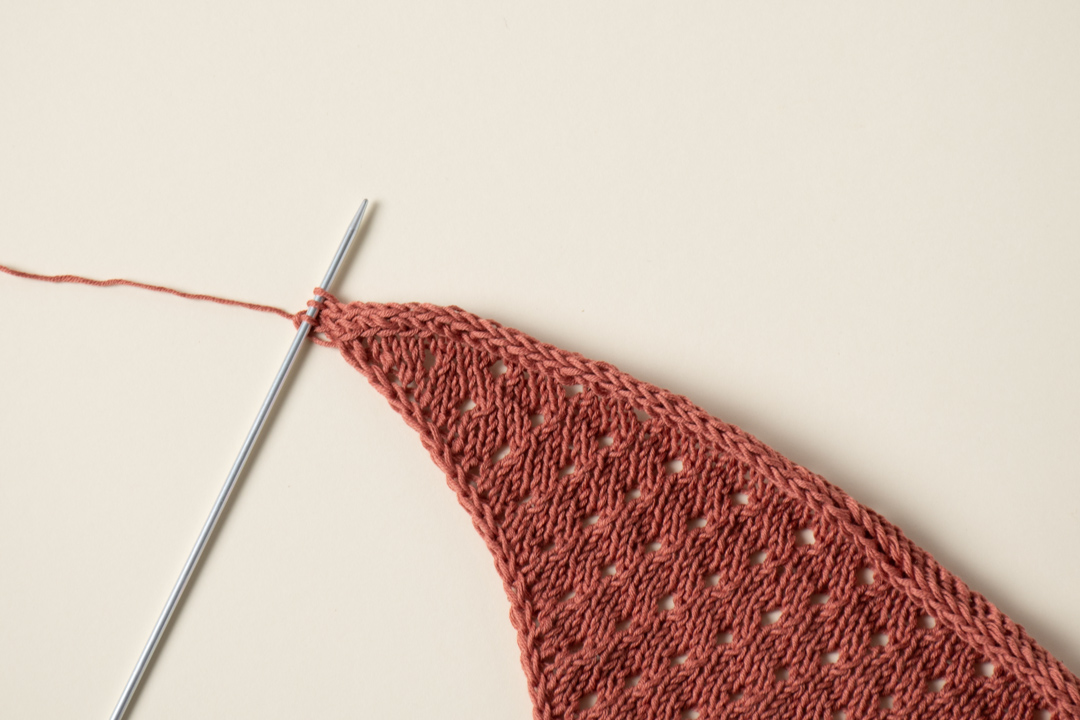
The important checkpoint is the instruction to continue until only 3 stitches are left. Those remaining stitches form the foundation for the second tie.
Do not rush this section. The neatness of the finished bandana depends heavily on the consistency of this edge. Keep the tension controlled without pulling the i-cord too tightly against the bandana.
Beginning the Second Tie
When the edging reaches the point where three stitches remain, begin the second i-cord tie using the same basic method as the first.
Work:
*Slip the 3 stitches to the right side of the needle. Knit 3.*
Continue until the tube measures approximately 30 cm.
Unlike the first tie, this time the construction ends with a bind-off. Bind off, cut the yarn, and weave in the tails.
Keeping Both Ties Consistent
Since each tie is intended to measure approximately 30 cm, use the measuring tape rather than relying only on visual comparison. The first tie is measured before joining it to the bandana, while the second is measured before binding off.
A simple practical habit is to measure each tie in the same relaxed condition. Avoid stretching one tie significantly while measuring and leaving the other unstretched. Consistent measuring makes the finished accessory easier to balance visually.
Understanding the Finished Shape
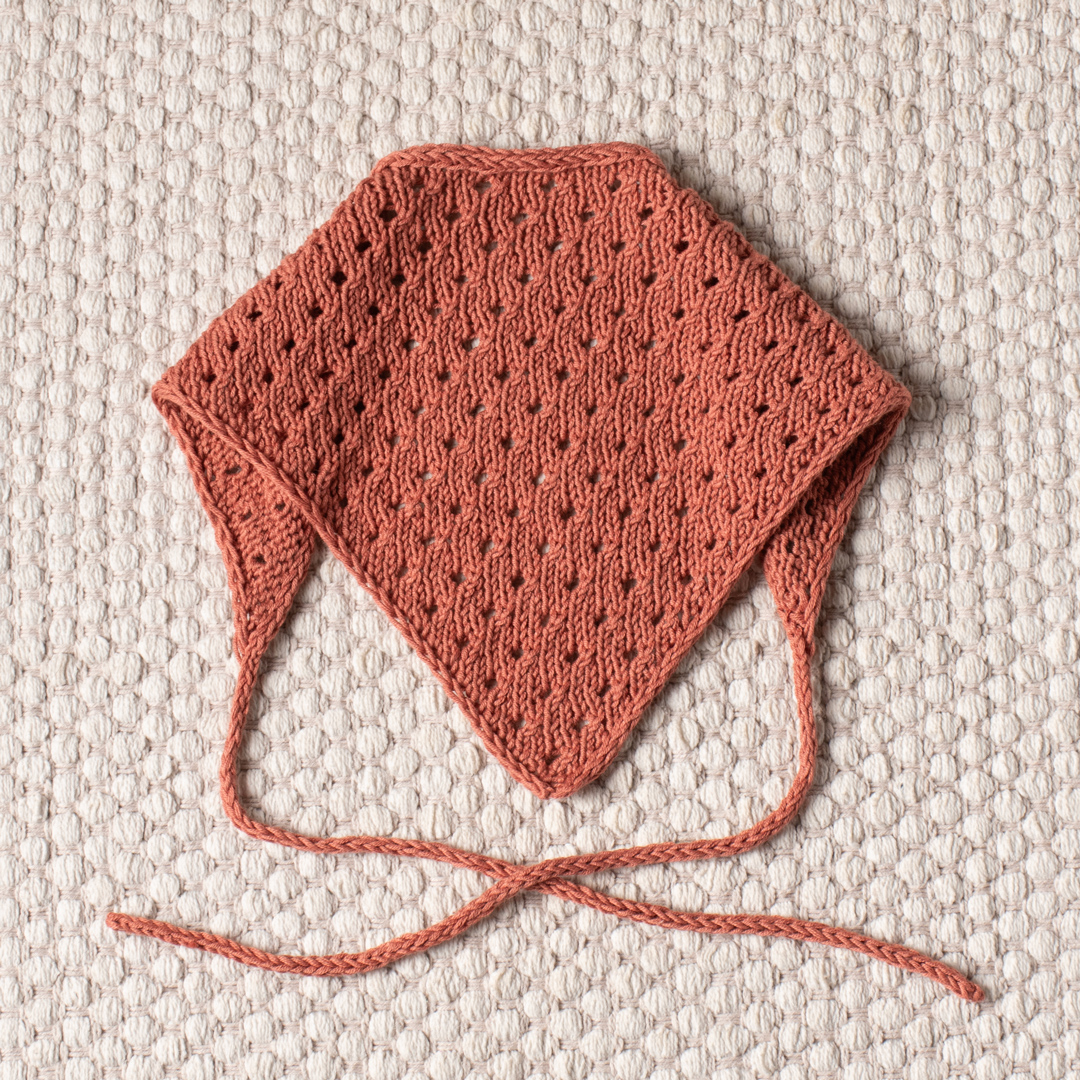
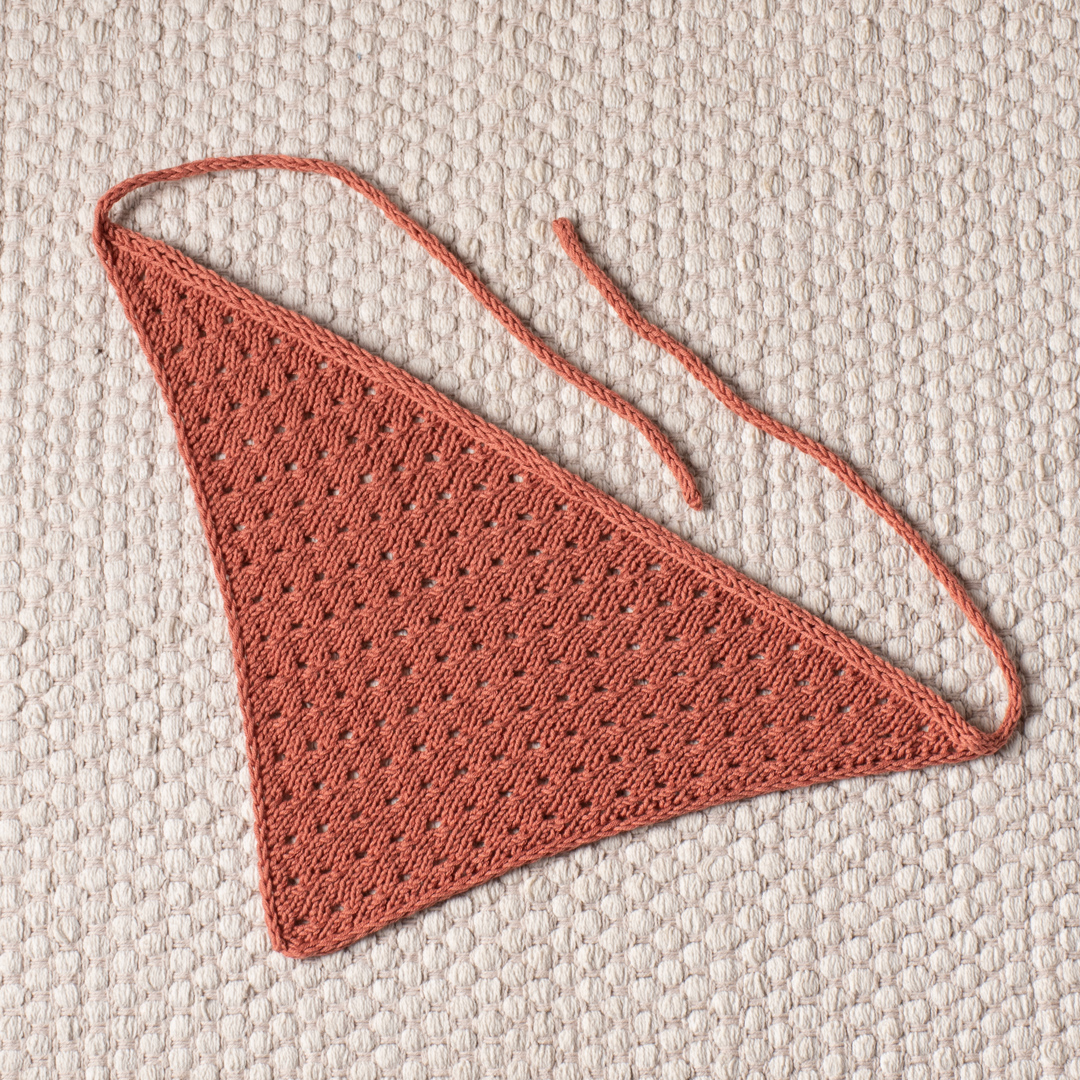
The final bandana has a triangular main body with a finished length without ties of 42cm / 16.5in and a height of 22cm / 8.75in. The ties extend from the two sides and provide the method for securing the accessory.
The shape is produced entirely through the knitting construction: a four-stitch beginning grows through increases, the eyelet pattern continues through repeated rows, and the edge is integrated into the final construction through the i-cord technique.
This makes the project useful as a compact study of how shaping, lace-like texture, and finishing can be combined without requiring a complicated overall silhouette.
Gauge and Finished Measurements
The specified gauge is 24 stitches x 32 rows over 10 x 10 cm (4 x 4in) in stockinette stitch after blocking.
Gauge is not the same thing as the final measurement of the bandana, but it provides the pattern’s stated reference for yarn and needle behavior. The finished measurements are given as 42cm / 16.5in in length without ties and 22cm / 8.75in in height.
Because the gauge is specified after blocking, the final evaluation of the fabric should also take blocking into account. If the accessory is being made for a particular size, measuring the blocked fabric is more meaningful than judging the dimensions of the unblocked piece alone.
Beginner Checkpoints That Prevent Common Mistakes
- Confirm that the cast-on begins with exactly 4 stitches.
- Use the stitch counts after Rows 2, 4, 6, 8, and 10 as checkpoints during the set-up section.
- Remember that the first 2 stitches are knitted on every row.
- Remember that the final 2 stitches are slipped with yarn in front on every row.
- Do not tighten the edge stitches.
- On Pattern Row 1, follow the complete k2tog and yo sequence between the specified edge stitches.
- Remember that Pattern Rows 1 and 3 each increase by 2 stitches.
- Track the four-row repeat rather than treating every row as unrelated.
- When the body is finished, leave the 10cm (4″) yarn tail specified by the pattern.
- Keep the live bandana stitches on the needle for the i-cord edging stage.
- Measure each i-cord tie to approximately 30 cm.
- Do not cut the yarn after completing the first tie because it is immediately used for the joining stage.
- Bind off and weave in tails only after completing the second tie.
Troubleshooting the Eyelet Pattern
The Stitch Count Is Wrong
Start by checking the most recent increase row. The pattern’s right-side increase rows are clearly identified as increasing by 2 stitches. If your count is incorrect, compare each yarnover and decrease in the row rather than immediately changing the next row to compensate.
The Edge Looks Tight
Review the instruction that the edge stitches should not be tightened. The first two stitches are knitted and the final two are slipped with yarn in front. Allow these stitches to remain relaxed.
The Eyelets Do Not Look Staggered
Check that the k2tog and yo sequence in Pattern Row 1 has been followed exactly. Also check that Pattern Row 3 contains the specified yarnovers at the beginning and end of the central section. Because the eyelets depend on the relationship between yarnovers and decreases, a missed operation can disturb the visual rhythm.
The I-Cord Join Feels Confusing
Slow down and isolate the three-stitch i-cord. The key movement is k2 followed by ssk, with the ssk combining the last i-cord stitch with the next live bandana stitch. Then transfer the three stitches back to the needle while holding the live bandana stitches.
The Ties Are Different Lengths
Measure both ties rather than judging them by eye. Each is worked until the tube measures approximately 30 cm.
A Practical Finishing Checklist
- Confirm the bandana body has reached the desired length.
- Break the yarn after the body, leaving a 10cm (4″) tail.
- Keep the live bandana stitches on the needle.
- Make the first three-stitch i-cord.
- Measure it to approximately 30 cm.
- Do not cut the yarn after the first tie.
- Connect the i-cord to the bandana using the specified ssk construction.
- Continue until 3 stitches remain.
- Work the second i-cord to approximately 30 cm.
- Bind off.
- Cut the yarn.
- Weave in the tails.
- Block the finished bandana and evaluate the stated finished measurements after blocking.
Quick Technical Reference
- Cast on: 4 stitches
- Set-up: Rows 1–11
- Set-up stitch checkpoints: 5, 7, 9, 11, and 13 stitches after Rows 2, 4, 6, 8, and 10 respectively
- Main repeat: Rows 1–4
- Main repeat: 16 more times or until desired length
- Body finishing tail: 10cm (4″)
- First i-cord: 3 stitches, approximately 30 cm
- Joining: k2, ssk, transfer 3 stitches, holding live bandana stitches
- Join until: 3 stitches remain
- Second i-cord: 3 stitches, approximately 30 cm
- Finished length without ties: 42cm / 16.5in
- Finished height: 22cm / 8.75in
- Gauge: 24 stitches x 32 rows in stockinette stitch over 10 x 10 cm (4 x 4in), after blocking
Frequently Asked Questions
Is this a one-size pattern?
Yes. The source lists the bandana as one size, with finished measurements of 42cm / 16.5in in length without ties and 22cm / 8.75in in height.
Can the size be changed?
Yes. The source notes that the size can be modified by adding or subtracting repeats. The main pattern itself says to repeat Rows 1–4 16 more times or until you reach your desired length.
What yarn is specified?
The pattern uses Drops Safran in red clay, uni color 59, with 1 ball required.
What needle size is used?
The main bandana uses 3mm (US 2.5) knitting needles. A pair of 3mm (US 2.5) DPNs is used for the ties.
Why are the edge stitches handled differently?
The first two stitches of every row are knitted and the last two are slipped with yarn in front to create the i-cord edging. The instructions also specify not to tighten these edge stitches.
How long should the ties be?
Each i-cord tie is worked until it measures approximately 30 cm.
Should the first tie be cut after it reaches 30 cm?
No. The first tie is specifically followed by the i-cord edging connection, so the instructions say not to cut the yarn after the first tie.
When do I bind off?
The second i-cord is worked after the bandana edge has been joined. Once the second tie measures approximately 30 cm, bind off, cut the yarn, and weave in the tails.
Final Thoughts on the Canyon Clay Bandana
The Canyon Clay Bandana is a compact project with a surprisingly useful range of knitting techniques. Its small triangular form gives you a manageable canvas for practicing increases, yarnovers, k2tog, purl rows, i-cord edging, and i-cord ties without requiring an enormous amount of fabric.
The staggered eyelet pattern provides the visual character, while the i-cord treatment gives the accessory a clean finished outline. The construction is especially satisfying because the separate first tie is eventually connected directly to the live stitches of the bandana, allowing the edge to flow naturally into the second tie.
For the most reliable result, focus on the technical checkpoints rather than trying to knit quickly. Begin with the exact four-stitch cast-on, verify the set-up stitch counts, keep the edge stitches relaxed, track the four-row repeat carefully, and preserve the live stitches for the joining stage. When the ties are being made, measure them to approximately 30 cm instead of estimating their length visually.
After the final tie has been bound off and the tails woven in, blocking provides the appropriate finishing stage for evaluating the finished dimensions. The stated gauge and finished measurements are both given with blocking in mind, making it an important part of achieving the intended final appearance.
With its lightweight cotton yarn, triangular silhouette, open eyelet texture, and practical i-cord ties, this bandana is a useful project for knitters who want a small accessory that also reinforces several foundational construction techniques.