
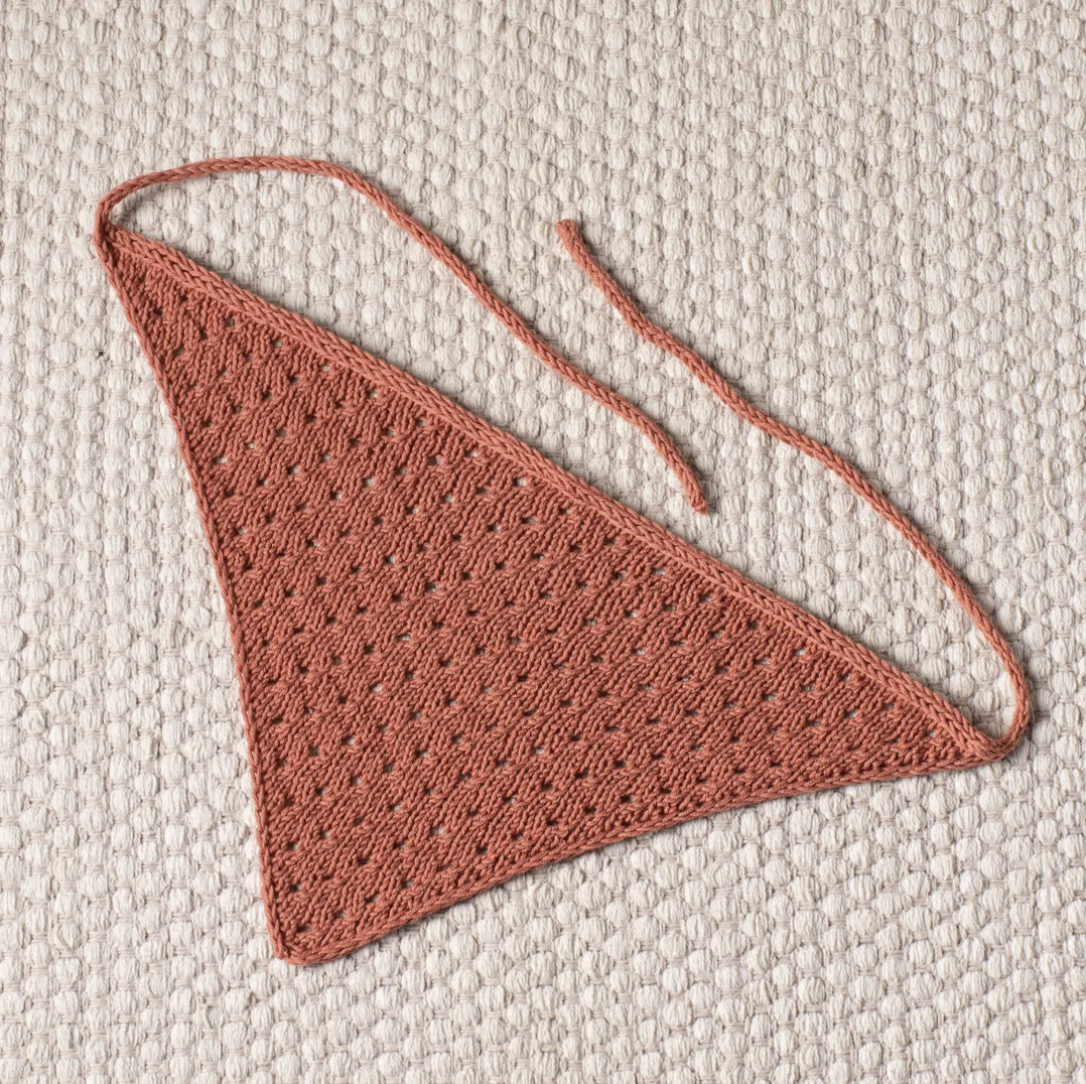
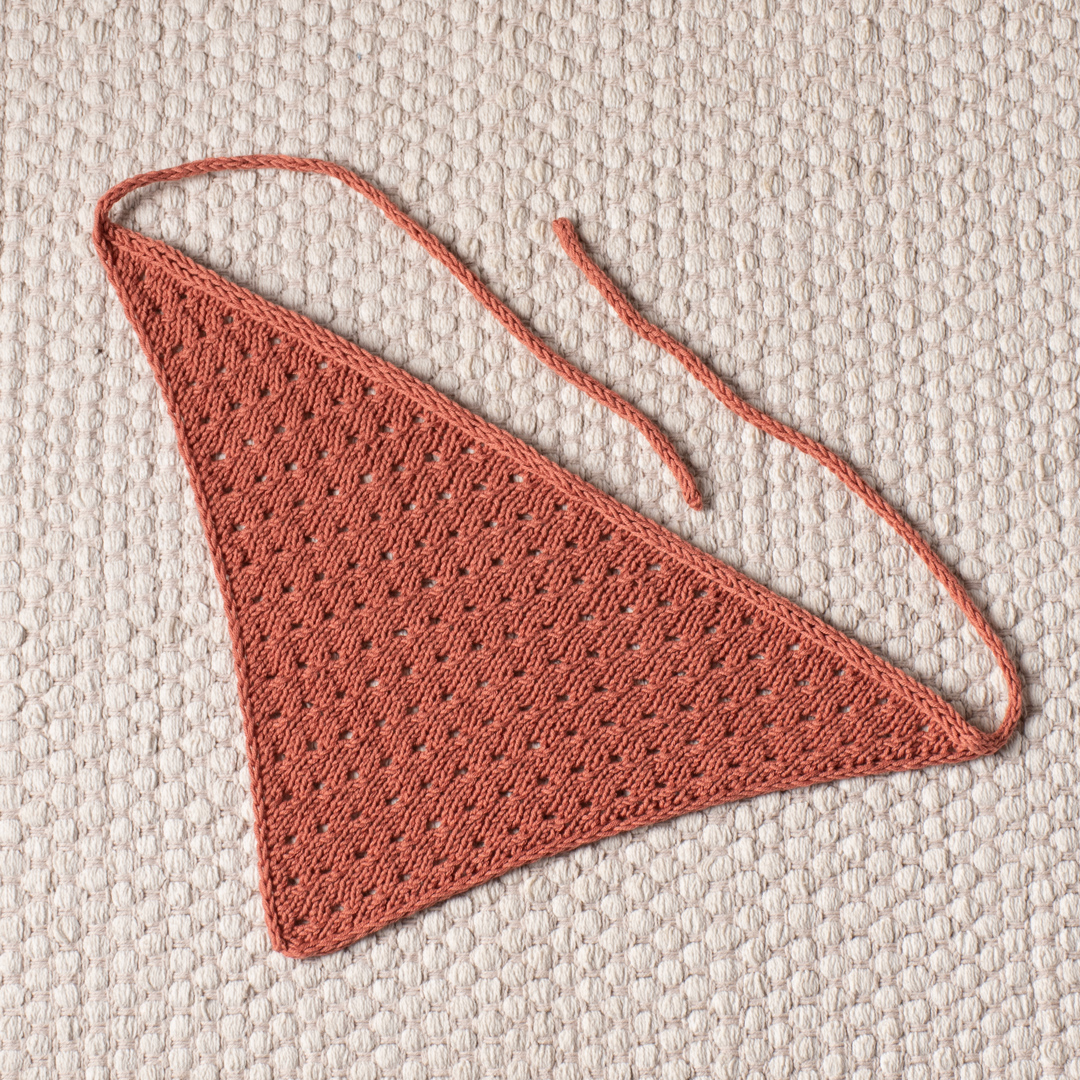
The Canyon Clay Bandana is a beautifully simple knitted accessory with a clever construction. Made from sport-weight cotton yarn, this triangular design combines gradual increases with a staggered eyelet stitch, then finishes with an integrated i-cord border and two narrow i-cord ties. The result is a lightweight piece that can be worn as a warm-weather accessory while also giving knitters an opportunity to practice several useful techniques in one project.
What makes this pattern especially interesting is the way the entire bandana grows from a tiny four-stitch beginning. There is no separate triangular panel followed by a sewn-on border. Instead, the edging is built into the knitting, and the first tie is connected directly to the live stitches of the finished triangle. The second tie then grows naturally from the opposite end of the edging.
This guide presents the pattern as a complete construction journey, with particular attention to the points where it is useful to stop and check your work. The original stitch counts, row numbers, measurements, yarn information, needle sizes, repeat instructions, and i-cord construction are retained exactly so the pattern remains practical to follow.
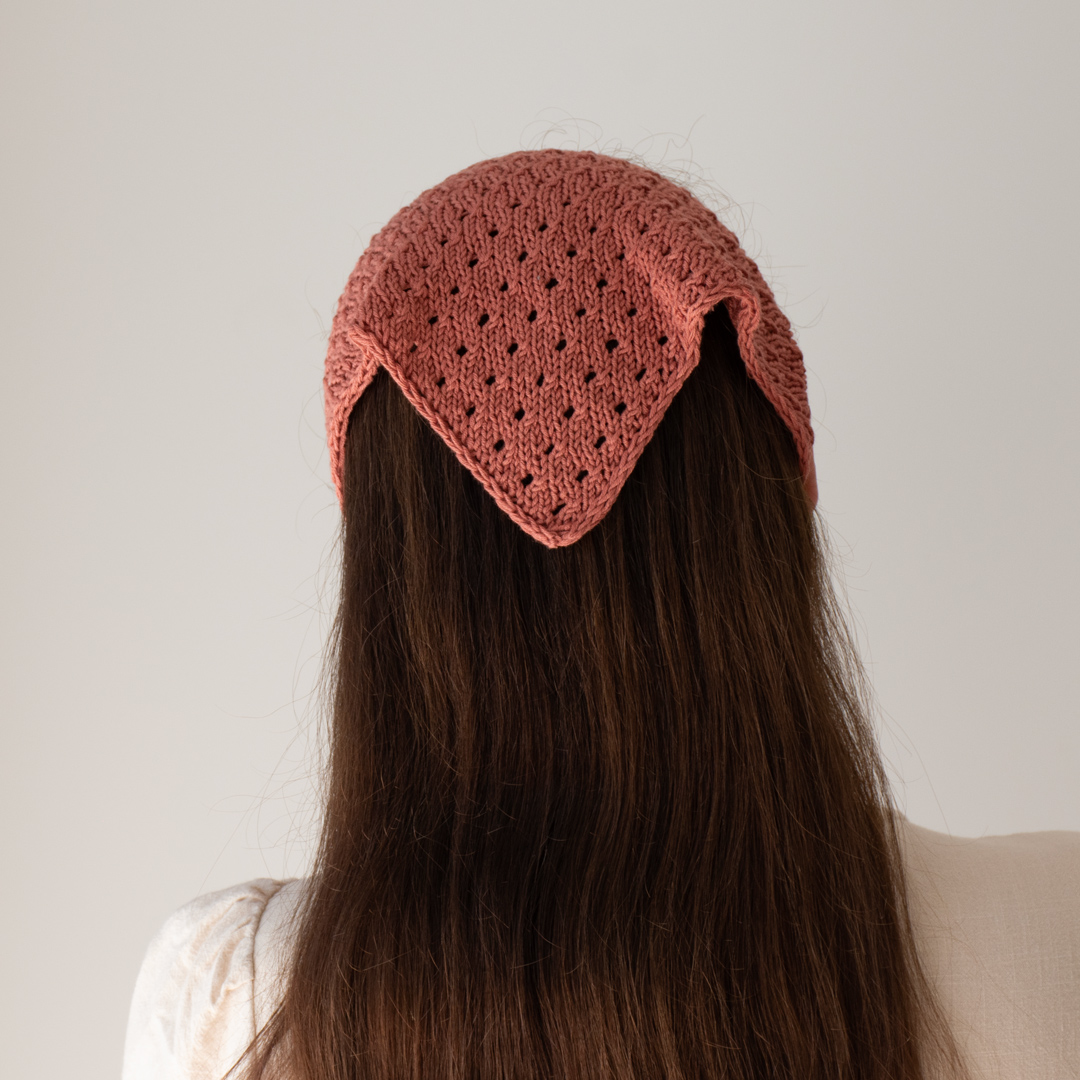
At a Glance: The Canyon Clay Bandana
The original design is written for one size. The main body is worked back and forth, starting from the bottom edge and increasing on the right side. The bandana can also be adjusted in size by adding or subtracting repeats, according to the original pattern notes.
- Size: One size
- Finished length without ties: 42cm/ 16.5in.
- Height: 22cm/ 8.75in.
- Gauge: 10 x 10 cm (4x4in) = 24 sts x 32 rows in stockinette stitch after blocking.
- Yarn: Drops Safran in the color red clay (uni color 59), 1 ball.
- Main needles: 3mm (US 2.5) knitting needles.
- Tie needles: A pair of 3mm (US 2.5) DPNs.
- Notions: Tapestry needle, measuring tape, and scissors.
What You Will Need Before Casting On
Yarn
The specified yarn is Drops Safran in the color red clay (uni color 59), with one ball required. This sport-weight cotton yarn is the yarn named in the original design, and its red clay shade gives the finished accessory its distinctive earthy appearance.
When working from the original specifications, keeping the yarn weight and gauge in mind is useful. The stated gauge is measured after blocking, so it is the post-blocking fabric that corresponds to the official gauge information.
Needles
The main triangular bandana is worked with 3mm (US 2.5) knitting needles. A pair of 3mm (US 2.5) DPNs is used for the i-cord ties.
Notions
- Tapestry needle
- Measuring tape
- Scissors
Abbreviations to Know
The written instructions use a small collection of standard knitting abbreviations. Having them nearby can make the longer pattern sections easier to follow.
- k – knit.
- k2tog – knit 2 stitches together.
- p – purl.
- RS – right side.
- sl – slip stitch as if to purl with yarn in front.
- ssk – slip 1 stitch knitwise, slip the next stitch knitwise, return the 2 stitches back to the left needle, knit those 2 stitches together through the back loops.
- WS – wrong side.
- yo – yarn over.
- *-* – repeat the instructions in between the asterisks the number of times specified.
The Edge Technique to Remember Throughout the Project
Before getting into the individual rows, there is one construction rule worth memorizing. The first and last two stitches form the i-cord edging.
The first two stitches of every row are knitted. The final two stitches of every row are slipped as if to purl with yarn in front. The original pattern specifically states: Don’t tighten the edge stitches.
This instruction applies throughout the main triangular section. The edge stitches are not simply ordinary stitches that happen to be at the beginning and end of the row. They are part of the finishing structure that gives the bandana its clean border.
Beginning with Only Four Stitches
The entire triangular body starts with a very small cast-on.
Cast on 4 stitches.
From this point, the set-up rows establish the initial increase rhythm. The stitch counts are particularly helpful here because the bandana is still small enough that an error can be corrected before it becomes buried in a much larger section.
Set-Up Rows: Building the Foundation
Work the following rows exactly as written.
- Row 1 (WS): k2, sl2.
- Row 2 (RS): k2, yo, sl2 (5sts).
- Row 3: k2, p1, sl2.
- Row 4: k2, yo, k1, yo, sl2 (7sts).
- Row 5: k2, p to last 2 sts, sl2.
- Row 6: k2, yo, k3, yo, sl2 (9sts).
- Row 7: k2, p to last 2 sts, sl2.
- Row 8: k2, yo, k1, k2tog, yo, k2, yo, sl2 (11sts).
- Row 9: k2, p to last 2 sts, sl2.
- Row 10: k2, yo, k to last 2 sts, yo, sl2 (13sts).
- Row 11: k2, p to last 2 sts, sl2.
Your First Stitch-Count Checkpoints
The set-up section provides five useful stitch-count checkpoints. These counts should be treated as progress markers rather than optional information.
- Row 2: 5sts
- Row 4: 7sts
- Row 6: 9sts
- Row 8: 11sts
- Row 10: 13sts
The progression is deliberately easy to recognize: the stitch count rises by two after each specified increase row. If you reach one of these checkpoints and the number is different, it is worth checking the preceding increase row before moving forward.
Rows 5, 7, 9, and 11 provide the wrong-side return. Their repeated structure also reinforces the importance of keeping the two edge stitches separate from the central fabric.
Moving Into the Main Pattern
Once Row 11 is complete, the bandana moves into the main four-row pattern repeat. This is where the staggered eyelet stitch becomes the dominant feature of the fabric.
The design uses yarnovers and right-leaning decreases to create the eyelets. The pattern is written rather than charted, so each row can be followed directly from the instructions below.
Main Pattern: Row 1
Row 1 (RS): k2, yo, k1, *k2tog, yo, k2* to last 2 sts, yo, sl2 (2 sts increased).
The asterisks identify the repeated section. Work the instructions between them repeatedly until you reach the final two stitches. The row then finishes with a yo followed by the two-stitch i-cord edge.
This is the row where the relationship between the decrease and yarnover creates the recognizable eyelet structure.
Main Pattern: Row 2
Row 2 (WS): k2, p to last 2 sts, sl2.
The wrong-side return is straightforward. Keep the two edge stitches intact, purl the center, and slip the final two stitches with yarn in front.
Main Pattern: Row 3
Row 3: k2, yo, k to last 2 sts, yo, sl2 (2 sts increased).
This row continues the triangular shaping. The yarnovers near both sides of the central section increase the stitch count by two.
Main Pattern: Row 4
Row 4: k2, p to last 2 sts, sl2.
After this row, begin the next four-row repeat.
Repeat rows 1-4 16 more times or until you reach your desired length.
How the Four-Row Repeat Works
It is useful to think of the main pattern as two different kinds of rows alternating with each other.
- Row 1: decorative eyelet shaping and 2-stitch increase.
- Row 2: wrong-side purl return.
- Row 3: 2-stitch increase.
- Row 4: wrong-side purl return.
This rhythm remains the same throughout the main body. The fabric gets wider while the eyelet design develops across the center.
If you are keeping track manually, completing one full group of Rows 1-4 is a useful milestone. You can then begin counting the next group rather than trying to remember your position in a long uninterrupted sequence.
Understanding the Eyelet Formation
The staggered eyelet effect is produced by combining yarnovers with decreases. The k2tog in Pattern Row 1 removes one stitch while the yo adds one stitch. This allows the decorative opening to form without disrupting the overall shaping sequence.
Because the pattern also includes yarnovers at the outer portions of the increase rows, the entire triangle continues to expand. The decorative holes therefore become part of a larger shaping structure rather than being added as a separate motif.
When checking the fabric visually, look for the eyelets developing in a staggered arrangement. If an opening appears in an unexpected location, compare the current Pattern Row 1 with the written sequence before assuming that the fabric itself is incorrect.
A Better Way to Track Repeats
For a project with repeated four-row sections, a small tracking system can prevent confusion. After completing each group of four rows, mark the completed repeat on paper or in your preferred knitting notes.
The original pattern requires the four-row sequence to be repeated 16 more times, or until the desired length is reached. You do not need to change the instructions inside the repeat when adjusting the size. The adjustment comes from changing the number of repeats.
This means the core construction remains stable even if the finished length changes.
Checking the Fabric Before Finishing the Triangle
As the triangle grows, periodically look at three things: the edge, the eyelets, and the overall direction of the shaping.
The edge should remain neat because the first two stitches are knitted and the final two stitches are slipped with yarn in front. The eyelets should follow the staggered pattern created by the written instructions. Finally, the body should continue widening as the right-side increases are worked.
If one of these features suddenly changes, it is better to investigate immediately than to continue through several additional repeats.
Completing the Main Triangle
Continue repeating Rows 1-4 16 more times or until you reach your desired length.
When the main triangular section is complete, the next step is different from the end of many conventional flat knitting projects. You do not bind off the live stitches.
Break the yarn, leaving a 10cm (4″) long tail.
Set the bandana aside, leaving the stitches on the needle as is.
Keeping these live stitches available is essential because they will be incorporated into the i-cord edging. If they were bound off at this stage, the specified joining method could not be followed.
Transitioning From the Triangle to the First Tie
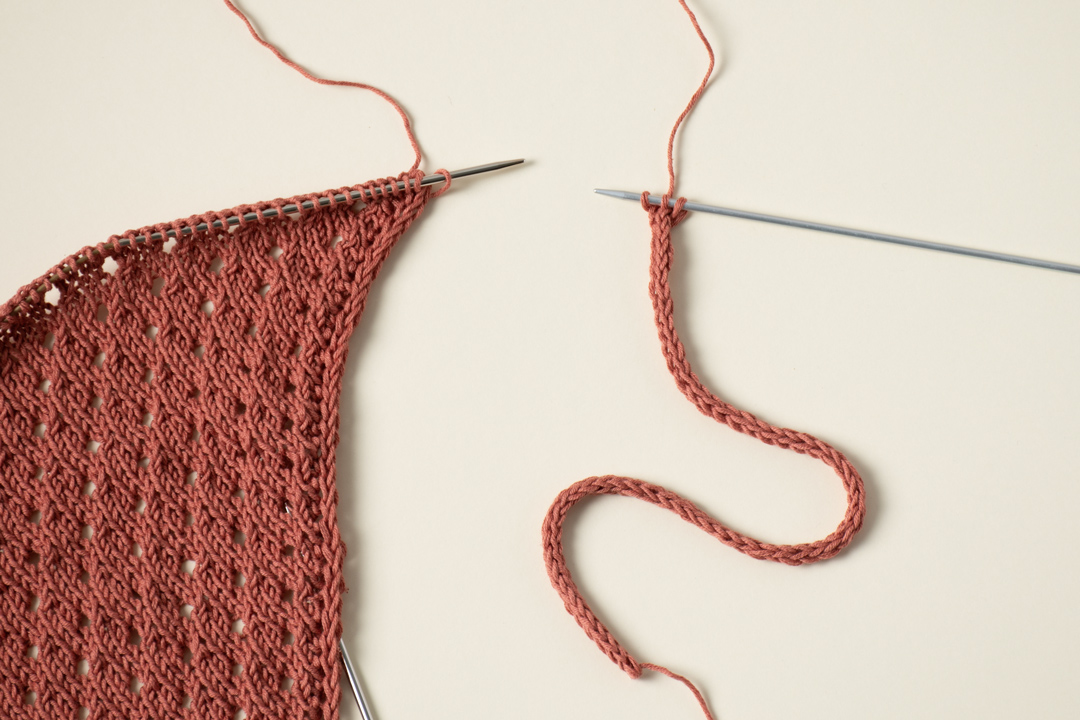
The first i-cord tie is worked separately using the pair of 3mm (US 2.5) DPNs.
Cast on 3 stitches, do not turn.
Then repeat:
*Slip the 3 stitches to the right side of the needle. Knit 3.*
Continue until the i-cord tube measures approximately 30 cm.
At this point, do not cut the yarn.
Why You Do Not Turn an I-Cord
The i-cord instructions may feel unfamiliar if you normally work flat knitting. In ordinary flat knitting, you would reach the end of a row and turn the work. Here, the three stitches remain in the same working direction. Instead, they are slipped to the other side of the needle and knitted again.
The repeated movement allows the fabric to curl around itself and form a narrow tube. Since the tie is only three stitches wide, maintaining this sequence consistently is the key to producing the intended cord.
Connecting the First I-Cord to the Bandana
Once the first tie measures approximately 30 cm, the separate pieces are brought together.
Transfer the 3 i-cord stitches to the needle, holding the live bandana stitches.
Then knit the first two i-cord stitches.
Next, work an ssk, knitting the last i-cord stitch together with the first bandana stitch.
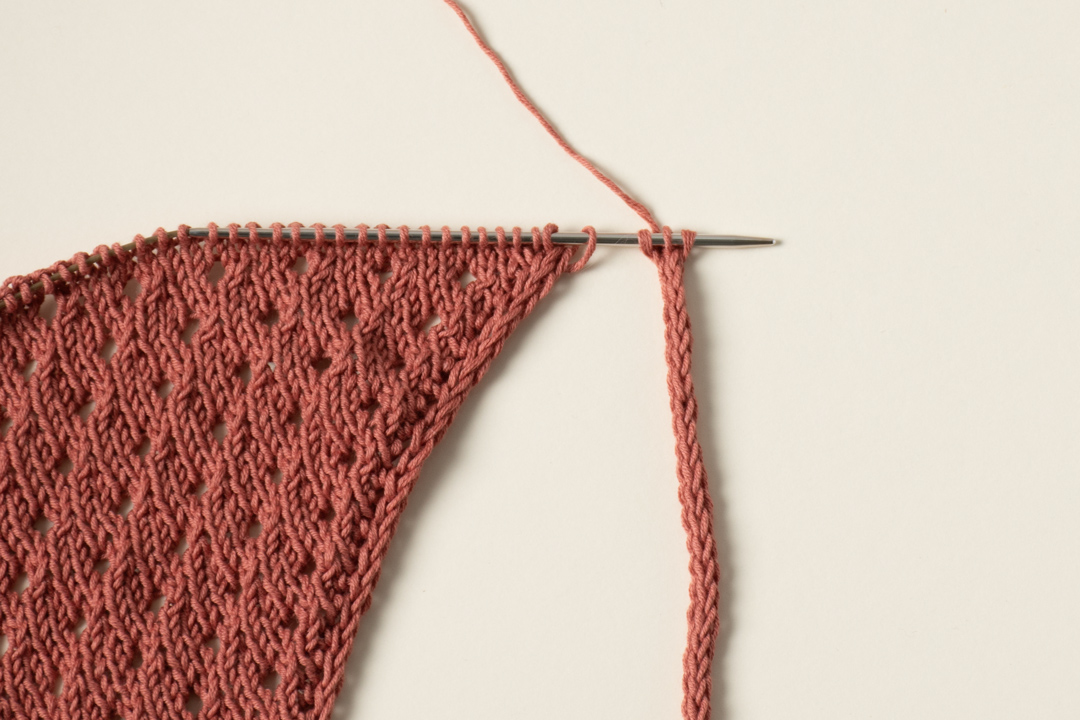
The ssk at this stage is not part of the staggered eyelet pattern. It has a different purpose: it attaches the i-cord edging to the live edge of the bandana.
The First Edging Checkpoint
After the first joining step, transfer the first three stitches to the needle while holding the live bandana stitches.
Then begin the repeated edging sequence:
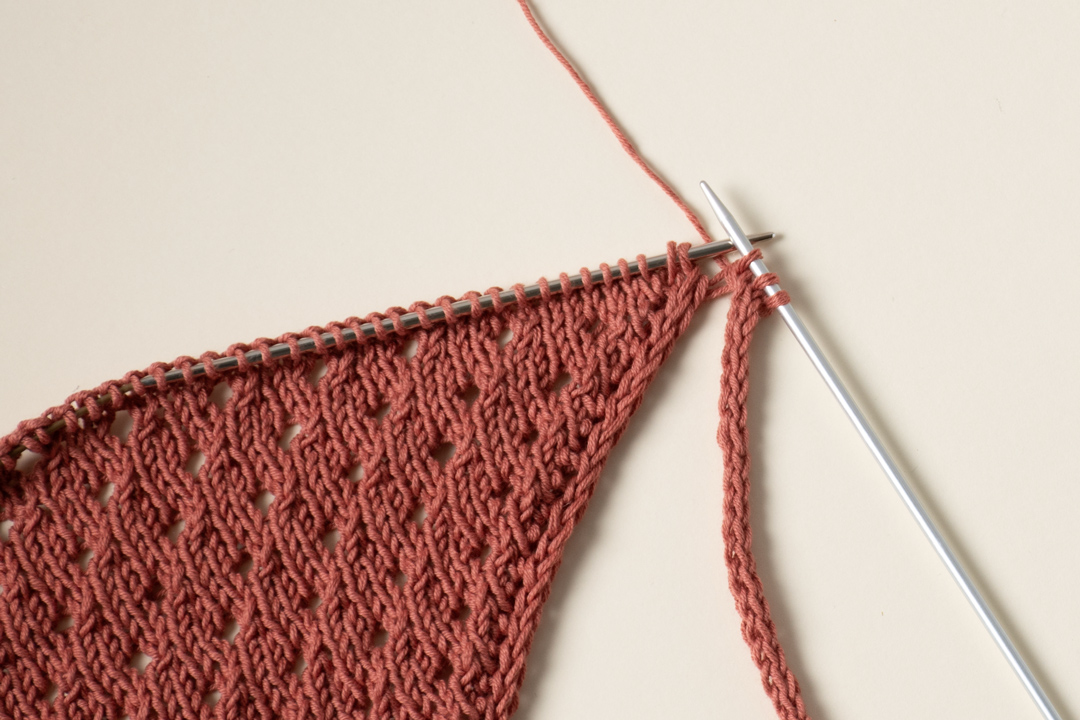
*k2, ssk, transfer 3 stitches to the needle, holding the live bandana stitches*
Repeat this sequence until you have 3 stitches left.
This is a stage where working slowly can make a significant difference. The process involves knitting two stitches, joining the next bandana stitch with an ssk, and then transferring the three i-cord stitches again. The sequence is repeated across the live stitches.
Watching the Edging Develop
As the repeated edging sequence progresses, the border becomes increasingly visible. The i-cord forms a narrow raised edge while the original live stitches are gradually incorporated into it.
The transfer step is just as important as the knitting step. The pattern repeatedly instructs you to transfer the three stitches to the needle while holding the live bandana stitches. This maintains the three-stitch i-cord structure so it can continue along the edge.
When Only Three Stitches Remain
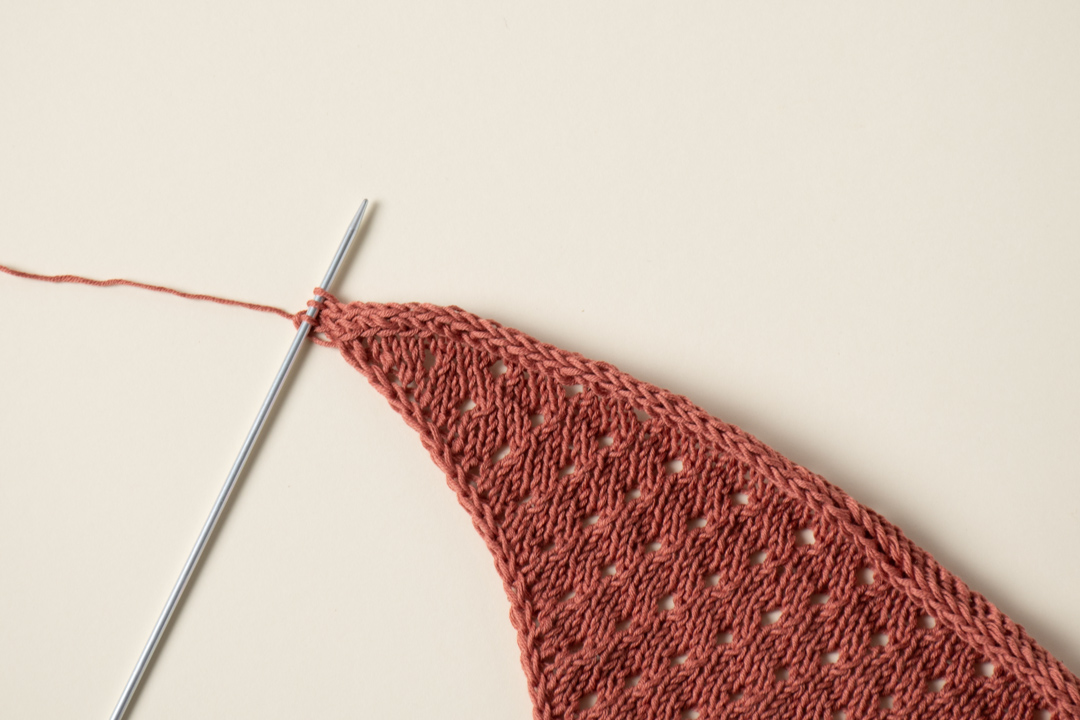
The edging sequence ends when you have 3 stitches left. These three stitches are not discarded because they become the foundation for the second tie.
This is another important construction checkpoint. At the end of the edging, you should recognize that the project has transitioned from a wide triangular fabric to a narrow three-stitch i-cord structure.
Working the Second I-Cord Tie
The second i-cord tie is worked as the first one:
*Slip the 3 stitches to the right side of the needle. Knit 3.*
Continue until the tube measures approximately 30 cm.
The final finishing is different from the first tie. Once the second tie reaches approximately 30 cm, bind off, cut the yarn, and weave in the tails.
How the Whole Construction Fits Together
Viewed as a complete sequence, the Canyon Clay Bandana follows a clear path:
- The project starts with four stitches.
- The set-up rows establish the first triangular increases.
- The main four-row pattern expands the triangle while creating staggered eyelets.
- The main body is stopped at the desired length.
- The yarn is broken with a 10cm (4″) tail, while the live stitches remain on the needle.
- A three-stitch i-cord is worked to approximately 30 cm.
- The i-cord is connected to the live bandana stitches using the specified ssk construction.
- The i-cord edging continues across the bandana.
- When three stitches remain, they become the second i-cord tie.
- The second tie is worked to approximately 30 cm, bound off, and finished.
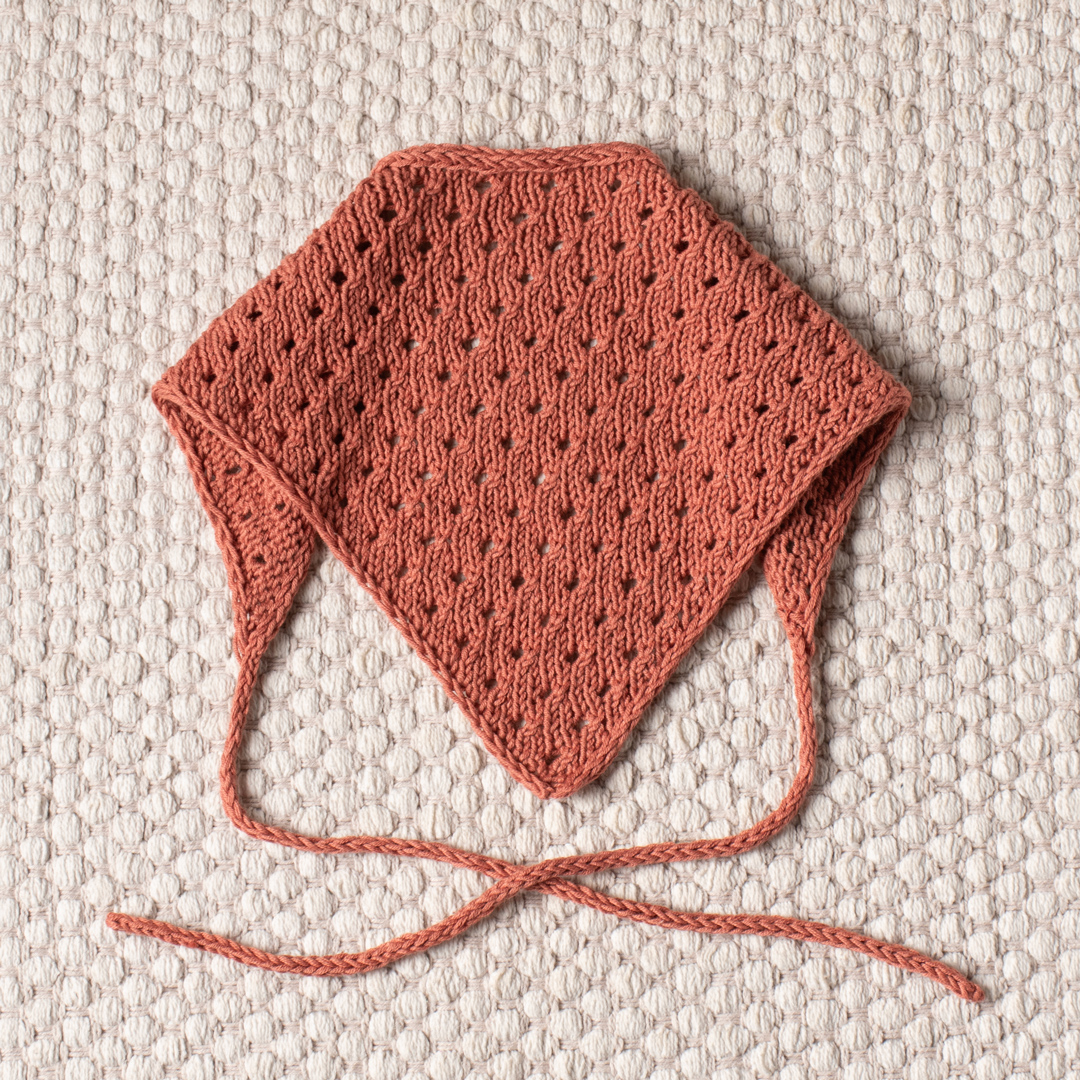
This integrated approach is one of the most interesting aspects of the pattern. The ties and edging are not separate decorative additions; they are structurally connected to the main knitted triangle.
Gauge and Blocking Reference
The official gauge is 10 x 10 cm (4x4in) = 24 sts x 32 rows in stockinette stitch after blocking.
The phrase after blocking is important because the listed gauge refers to the fabric in its blocked state. The finished measurements are also best considered alongside the blocking stage.
The finished measurements are:
- Length without ties: 42cm/ 16.5in.
- Height: 22cm/ 8.75in.
The pattern also provides flexibility by allowing the knitter to add or subtract main-pattern repeats to change the size.
Beginner-Friendly Ways to Avoid Mistakes
Read the Entire Row Before Knitting
For the eyelet row, read through the complete instruction before starting. This helps you recognize where the repeated section begins and where the row returns to the final edge stitches.
Separate Edge Stitches From Pattern Stitches
Mentally treating the first and last two stitches as a permanent border can simplify the main pattern. The center is where most of the decorative activity happens.
Use the Written Stitch Counts
During the set-up section, use the 5sts, 7sts, 9sts, 11sts, and 13sts checkpoints. These are particularly useful if this is your first project involving repeated yarnovers.
Measure the Main Triangle
If you are aiming for the listed finished dimensions, keep a measuring tape nearby. The pattern allows the length to be modified, so measurement can be used alongside repeat counting.
Protect the Live Stitches
When the triangle is finished, do not bind off the stitches. Keep them on the needle exactly as instructed so they are ready for the i-cord edging.
Common Issues and How to Diagnose Them
A Stitch Count Is Incorrect
Start with the most recent increase row. Check each yo and, where applicable, the k2tog. Also verify the first two and final two edge stitches.
The Edge Is Curling or Looking Uneven
Review the i-cord edge instructions. The first two stitches are knitted, the final two are slipped with yarn in front, and the edge stitches should not be tightened.
The Eyelet Pattern Looks Misaligned
Check Pattern Row 1 carefully. The repeated section is *k2tog, yo, k2*, worked to the last two stitches. A misplaced decrease or yarnover can affect the visual arrangement.
The Triangle Is Shorter Than Expected
Check how many complete four-row repeats you have worked. The original pattern calls for repeating Rows 1-4 16 more times or continuing until you reach your desired length.
The I-Cord Is Too Short
Measure the cord with a measuring tape. Each tie should be worked until the tube measures approximately 30 cm.
The First Tie Was Finished Too Early
The first i-cord should not be cut when it reaches approximately 30 cm. The pattern specifically says not to cut the yarn because it is immediately used to join the tie to the live bandana stitches.
Finishing Checklist
Before putting the finished accessory into use, review these points:
- The main triangle has been worked to the desired length.
- The first and last two stitches were treated as the i-cord edge.
- The edge stitches were not tightened.
- The triangular section ended with a 10cm (4″) yarn tail.
- The live stitches remained on the needle.
- The first i-cord was made with 3 stitches.
- The first i-cord measures approximately 30 cm.
- The first tie was joined to the bandana using the specified ssk method.
- The edging was continued until 3 stitches remained.
- The second i-cord was worked from those 3 stitches.
- The second i-cord measures approximately 30 cm.
- The second tie was bound off.
- The yarn tails were woven in.
Quick Reference for the Complete Pattern
Main Body
- Cast on 4 stitches.
- Complete Set-up Rows 1-11.
- Confirm 13sts after Row 10.
- Work Pattern Rows 1-4.
- Repeat rows 1-4 16 more times or until desired length.
- Break yarn, leaving a 10cm (4″) tail.
- Leave live stitches on the needle.
First Tie
- Cast on 3 stitches.
- Do not turn.
- Slip the 3 stitches to the right side of the needle.
- Knit 3.
- Continue until approximately 30 cm.
- Do not cut the yarn.
Edging
- Transfer the 3 i-cord stitches to the needle holding the live bandana stitches.
- Knit the first two i-cord stitches.
- Work ssk, knitting the last i-cord stitch together with the first bandana stitch.
- Transfer the first 3 stitches to the needle while holding the live bandana stitches.
- Repeat *k2, ssk, transfer 3 stitches to the needle, holding the live bandana stitches* until 3 stitches remain.
Second Tie
- Slip the 3 stitches to the right side of the needle.
- Knit 3.
- Continue until approximately 30 cm.
- Bind off.
- Cut the yarn.
- Weave in the tails.
Frequently Asked Questions
What type of yarn is used for the Canyon Clay Bandana?
The original pattern specifies Drops Safran in the color red clay (uni color 59), using one ball.
What needle size do I need?
The main bandana uses 3mm (US 2.5) knitting needles. The ties are worked with a pair of 3mm (US 2.5) DPNs.
What is the finished size?
The pattern is one size. The finished length without ties is 42cm/ 16.5in., and the height is 22cm/ 8.75in.
What is the gauge?
The gauge is 24 stitches x 32 rows in stockinette stitch over 10 x 10 cm (4x4in) after blocking.
How does the bandana increase?
The triangle starts with four stitches and grows through increases on the right side. In the main pattern, Rows 1 and 3 each specify a 2-stitch increase.
How many times is the main pattern repeated?
The instructions say to repeat Rows 1-4 16 more times or until you reach your desired length.
Can the size be modified?
Yes. The pattern notes that you can modify the size by adding or subtracting repeats.
What creates the neat border?
The first and last two stitches of every row form an i-cord edging. The first two stitches are knitted, and the last two are slipped as if to purl with yarn in front.
How long are the ties?
Both i-cord ties are worked until the tube measures approximately 30 cm.
Why are the bandana stitches left live?
The live stitches are needed for the i-cord edging. The first tie is joined to the bandana by working an ssk that combines the last i-cord stitch with the first bandana stitch.
Final Perspective on the Pattern
The Canyon Clay Bandana is a strong example of how a small accessory can combine shaping and finishing techniques into one continuous construction. The project begins with just four stitches and gradually develops into a triangular fabric with a staggered eyelet pattern. Rather than ending the body with a conventional bind-off, the design keeps the live stitches available for the i-cord border.
The first tie provides the starting point for that border. Once its three-stitch tube reaches approximately 30 cm, it is transferred to the needle with the live bandana stitches and joined using an ssk. The same three-stitch structure then travels across the edge until only three stitches remain. Those final stitches become the second tie.
For knitters working this pattern for the first time, the most useful strategy is to treat the project as a series of checkpoints. Begin with the set-up stitch counts, then organize the main section into four-row groups. Keep the two edge stitches visually separate from the center, watch the yarnovers and k2tog carefully, and preserve the live stitches when the triangle is complete.
The result is a lightweight cotton bandana measuring 42cm/ 16.5in. in length without ties and 22cm/ 8.75in. in height when worked to the stated specifications. The approximately 30 cm i-cord ties complete the accessory while the integrated edging provides the neat finish that helps define the design.
With its red clay color, compact construction, decorative eyelets, and practical ties, the Canyon Clay Bandana is a useful project for anyone looking to practice increases, yarnovers, decreases, i-cord techniques, and careful stitch management while creating a wearable handmade accessory.