
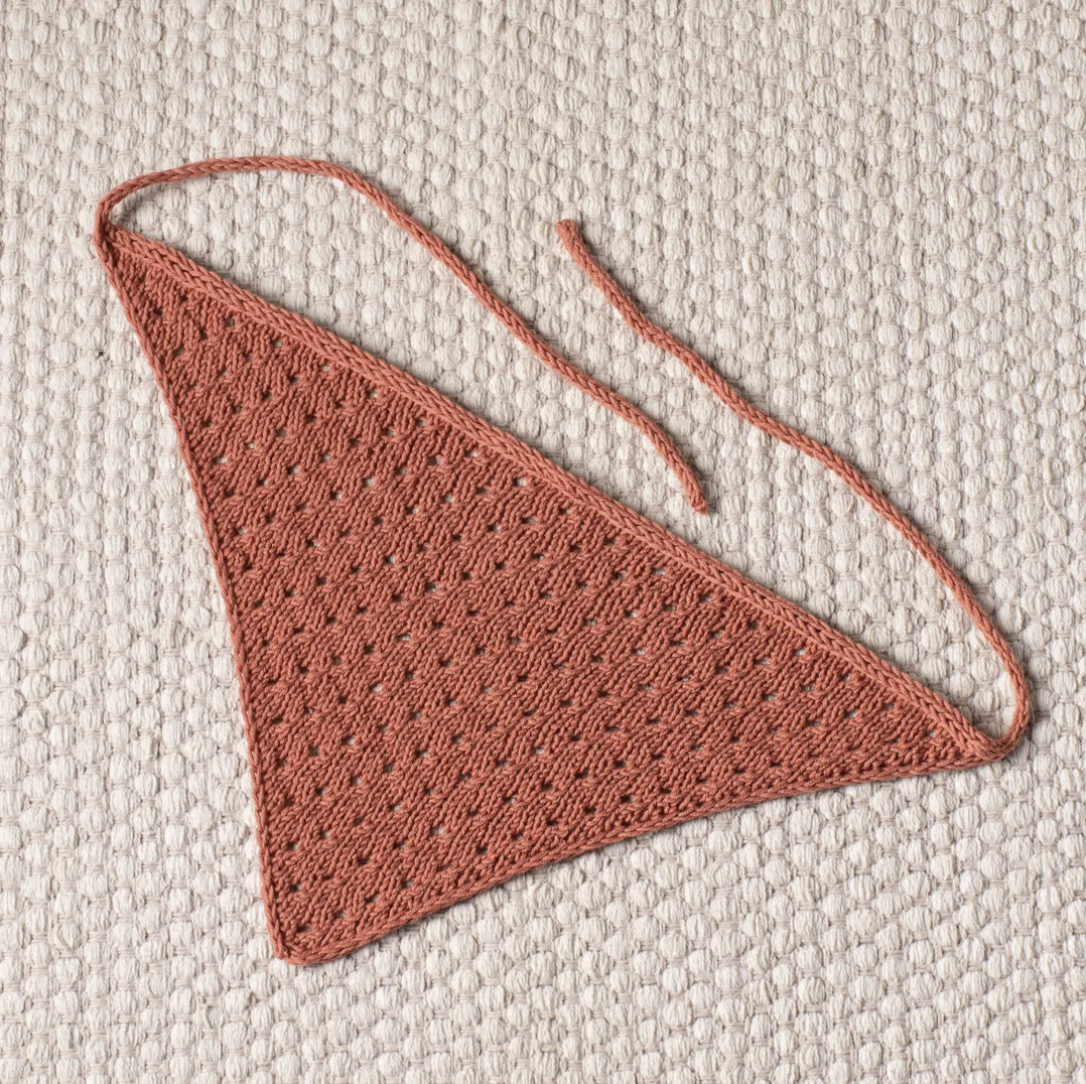
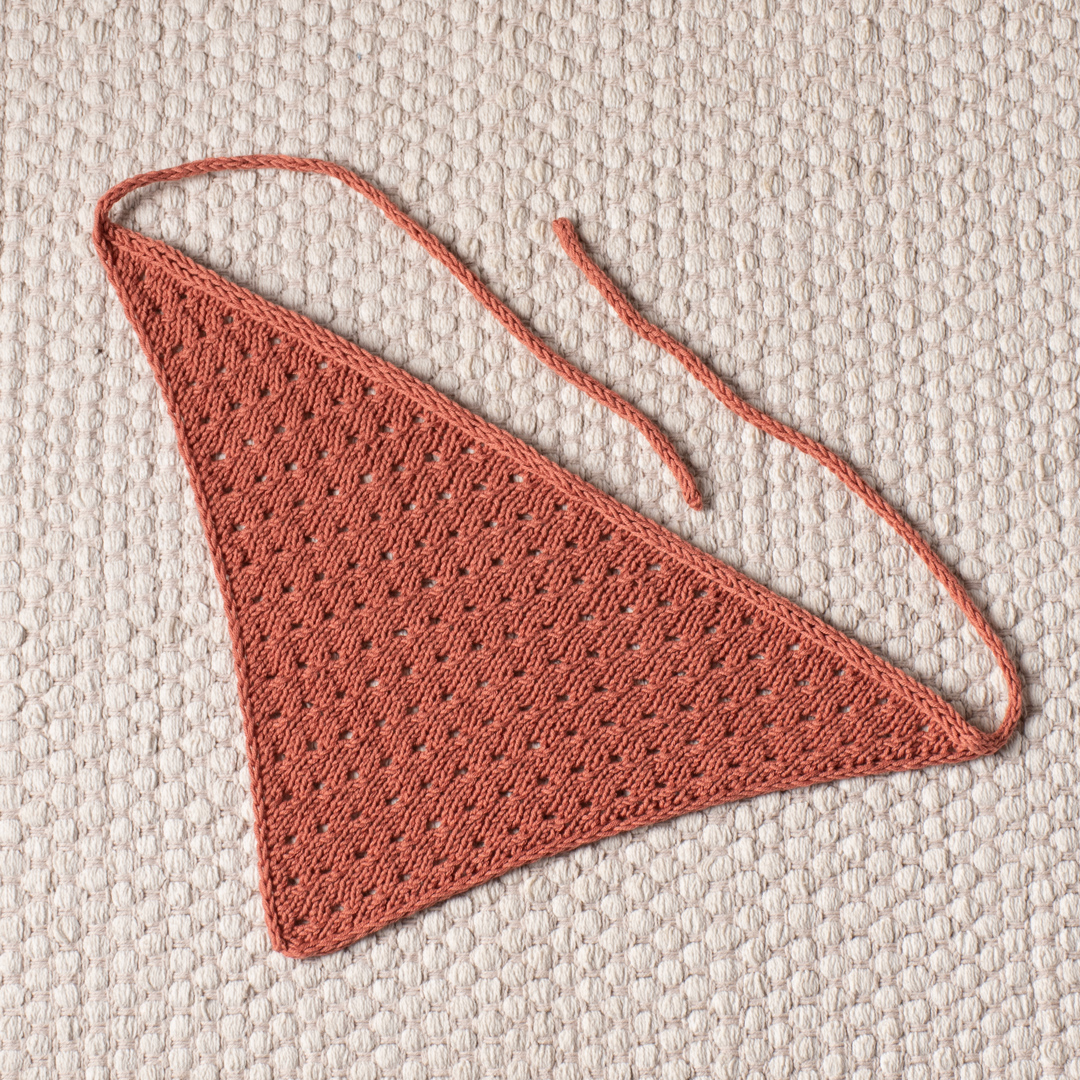
The Canyon Clay Bandana is a small but rewarding knitting project that combines decorative lace-like texture with a practical triangular construction. Designed as a lightweight summer accessory, the bandana is knitted from sport-weight cotton yarn and finished with narrow i-cord ties that make it easy to wear and adjust.
Unlike a traditional rectangular scarf, this design begins at the bottom point of the triangle and expands gradually as the knitting progresses. The shaping is created through yarnovers, while the decorative staggered eyelet pattern uses yarnovers together with right-leaning decreases. Along the outer edges, two stitches are treated as an i-cord border, giving the finished fabric a tidy outline and helping keep the edges from curling.
This guide walks through the construction from the initial four-stitch cast-on to the final woven-in ends. The technical instructions remain faithful to the original pattern, while the explanations provide checkpoints that can make the construction easier to follow, especially when working the eyelet rows and joining the first i-cord tie to the live bandana stitches.
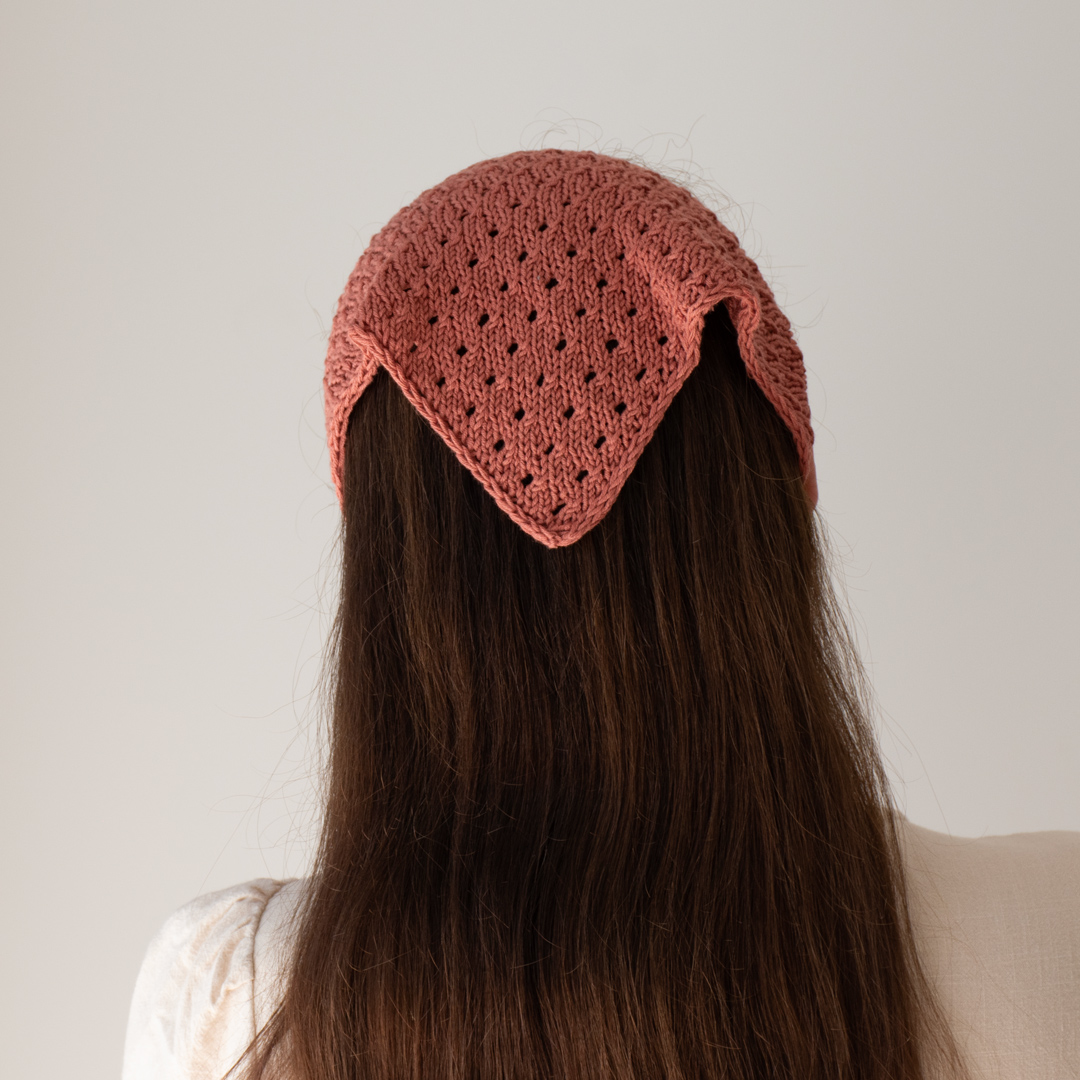
What Makes This Bandana Different?
The construction of the Canyon Clay Bandana is based on a simple repeating idea: the piece becomes wider as you work upward. The increases happen on the right side, while the wrong-side rows provide a straightforward return across the growing fabric.
The decorative character comes from the staggered eyelet stitch. Rather than relying on a complicated lace chart, the pattern gives the eyelet sequence directly in written instructions. This makes the project approachable for knitters who prefer written rows to charts.
Another defining feature is the i-cord edging. The first two stitches of every row are knitted, and the last two stitches are slipped with yarn in front. This creates an integrated edging rather than requiring a separate border to be picked up afterward.
Finally, the i-cord technique continues into the ties. The first tie is made before it is connected to the live stitches, while the second tie is worked after the edging reaches the opposite side. The result is one continuous-looking finished accessory.
Project Specifications
The pattern is written for one size, with the option to adjust the length by changing the number of main-pattern repeats.
- Size: One size
- Finished measurements: Length without ties: 42cm/ 16.5in.
- Height: 22cm/ 8.75in.
- Gauge: 10 x 10 cm (4x4in) = 24 sts x 32 rows in stockinette stitch after blocking.
- Yarn: Drops Safran in the color red clay (uni color 59), 1 ball.
- Needles: 3mm (US 2.5) knitting needles.
- Tie needles: A pair of 3mm (US 2.5) DPNs.
- Notions: Tapestry needle, measuring tape, and scissors.
Yarn, Needles, and Notions
Specified Yarn
The original pattern uses Drops Safran in red clay (uni color 59), with one ball required. The red clay shade gives the project its name and creates a warm, earthy appearance that works particularly well as a summer accessory.
If you are following the original design exactly, use the specified yarn and quantity. If substituting yarn, the stated gauge remains an important reference because the finished dimensions depend on the relationship between stitch size, row size, and the number of repeats.
Needle Size
The main bandana is knitted with 3mm (US 2.5) knitting needles. The i-cord ties use a pair of 3mm (US 2.5) DPNs.
Useful Notions
- Tapestry needle for weaving in the yarn tails
- Measuring tape for checking the bandana and i-cord dimensions
- Scissors for cutting the yarn when instructed
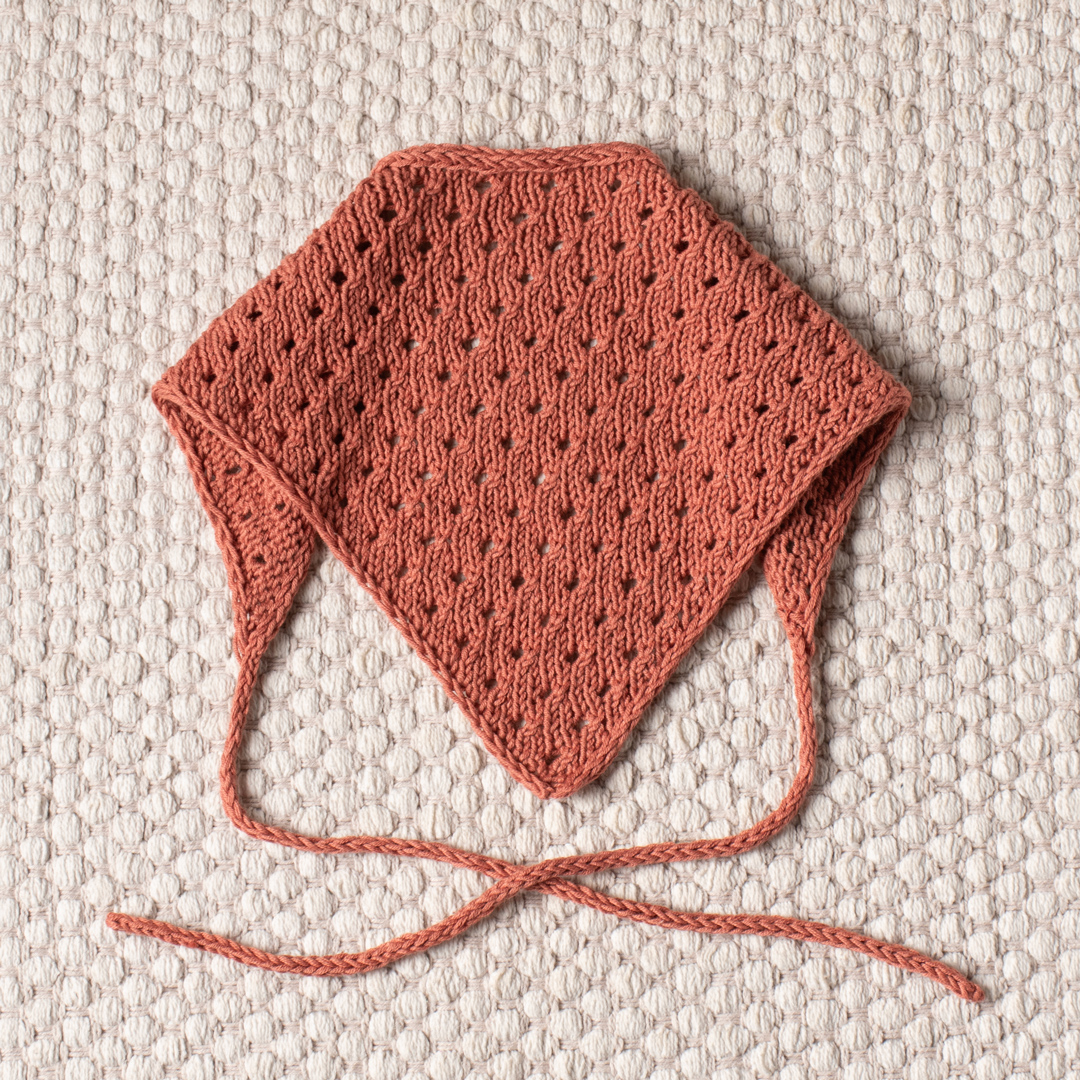
Abbreviations Used in the Pattern
Because the construction combines standard knitting stitches with lace-style increases and decreases, it is helpful to have the abbreviations available before beginning.
- k – knit.
- k2tog – knit 2 stitches together.
- p – purl.
- RS – right side.
- sl – slip stitch as if to purl with yarn in front.
- ssk – slip 1 stitch knitwise, slip the next stitch knitwise, return the 2 stitches back to the left needle, knit those 2 stitches together through the back loops.
- WS – wrong side.
- yo – yarn over.
- *-* – repeat the instructions in between the asterisks the number of times specified.
Reading the Construction Before You Start
There are three main sections to understand before casting on. First comes the triangular bandana itself. Second comes the first i-cord tie and the i-cord edging that connects it to the live stitches. Third comes the second i-cord tie.
The triangle is not bound off when it is finished. Instead, its stitches remain live on the needle. This is an important construction detail because those stitches become part of the edging.
The first i-cord is also not cut when it reaches its required length. It is kept attached to the working yarn so it can immediately be incorporated into the edge.
Understanding these three stages in advance helps prevent one of the most common mistakes with this type of construction: accidentally finishing or cutting something that still needs to be joined.
Stage One: Establishing the Triangle
Begin by casting on 4 stitches.
The first eleven rows are the set-up section. These rows gradually establish the shape and introduce the increase rhythm used by the larger triangle.
Set-Up Row Instructions
- Row 1 (WS): k2, sl2.
- Row 2 (RS): k2, yo, sl2 (5sts).
- Row 3: k2, p1, sl2.
- Row 4: k2, yo, k1, yo, sl2 (7sts).
- Row 5: k2, p to last 2 sts, sl2.
- Row 6: k2, yo, k3, yo, sl2 (9sts).
- Row 7: k2, p to last 2 sts, sl2.
- Row 8: k2, yo, k1, k2tog, yo, k2, yo, sl2 (11sts).
- Row 9: k2, p to last 2 sts, sl2.
- Row 10: k2, yo, k to last 2 sts, yo, sl2 (13sts).
- Row 11: k2, p to last 2 sts, sl2.
Set-Up Stitch Checkpoints
The stitch counts included in the first part of the pattern provide a useful way to verify that the increases are working correctly.
- After Row 2: 5 stitches
- After Row 4: 7 stitches
- After Row 6: 9 stitches
- After Row 8: 11 stitches
- After Row 10: 13 stitches
If one of these counts is incorrect, it is best to stop and inspect the relevant increase row. The easiest time to correct an error is immediately after the row where it occurred.
Notice that the edge treatment remains consistent even while the center grows. The first two stitches are knitted, and the final two stitches are slipped with yarn in front. The middle stitches are where the shaping takes place.
Stage Two: The Main Staggered Eyelet Section
After the set-up rows, the main pattern begins. This is the portion that creates most of the visual texture in the finished bandana.
The pattern is four rows long and is repeated. Rows 1 and 3 are the increase rows, while Rows 2 and 4 are worked on the wrong side.
Pattern Row 1
Row 1 (RS): k2, yo, k1, *k2tog, yo, k2* to last 2 sts, yo, sl2 (2 sts increased).
The section between the asterisks is repeated across the row until the final two stitches. This is the key eyelet-producing section because the k2tog and yo work together to create the decorative openings.
Pattern Row 2
Row 2 (WS): k2, p to last 2 sts, sl2.
This return row is intentionally simpler. The first two stitches maintain the i-cord edge, the center is purled, and the last two stitches are slipped with yarn in front.
Pattern Row 3
Row 3: k2, yo, k to last 2 sts, yo, sl2 (2 sts increased).
This row continues the triangular shaping by placing a yarnover near each side of the central section.
Pattern Row 4
Row 4: k2, p to last 2 sts, sl2.
Once Row 4 is complete, the four-row repeat begins again.
Repeat rows 1-4 16 more times or until you reach your desired length.
How to Stay Oriented During Repeats
When repeating four rows several times, it can be easy to lose track of whether the next row is an increase row or a purl return row. A simple way to organize the work is to treat every group of four rows as one complete unit.
At the end of each unit, check that you have completed:
- One eyelet increase row.
- One wrong-side purl row.
- One additional increase row.
- One wrong-side purl row.
The two increase rows each specify 2 sts increased. That statement is useful as a checkpoint, particularly when working the pattern repeatedly.
It is also helpful not to confuse the decorative k2tog in Pattern Row 1 with the ssk used later during the i-cord edging. They occur in different sections and serve different construction purposes.
Adjusting the Length
The pattern notes that the bandana can easily be modified in size by adding or subtracting repeats. The original instructions say to repeat Rows 1-4 16 more times or continue until you reach your desired length.
This flexibility is useful because the triangle grows progressively rather than being created from a fixed rectangular piece. However, the technical sequence itself should remain unchanged: the pattern rows are still worked as Rows 1-4, with the same increase and return-row structure.
If you are following the original finished measurements, the target is 42cm/ 16.5in. in length without ties and 22cm/ 8.75in. in height.
Ending the Main Body Correctly
When the main triangular section reaches the desired length, break the yarn while leaving a 10cm (4″) long tail.
Do not bind off the bandana stitches. The pattern specifically instructs you to set the bandana aside while leaving the stitches on the needle as is.
This is a crucial transition point. The next step depends on those live stitches being available for the i-cord edging. Keeping them on the needle also makes the construction sequence much easier because the first tie can be joined directly to the edge.
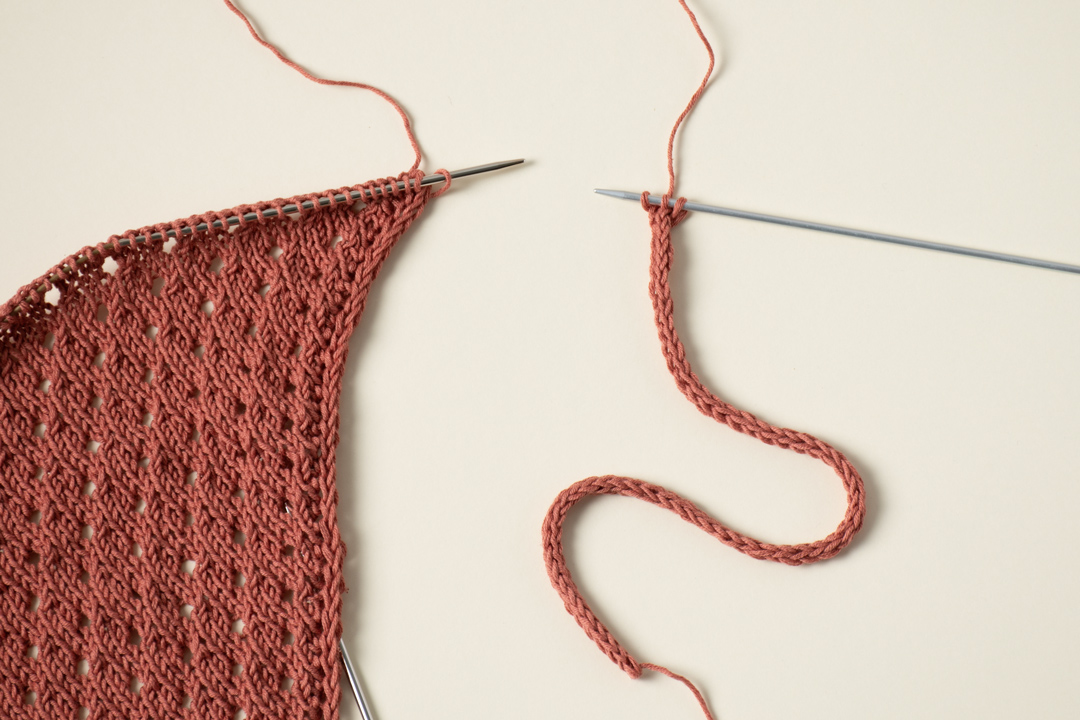
Stage Three: First I-Cord Tie
The first tie is created using the pair of 3mm (US 2.5) DPNs.
Cast on 3 stitches, do not turn.
Then repeat:
*Slip the 3 stitches to the right side of the needle. Knit 3.*
Continue until the i-cord tube measures approximately 30 cm. At this point, do not cut the yarn.
The instruction to not turn is one of the defining characteristics of i-cord construction. Instead of reversing direction as you would with flat knitting, the three stitches are moved to the other side of the needle and knitted again. Repeating this movement forms a narrow tube.
Joining the I-Cord to the Live Bandana
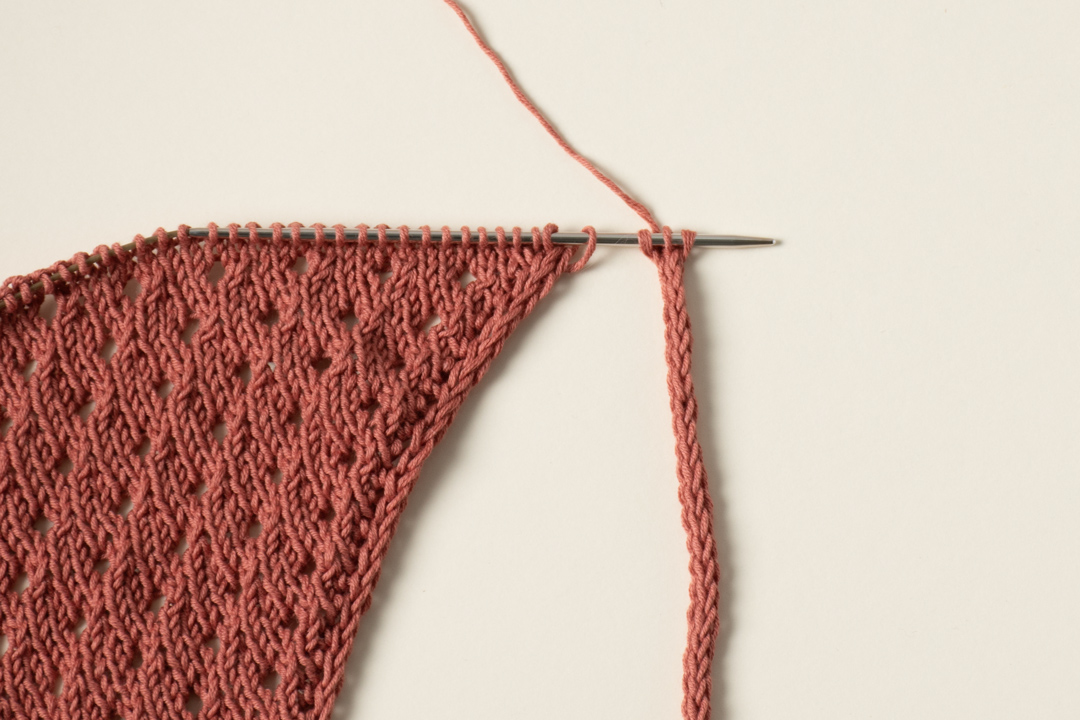
Once the first i-cord measures approximately 30 cm, transfer the 3 i-cord stitches to the needle, holding the live bandana stitches.
Then knit the first two i-cord stitches.
Next, work an ssk, knitting the last i-cord stitch together with the first bandana stitch.
This joining step is the beginning of the finished i-cord border. The live stitch from the bandana is incorporated into the edging rather than being bound off separately.
The I-Cord Edging Sequence
After the initial connection, transfer the first three stitches to the needle while holding the live bandana stitches.
Then repeat:
*k2, ssk, transfer 3 stitches to the needle, holding the live bandana stitches*
Continue the sequence until only 3 stitches remain.
The ssk is the joining mechanism. Each time it is worked, the last stitch of the three-stitch i-cord is knitted together with a live bandana stitch. The three stitches are then repositioned so the i-cord can continue along the edge.
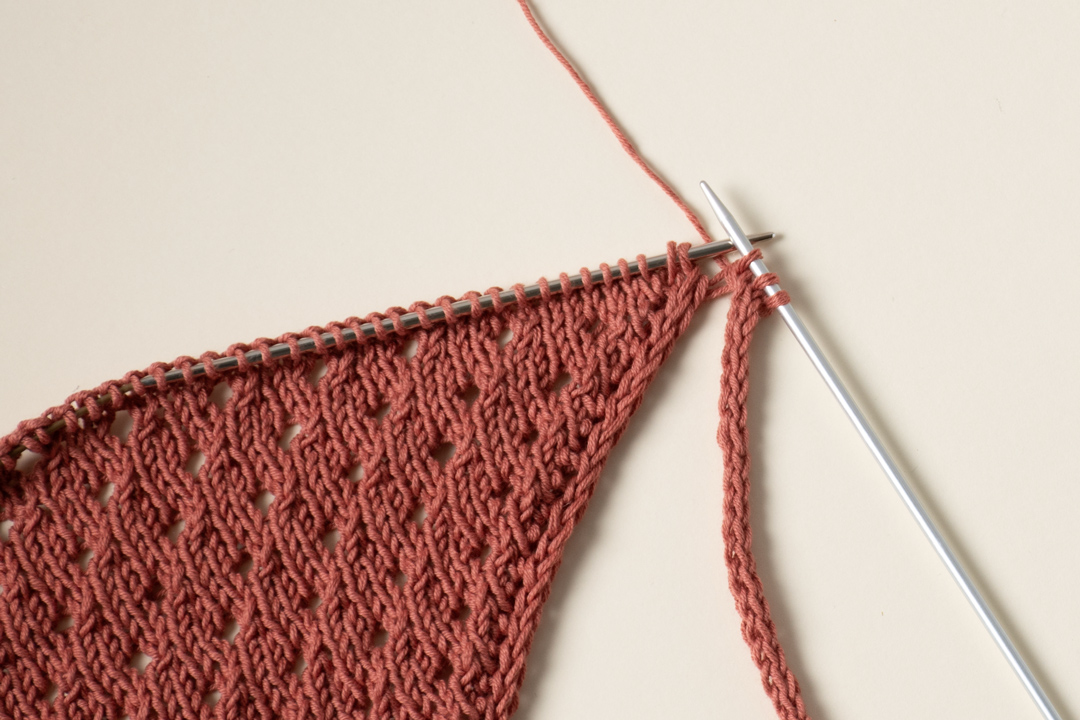
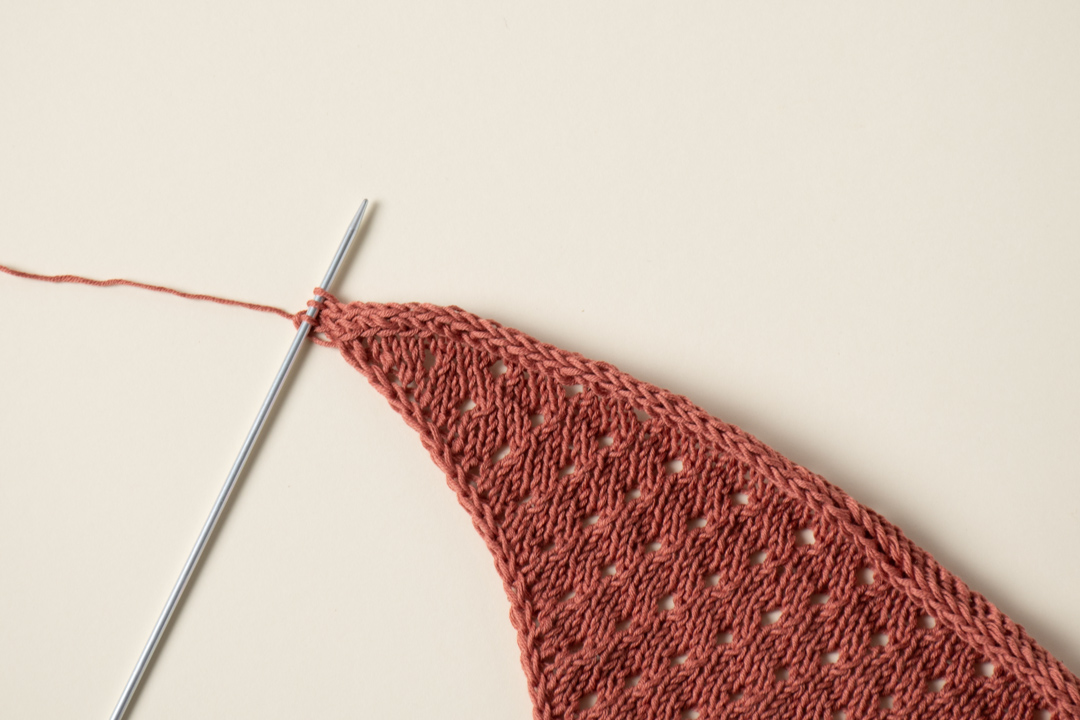
As the process continues, the edge gradually becomes enclosed in the narrow i-cord structure. The result is a clean border that frames the triangular fabric.
Stage Four: The Second Tie
When the edging reaches the point where only three stitches remain, these stitches become the foundation of the second i-cord tie.
Work the second tie in the same way as the first:
*Slip the 3 stitches to the right side of the needle. Knit 3.*
Continue until the tube measures approximately 30 cm.
For the second tie, the finishing sequence is different from the first tie because the bandana is now complete. Bind off, cut the yarn, and weave in the tails.
Why the I-Cord Matters
The i-cord is more than a decorative detail in this design. It serves several functions at once. Along the outer edge, it creates a visually clean finish and helps prevent curling. At the ends, the same three-stitch technique produces the ties needed to secure the accessory.
This also makes the construction efficient. Instead of sewing a separate border onto the triangle and then adding separate ties, the edging and ties are integrated directly into the knitting process.
The original pattern notes that the i-cord edging is created by knitting the first two stitches of every row and slipping the last two stitches of every row with yarn in front. The instruction not to tighten those edge stitches should be respected throughout the project.
Gauge and Finished Dimensions
The specified gauge is 10 x 10 cm (4x4in) = 24 sts x 32 rows in stockinette stitch after blocking.
Gauge is especially useful when working toward the listed finished measurements. A difference in stitch or row size can change the dimensions of the triangular fabric. The original pattern specifies the gauge after blocking, so that is the reference point for the stated fabric measurement.
The finished size is one size:
- Length without ties: 42cm/ 16.5in.
- Height: 22cm/ 8.75in.
The two i-cord ties are each worked to approximately 30 cm.
Helpful Working Habits
Keep the Two Edge Stitches Visually Separate
It can help to think of the first two and final two stitches as belonging to the border rather than the main pattern. The center is where the increases, yarnovers, and eyelets are formed. This mental division can make the written instructions easier to follow.
Check After Increase Rows
Both main-pattern increase rows specify that two stitches are increased. Make it a habit to verify that the work is behaving accordingly. This is especially useful when repeating the four-row sequence many times.
Measure Rather Than Guess
Use the measuring tape to check the 30 cm i-cord lengths. Because the ties are visible and functional, keeping them close to the stated length helps maintain the proportions of the finished design.
Keep the Live Stitches Secure
After the triangle is complete, avoid accidentally pulling stitches off the needle while preparing the first i-cord. The live stitches are an essential part of the joining process.
Troubleshooting the Main Body
I Have Too Many or Too Few Stitches
Check the most recent right-side increase row first. Look specifically at the yarnovers and the k2tog in Pattern Row 1, then verify the yarnovers near the edges. Also make sure the two edge stitches on each side were handled according to the instructions.
The Eyelet Pattern Looks Irregular
The eyelets are produced by the exact relationship between the k2tog and yo instructions in Pattern Row 1. If one of those stitches has been skipped, added, or moved, the staggered appearance can change. Compare the current row carefully with the written sequence before continuing.
The Triangle Is Not the Expected Size
Check your gauge against the stated 24 sts x 32 rows per 10 x 10 cm after blocking. Also verify how many four-row repeats you have completed. The pattern permits size modification by adding or subtracting repeats, so the number of repeats directly affects the length.
Troubleshooting the I-Cord
The Cord Is Not Forming a Tube
Make sure you are not turning the work. After knitting all three stitches, slip the three stitches to the right side of the needle and knit three again. This repeated movement is what creates the i-cord structure.
The Edge Looks Loose
Check that the i-cord stitches are being worked consistently. At the same time, remember the original instruction not to tighten the edge stitches. The goal is an even, controlled edge rather than an aggressively tight one.
I Finished the Triangle and Cannot Attach the Tie
The triangle should not be bound off. The pattern specifically says to break the yarn after leaving a 10cm (4″) tail and set the bandana aside with the stitches remaining on the needle. Those live stitches are needed for the i-cord edging.
A Simple Project Workflow
For knitters who prefer to think of the pattern as a sequence of milestones rather than a long list of rows, the project can be divided into these stages:
- Cast on 4 stitches.
- Complete Set-up Rows 1-11.
- Confirm the final set-up stitch count of 13 stitches after Row 10.
- Begin the four-row staggered eyelet pattern.
- Repeat Rows 1-4 16 more times or until the desired length is reached.
- Break the yarn and leave a 10cm (4″) tail.
- Keep the live bandana stitches on the needle.
- Cast on 3 stitches for the first i-cord tie.
- Work the first i-cord to approximately 30 cm.
- Transfer the three i-cord stitches to the needle holding the live bandana stitches.
- Work k2, then ssk to join the first bandana stitch.
- Continue the i-cord edging sequence until three stitches remain.
- Work the second i-cord tie to approximately 30 cm.
- Bind off, cut the yarn, and weave in the tails.
Finishing and Final Inspection
Once the second tie has been bound off and the yarn tails have been woven in, inspect the bandana from edge to edge. The i-cord should provide a consistent finish around the triangular section, and both ties should be approximately 30 cm long.
Check the finished fabric against the stated dimensions after blocking: 42cm/ 16.5in. in length without ties and 22cm/ 8.75in. in height.
Because the pattern is worked from the bottom point upward, the final shape should read clearly as a triangle. The eyelet pattern should appear across the central fabric, while the outer edges should remain neat and structured by the i-cord treatment.
Quick Technical Reference
- Yarn: Drops Safran, red clay (uni color 59), 1 ball.
- Main needle: 3mm (US 2.5).
- DPNs: 3mm (US 2.5).
- Cast-on: 4 stitches.
- Set-up: Rows 1-11.
- Stitch count after Row 2: 5sts.
- Stitch count after Row 4: 7sts.
- Stitch count after Row 6: 9sts.
- Stitch count after Row 8: 11sts.
- Stitch count after Row 10: 13sts.
- Main repeat: Rows 1-4.
- Main repetition: Repeat rows 1-4 16 more times or until desired length.
- Tail after triangle: 10cm (4″).
- First tie: 3 stitches, approximately 30 cm.
- Edging: k2, ssk, transfer 3 stitches, repeated until 3 stitches remain.
- Second tie: 3 stitches, approximately 30 cm.
- Finished length without ties: 42cm/ 16.5in.
- Finished height: 22cm/ 8.75in.
Frequently Asked Questions
Is the Canyon Clay Bandana suitable for a summer accessory?
Yes. The original pattern is designed using sport-weight cotton yarn, specifically Drops Safran in red clay (uni color 59), making the finished project a lightweight accessory.
Is the pattern knitted flat?
Yes. The bandana is knitted back and forth. It starts at the bottom edge and grows upward through increases on the right side.
What stitch creates the decorative openings?
The pattern uses a staggered eyelet stitch made with yarnovers and right-leaning decreases. In Pattern Row 1, the eyelet sequence uses k2tog and yo.
How are the edges finished?
The first and last two stitches of every row form the i-cord edging. The first two stitches are knitted, and the final two stitches are slipped with yarn in front.
Can I change the size?
The pattern states that the size can be modified by adding or subtracting repeats. The main pattern is repeated for 16 more times or until you reach your desired length.
Why should I leave the bandana stitches on the needle?
The live stitches are needed to construct the i-cord edging. The first i-cord tie is connected directly to these stitches using an ssk.
How many stitches are used for each i-cord?
Each i-cord tie uses 3 stitches.
How long should each tie be?
The first and second i-cord ties are each worked until the tube measures approximately 30 cm.
What should I do with the yarn after completing the first triangle?
Break the yarn, leaving a 10cm (4″) long tail. Then set the bandana aside with the stitches remaining on the needle.
Final Thoughts on the Construction
The Canyon Clay Bandana demonstrates how a relatively small knitting project can combine shaping, lace-style texture, and integrated finishing techniques without requiring a complicated construction. The triangle begins with four stitches, expands through carefully placed yarnovers, and develops its decorative surface through the staggered eyelet pattern.
The i-cord edging is equally important to the final appearance. By maintaining the first and last two stitches as an i-cord treatment throughout the main body, the project gains a tidy edge that works naturally with the two i-cord ties. The first tie is incorporated into the live stitches, the edging travels across the bandana, and the second tie grows directly from the final three stitches.
For the most reliable result, work from the technical checkpoints rather than relying on appearance alone. Confirm the set-up stitch counts, keep track of the four-row repeat, watch the two-stitch increases on the right side, and preserve the live stitches until the edging begins.
With the specified red clay Drops Safran yarn, 3mm needles, decorative staggered eyelets, and approximately 30 cm i-cord ties, the finished Canyon Clay Bandana remains both practical and visually distinctive. The project can be followed at the original dimensions or adjusted through the number of main-pattern repeats while preserving the same underlying construction.