
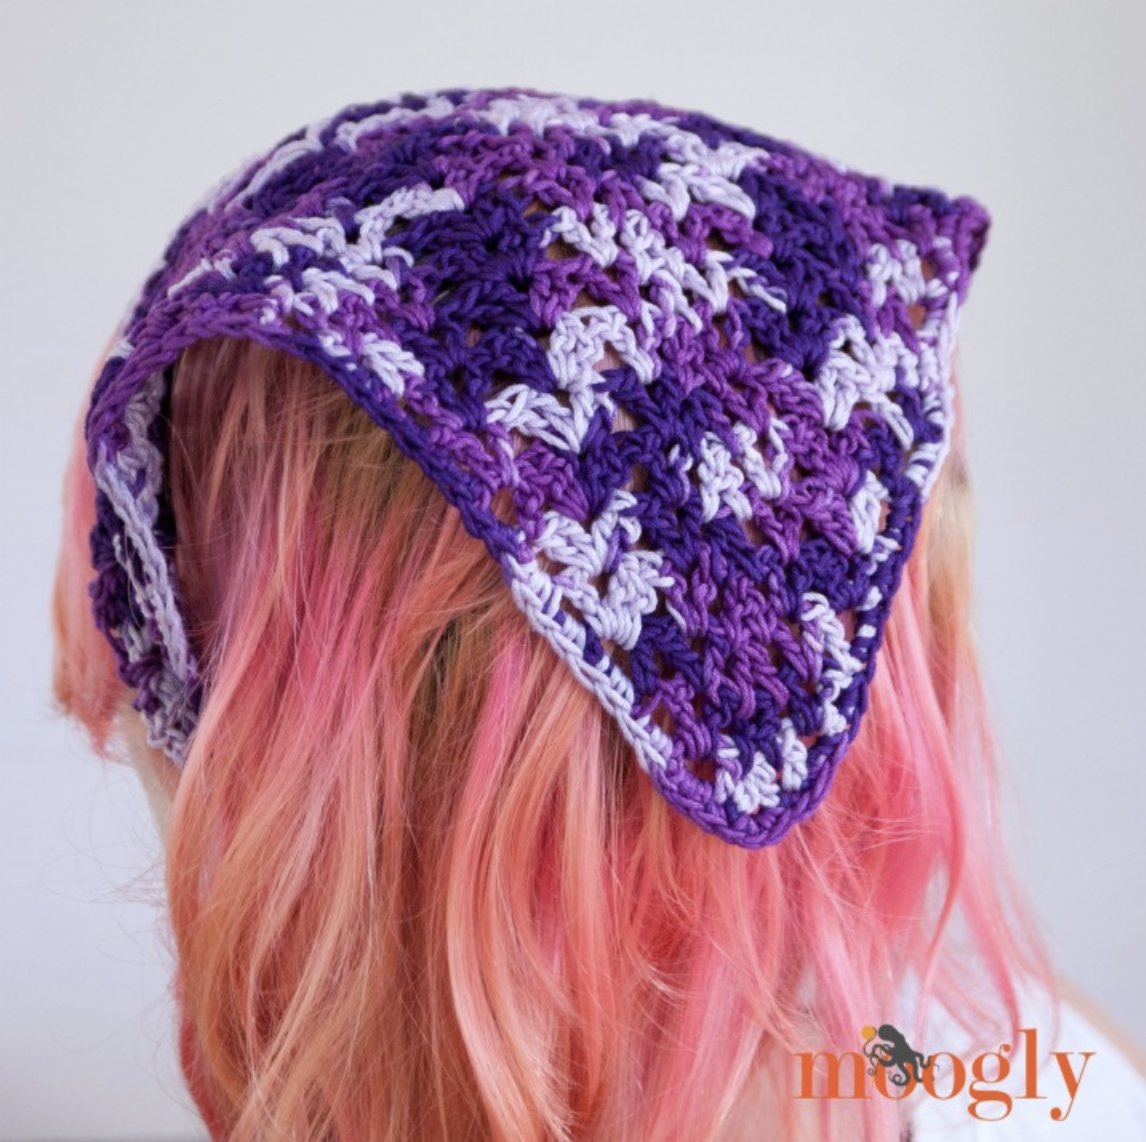
Complete Crochet Kerchief Workshop: Build the Lazy Summer Kerchief from Center to Hair Band
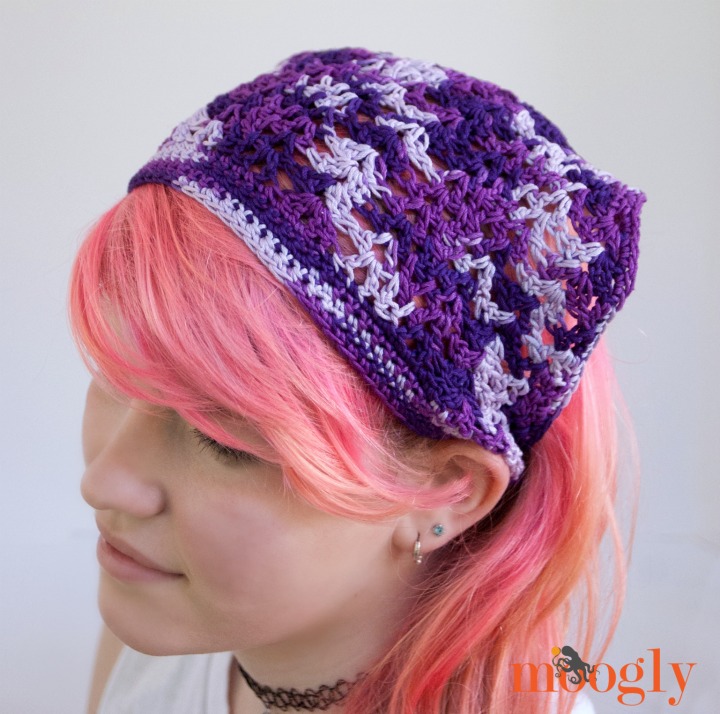
The Lazy Summer Kerchief is a crochet accessory designed around a simple idea: take the familiar shape of a traditional bandana-style kerchief and combine it with a hair band instead of conventional ties. The result is a lightweight accessory that can be put on and removed easily while still giving the finished piece a recognizable kerchief silhouette.
This version of the project guide looks at the pattern as a construction workshop. Instead of approaching the instructions only as a list of rows, we will follow the project from its first chain through the expanding stitch architecture, the size-specific shaping, the single-crochet transition, and finally the process of enclosing the hair band.
The original design includes four head-size ranges: Baby, Toddler/Child, Child/Teen, and Adult. Much of the decorative section follows the same foundation, while each size eventually takes its own path toward the band. That makes it important to identify your size before reaching the size-specific rows.
The pattern is worked with a US H, 5.0mm hook and Sport/5 ply yarn. The sample uses Omega Sinfonia 100% cotton in colorway #847. The stated yarn requirement is 70-100 yds, and one hair band or elastic band is also required.
What Makes This Kerchief Different?
The most distinctive construction detail is not simply the triangular crochet fabric. It is the way that fabric connects to an elastic hair band. Traditional kerchiefs often depend on ties, but this design uses the hair band to create the back connection. The crochet band is worked around the elastic and enclosed with single crochet.
That construction explains why the final fitting stage is so important. Hair bands do not all have the same size or elasticity. The original instructions specifically recommend trying the project on before cutting the yarn and note that the band should be fitted on the tighter side because both the hair band and yarn can stretch.
The decorative fabric is equally important. Three stitch concepts control most of its appearance:
- wdc2tog: wide double crochet two together decrease
- V stitch: [dc, ch 1, dc] in the same stitch
- Double V stitch: [2 dc, ch 1, 2dc] in the same stitch
The source also gives a key placement rule: V-sts are all worked in the v-sts below, and double v-sts are worked into the double v-sts below.
Materials and Fixed Pattern Information
Before starting, prepare the exact materials listed in the pattern. Keeping these specifications together makes it easier to check your setup before the first chain.
- Crochet hook: US H, 5.0mm
- Yarn: 70-100 yds Sport/5 ply yarn
- Sample yarn: Omega Sinfonia
- Fiber: 100% cotton
- Yardage of sample yarn: 218 yds/199 m
- Weight of sample yarn: 3.52 oz/100 g
- Colorway: #847
- Elastic: 1 hair band/elastic band
- Gauge: 16 sts x 22 rows = 4 inches in sc
The four size ranges are:
- Baby: 16-18″ head
- Toddler/Child: 18-20″ head
- Child/Teen: 20-22″ head
- Adult: 22-24″ head
These specifications should be treated as the pattern’s fixed reference information. In particular, the hook size, yarn category, gauge, and listed head-size ranges should not be casually changed while following the original instructions.
Understanding the Stitch Vocabulary
wdc2tog
The wide double crochet two together decrease is defined by the pattern as a dc2tog in between the posts on either side of the dc2tog of the previous round.
This is a structural stitch rather than a decorative detail that can simply be substituted. Its repeated placement helps organize the central shaping of the kerchief.
V Stitch
The V stitch is worked as [dc, ch 1, dc] in the same stitch. The resulting chain-1 space becomes an important landmark for later rows.
Double V Stitch
The double V stitch is worked as [2 dc, ch 1, 2dc] in the same stitch. It creates a larger stitch cluster and is used repeatedly throughout the expanding fabric.
When moving from one row to another, do not assume that every open space is interchangeable. The source specifically instructs that V stitches are worked into V stitches below, while double V stitches are worked into double V stitches below.
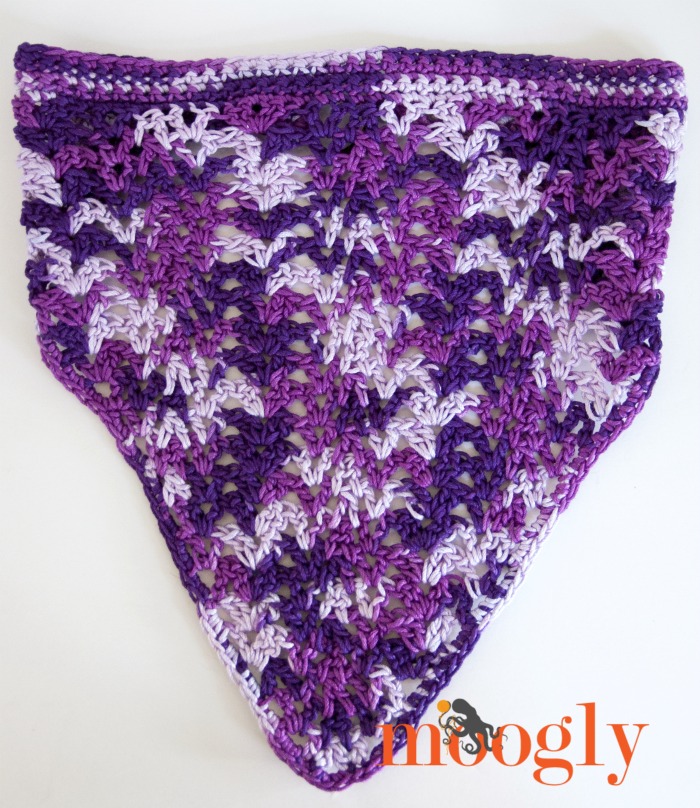
Workshop Stage One: Establish the First Triangle
The opening rows are shared by the four sizes. The first chain and several early rows establish the basic architecture that the later sections build upon.
Row 1
Row 1: Ch 9, dc in the 5th ch from the hook (first v st made), dc2tog over the next 3 ch (skip center ch), v st in the last ch; turn.
Row 2
Row 2: Ch 3 (counts as first dc), v st in next ch sp, wdc2tog, v st in ch sp, dc in top of ch 3; turn.
Row 3
Row 3: Ch 4, dc in 1st st (first v st made), v st in next ch sp, wdc2tog. Vs st in next ch sp, v st in top of ch 3; turn.
Row 4
Row 4: Ch 3, [dc, ch 1, 2 dc] in next ch sp, v st in next ch sp, wdc2tog, v st in next ch sp, [2 dc, ch 1, dc] in next ch sp, dc in top of ch 3; turn.
By this point, the basic rhythm is already visible: outer stitch groups create expansion, while the central decrease remains a consistent shaping landmark.
Row 5
Row 5: Ch 3, double v st in next ch sp, v st in next ch sp, wdc2tog, v st in next ch sp, double v st in next ch sp, dc in top of ch 3; turn.
Row 6
Row 6: Ch 4, dc in 1st st, double v st in next ch sp, v st in next ch sp, wdc2tog, v st in next ch sp, double v st in next ch sp, v st in top of ch 3; turn.
Row 7
Row 7: Ch 3, v st in next ch sp, double v st in next ch sp, v st in next ch sp, wdc2tog, v st in next ch sp, double v st in next ch sp, v st in next ch sp, dc in top of ch 3; turn.
Row 8
Row 8: Ch 3, dc in next st, v st in ch sp, double v st in next ch sp, v st in next ch sp, wdc2tog, v st in next ch sp, double v st in next ch sp, v st in next ch sp, dc in next st, dc in top of ch 3; turn.
Workshop Stage Two: Watch the Edges
Row 9 is an important structural checkpoint. Unlike the preceding rows, it introduces dc2tog shaping at both outer portions of the row while retaining the central wdc2tog.
Row 9: Ch 3, dc2tog working between first 2 sts of previous row and top of 3rd st of previous row, v st in next ch sp, double v st in next ch sp, v st in next ch sp, wdc2tog, v st in next ch sp, double v st in next ch sp, v st in next ch sp, dc2tog in top of next st and between last 2 sts, dc in top of ch 3; turn.
After completing this row, inspect the two outer sides. The goal is not to improvise corrections but to confirm that the decreases were made exactly where the instructions specify.
Row 10
Row 10: Ch 4, dc in 1st st, wdc2tog, v st in next ch sp, double v st in next ch sp, v st in next ch sp, wdc2tog, v st in next ch sp, double v st in next ch sp, v st in next ch sp, wdc2tog, v st in top of ch 3; turn.
Rows 11-13: Repetition With Purpose
Row 11: Ch 3, *v st in next ch sp, wdc2tog, v st in next ch sp,** double v st in next ch sp; rep from * across, finishing last repeat at **, then dc in the top of the ch 3; turn.
Row 12: Ch 4, dc in 1st st *v st in next ch sp, wdc2tog, v st in next ch sp,** double v st in next ch sp; rep from * across, finishing last repeat at **, then v st in the top of the ch 3; turn.
Row 13: Ch 3, [dc, ch 1, 2 dc] in next ch sp, *v st in next ch sp, wdc2tog, v st in next ch sp,** double v st in next ch sp; rep from * across, finishing last repeat at **, then [2 dc, ch 1, dc] in last ch sp, dc in top of ch 3; turn.
The repeating instructions can look intimidating on the page, but they are built from the same small group of stitch elements. Once the V-stitch and double-V locations are recognizable, the row becomes easier to navigate.
Rows 14-17: Complete the Main Decorative Section
Row 14: Ch 3, double v st in next ch sp, *v st in next ch sp, wdc2tog, v st in next ch sp, double v st in next ch sp; rep from * across, then dc in top of ch 3; turn.
Row 15: Ch 4, dc in 1st st, double v st in next ch sp, *v st in next ch sp, wdc2tog, v st in next ch sp, double v st in next ch sp; rep from * across, then v st in top of ch 3; turn.
Row 16: Ch 3, *v st in next ch sp, double v in next ch sp, v st in next ch sp,** wdc2tog; rep from * across, finishing last repeat at **, then dc in the top of the ch 3; turn.
Row 17: Ch 3, dc in next st, *v st in ch sp, double v st in next ch sp, v st in next ch sp,** wdc2tog; rep from * across, finishing last repeat at **, then dc in the next st, dc in the top of the ch 3; turn.
Rows 14 through 17 complete the shared decorative section used before the sizes move toward their individual finishing bands. At this stage, compare both sides of the fabric and verify the repeated central shaping.
Stage Three: Choose Your Size Path
The project now begins to separate according to head size. This is the point where it is especially important not to combine instructions from two different size sections.
Baby: 16-18″ Head
For the Baby size, Row 18 begins the transition to the band.
Row 18: Ch 1, sc in each st and ch sp across; turn. (51 sts)
The source then gives a specific fitting note: the remaining rows form the band that goes around the head and will be attached to the hair band. Try this on before cutting the yarn. Hair bands do not come in standard sizes or elasticity, so the number of stitches may need to be adjusted to create the perfect fit. The instruction is to err on the tighter side to account for stretching of both the band and yarn.
Row 19: Ch 5, skip ch closest to hook, sc in remaining 4 chs, sc in each st across, extend row with 4 FSC; turn. (59 sts)
Rows 20-21: Ch 1, sc in each st across; turn. (59 sts)
Row 22: Ch 1, sc in each st across, turn to sc across ends of Rows 22-19, enclosing hair band in each st; turn again to sc along other side of band and along two sides of scarf; at next end of band, sc across ends of Rows 19-22, enclosing other side of hair band; break yarn and finish off (but not before try on).
Toddler/Child: 18-20″ Head
The Toddler/Child size follows the shared rows through Row 17, then adds three more shaping rows before entering the band section.
Row 18: Ch 3, dc2tog working between first 2 sts of previous row and top of 3rd st of previous row, *v st in next ch sp, double v st in next ch sp, v st in next ch sp,** wdc2tog; rep from * across, finishing last repeat at **, dc2tog in top of next st and between last 2 sts, dc in top of ch 3; turn.
Row 19: Ch 4, dc in 1st st, wdc2tog, *v st in next ch sp, double v st in next ch sp, v st in next ch sp, wdc2tog; rep from * across, then v st in top of ch 3; turn.
Row 20: Ch 3, *v st in next ch sp, wdc2tog, v st in next ch sp,** double v st in next ch sp; rep from * across, finishing last repeat at **, then dc in top of ch 3; turn.
Row 21: Ch 1, sc in each st and ch sp across; turn. (57 sts)
Row 22: Ch 5, skip ch closest to hook, sc in remaining 4 chs, sc in each st across, extend row with 4 FSC; turn. (65 sts)
Rows 23-24: Ch 1, sc in each st across; turn. (65 sts)
Row 25: Ch 1, sc in each st across, turn to sc across ends of Rows 25-22, enclosing hair band in each st; turn again to sc along other side of band and along two sides of scarf; at next end of band, sc across ends Rows 22-25, enclosing other side; break yarn and finish off (but not before try on).
Child/Teen: 20-22″ Head
The Child/Teen path extends the decorative portion one row further than Toddler/Child.
Rows 1-20: Follow the shared instructions through Row 20.
Row 21: Ch 4, dc in 1st st, *v st in next ch sp, wdc2tog, v st in next ch sp,** double v st in next ch sp; rep from * across, finishing last repeat at **, then v st in top of ch 3; turn.
Row 22: Ch 1, sc in each st and ch sp across; turn. (61 sts)
Row 23: Ch 5, skip ch closest to hook, sc in remaining 4 chs, sc in each st across, extend row with 4 FSC; turn. (69 sts)
Rows 24-25: Ch 1, sc in each st across; turn. (69 sts)
Row 26: Ch 1, sc in each st across, turn to sc across ends of Rows 26-23, enclosing hair band in each st; turn again to sc along other side of band and along two sides of scarf; at next end, sc across ends Rows 23-26, enclosing other side; break yarn and finish off (but not before try on).

Adult: 22-24″ Head
The Adult version shares the main construction through Row 20 and then follows the same Row 21 used for Child/Teen before adding its own Row 22.
Row 21: Ch 4, dc in 1st st, *v st in next ch sp, wdc2tog, v st in next ch sp,** double v st in next ch sp; rep from * across, finishing last repeat at **, then v st in top of ch 3; turn.
Row 22: Ch 3, [dc, ch 1, 2 dc] in next ch sp, *v st in next ch sp, wdc2tog, v st in next ch sp,** double v st in next ch sp; rep from * across, finishing last repeat at **, then [2 dc, ch 1, dc] in last ch sp, dc in top of ch 3; turn.
Row 23: Ch 1, sc in each st and ch sp across; turn. (65 sts)
Row 24: Ch 5, skip ch closest to hook, sc in remaining 4 chs, sc in each st across, extend row with 4 FSC; turn. (73 sts)
Rows 25-26: Ch 1, sc in each st across; turn. (73 sts)
Row 27: Ch 1, sc in each st across, turn to sc across ends of Rows 27-24, enclosing hair band in each st; turn again to sc along other side of band and along two sides of scarf; at next end, sc across ends Rows 24-27, enclosing other side; break yarn and finish off (but not before try on).
The Band Is More Than a Finishing Detail
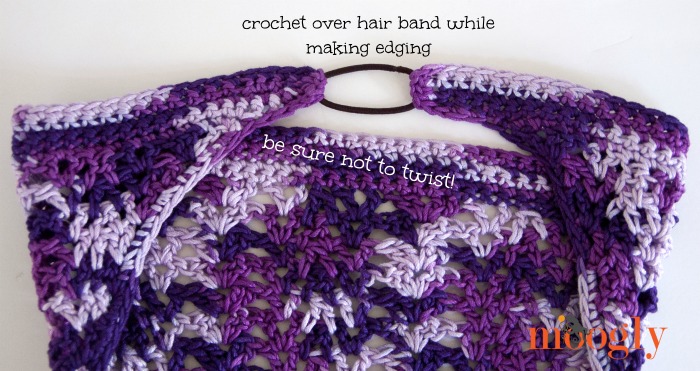
The final band changes the way the kerchief behaves. Instead of tying two ends behind the head, the crochet fabric is extended and then worked around the hair band. The band is enclosed by single crochet, creating a finished connection between the accessory and the elastic.
One of the most important practical instructions in the entire pattern is to try the project on before finishing. This is not simply a suggestion for comfort. The original design recognizes that hair bands vary in their physical dimensions and elasticity.
If the fit needs adjustment, the source allows the number of stitches to be adjusted to create the perfect fit. The recommendation is to err on the tighter side because stretching occurs in both the band and yarn.
How to Check Your Work Without Losing Your Place
Long crochet rows become much easier when you use visual checkpoints. For this project, three checkpoints are especially useful.
Checkpoint One: The Center
Look for the repeated wdc2tog shaping. It should remain a clear reference point throughout the decorative fabric.
Checkpoint Two: The Open Spaces
Identify the V-stitch and double-V-stitch spaces. Remember the source rule: V-sts go into V-sts below, and double v-sts go into double v-sts below.
Checkpoint Three: The Outer Edges
Watch the beginning and ending stitches, especially around Row 9 where dc2tog shaping occurs at both sides.
These checkpoints can help catch mistakes early. If the fabric appears to be changing direction unexpectedly, stop and inspect the most recent row rather than continuing for several more rows.
Stitch Count Checkpoints by Size
The pattern supplies useful stitch-count references as each size enters the band section.
| Size | Head Range | Sc Transition | FSC Band Row | Final Row |
|---|---|---|---|---|
| Baby | 16-18″ | Row 18: 51 sts | Row 19: 59 sts | Row 22 |
| Toddler/Child | 18-20″ | Row 21: 57 sts | Row 22: 65 sts | Row 25 |
| Child/Teen | 20-22″ | Row 22: 61 sts | Row 23: 69 sts | Row 26 |
| Adult | 22-24″ | Row 23: 65 sts | Row 24: 73 sts | Row 27 |
Troubleshooting the Construction
My Center Shaping Looks Uneven
Start by checking the wdc2tog placements. The decrease is specifically defined by the pattern and is repeated as a shaping feature. Also review the outer dc2tog placements in Row 9.
I Cannot Tell Which Space to Use
Use the stitch type below as your landmark. The pattern explicitly states that V-sts are worked into V-sts below and double v-sts into double v-sts below.
My Band Is Too Loose
Try the kerchief on before cutting the yarn. The pattern explains that hair bands differ in size and elasticity and that both the band and yarn stretch. The recommended approach is to err on the tighter side.
The FSC Extension Is New to Me
The band-extension rows use 4 FSC. The source provides a tutorial for extending rows with FSC, so review that technique before replacing it with a different construction.
I Am Unsure Which Size Instructions to Follow
Check the intended head measurement first: Baby is 16-18″, Toddler/Child is 18-20″, Child/Teen is 20-22″, and Adult is 22-24″. Once you select a size, remain with that size’s later rows.
A Practical Order for Making the Project
- Select the intended head-size range.
- Gather the US H, 5.0mm hook, Sport/5 ply yarn, and one hair band/elastic band.
- Keep the gauge reference of 16 sts x 22 rows = 4 inches in sc available.
- Learn the wdc2tog, V stitch, and double V stitch before beginning.
- Work Rows 1-17 carefully, using the central decrease and stitch spaces as landmarks.
- Check the outer shaping after Row 9.
- Continue into the correct size-specific rows.
- Watch the listed stitch-count checkpoints.
- Begin the band using the specified chain and 4 FSC extension.
- Try the kerchief on before cutting the yarn.
- Enclose the hair band using the edging instructions for the chosen size.
- Finish off only after confirming the fit.
Final Inspection Before Wearing
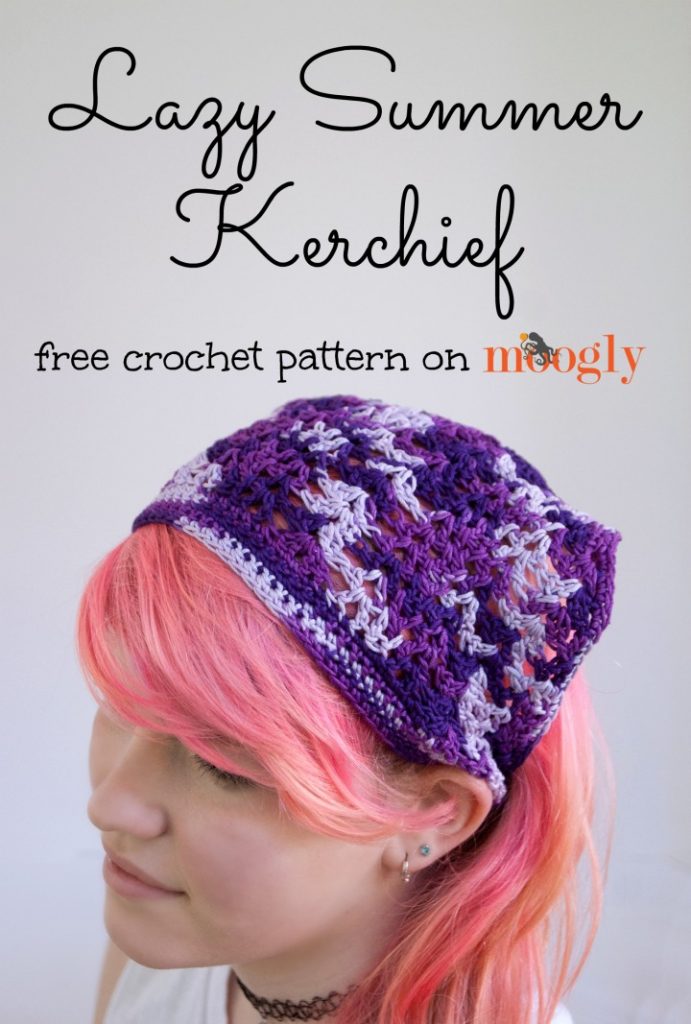
Before considering the project complete, inspect the center, both outer edges, and the band connection. The center should reflect the repeated decrease structure. The outer sides should look balanced, and the band should sit securely without being unnecessarily loose.
Most importantly, the final fitting should be checked while the yarn and elastic are behaving as they will during actual wear. The source specifically emphasizes trying the kerchief on before cutting the yarn, so this is an essential part of the finishing process rather than an optional extra.
Frequently Asked Questions
Is this pattern available in more than one size?
Yes. It includes four size ranges: Baby, Toddler/Child, Child/Teen, and Adult.
What is the Baby head-size range?
The Baby size is for a 16-18″ head.
What is the Adult head-size range?
The Adult size is for a 22-24″ head.
What yarn was used for the sample?
The sample uses Omega Sinfonia, a 100% cotton yarn with 218 yds/199 m, 3.52 oz/100 g, in colorway #847.
What hook size is specified?
The pattern uses a US H, 5.0mm hook.
How much yarn is required?
The pattern states 70-100 yds of Sport/5 ply yarn.
Does the project require an elastic?
Yes. The materials list includes 1 hair band/elastic band.
Why is the final band not simply made to a fixed number of stitches?
The pattern explains that hair bands do not come in standard sizes or elasticity. The number of stitches may therefore need to be adjusted for the perfect fit.
Should the finished band be slightly tight?
The source recommends erring on the tighter side to account for stretching of both the band and the yarn.
The Finished Kerchief
The Lazy Summer Kerchief demonstrates how a relatively small group of crochet techniques can create a distinctive wearable accessory. The project begins with a narrow foundation, grows through repeated V and double V stitches, uses wdc2tog and other decreases to control the shape, and eventually transitions into a practical single-crochet band.
Its four-size construction also makes the pattern useful as a study in crochet shaping. The early rows establish the shared design language, while the later size-specific instructions control how much additional fabric is created before the hair band is attached.
For the cleanest result, focus on accuracy rather than speed. Keep the special stitches consistent, follow the size-specific rows carefully, use the listed stitch counts as checkpoints, and pay close attention to the fitting instruction at the end.
The final result is a lightweight summer kerchief with a bandana-inspired appearance and a convenient elastic connection. Its construction is practical enough for everyday wear while giving the crocheter plenty of opportunities to practice V stitches, double V stitches, wide decreases, foundation single crochet, and neat edging.
If you share a photo of your finished project on social media, the original source asks you to tag @mooglyblog or use #mooglyblog.
Pattern copyright notice: The written pattern is copyright Tamara Kelly 2015, all rights reserved. The original source requests that the pattern not be reprinted or reposted and asks readers to link to the original page when sharing it. For information about making items for sale from the pattern, consult the original About page.