
Complete Linked Crochet Bandana Guide: How to Make a Triangle Head Kerchief
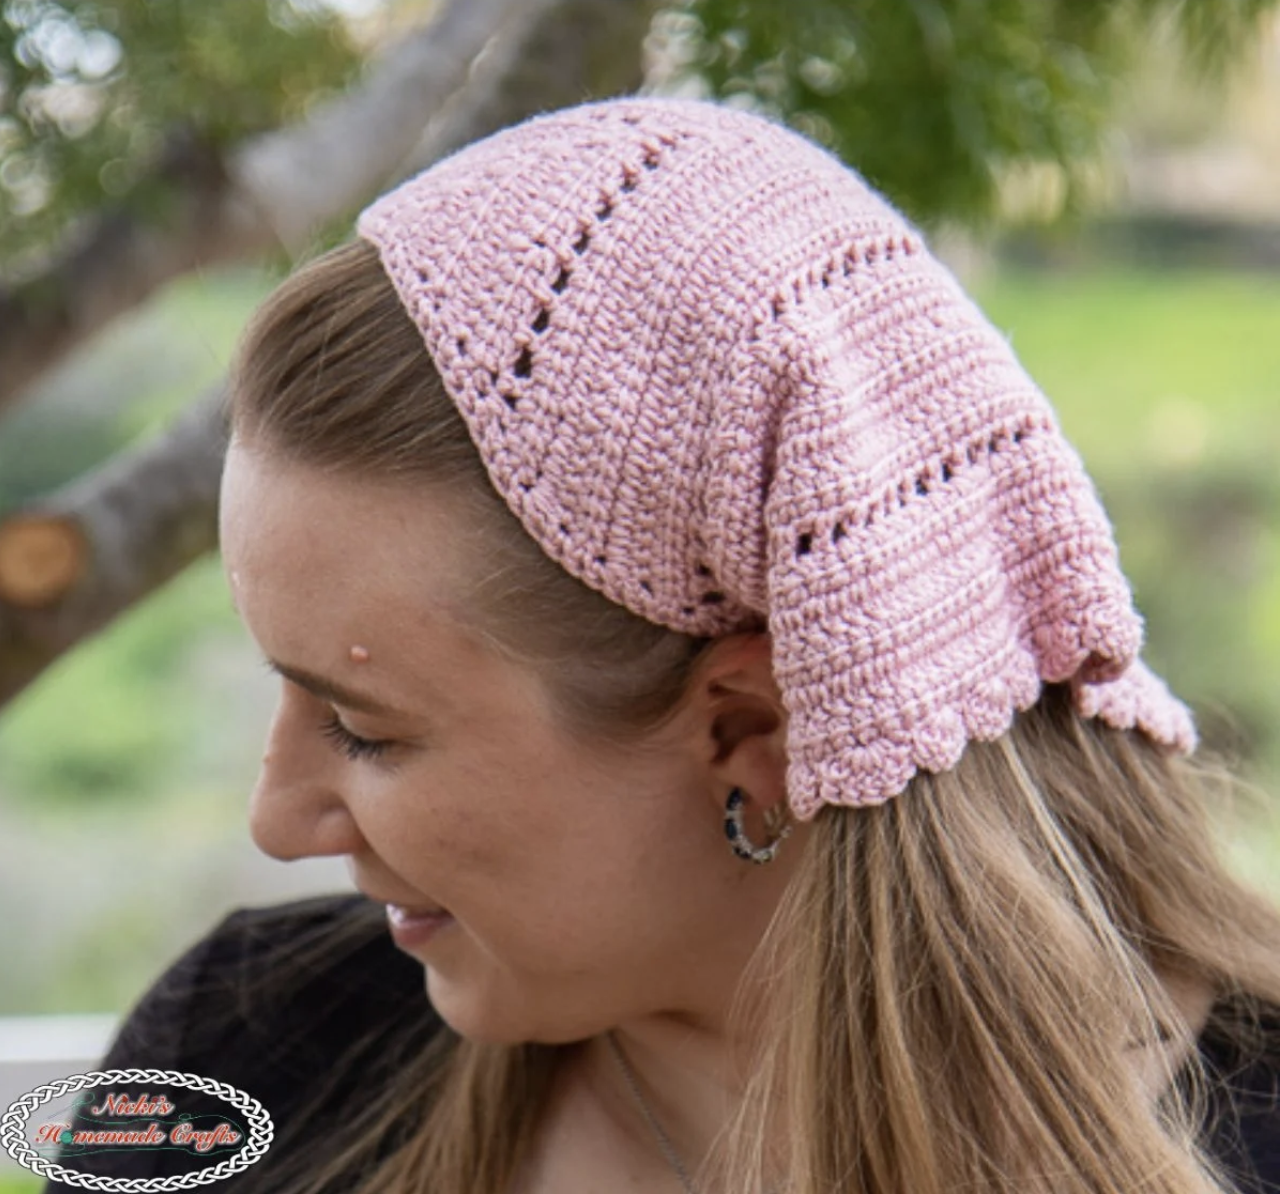
A handmade crochet bandana can be one of those projects that is both decorative and genuinely useful. This linked crochet bandana combines a triangular shape, linked double crochet texture, simple straps, and a scalloped edge to create a wearable accessory with a distinctive handmade finish.
The project is also an approachable way to explore linked crochet without committing to a large garment. The main body grows from a magic ring, and the repeated increases gradually develop the triangle. A filet-style row adds a change in texture, after which the linked construction continues until the triangle reaches its full 23-row structure.
The original pattern gives a finished size of 12.5 x 21 inches and a gauge of 5 ldc x 2 rows = 1 square inch. It calls for one skein of Mary Maxim Sunrise in Desert and a 3.75mm crochet hook.

What Makes This Bandana Different?
The defining feature of this project is the linked double crochet stitch. Instead of treating each double crochet as a completely separate stitch, linked crochet connects neighboring stitches. In this particular pattern, that technique forms the main fabric of the triangle.
The bandana is not built as a separate rectangle that is later shaped into a kerchief. Its triangular form develops directly from the first magic ring through strategically placed increases. This makes the construction easy to follow once the repeated row structure becomes familiar.
Another important feature is the transition between the dense linked crochet sections and Row 6. Row 6 is worked as a filet crochet row, using DCs and ATC rather than LDCs. This gives the project a different visual and structural section before the linked double crochet sequence resumes.
Project Specifications
- Finished Size: 12.5 x 21 inches
- Gauge: 5 ldc x 2 rows = 1 square inch
- Yarn: Mary Maxim Sunrise
- Color: Desert
- Yarn Quantity: 1 skein
- Hook: 3.75mm
- Body: 23 rows
- Starting Point: Magic ring
- Main Stitch: Linked double crochet
- Strap Foundation: Chain 40 for each strap
Supplies and Preparation
Before beginning, gather the complete supply list. Keeping everything nearby is particularly helpful when working a small accessory because you can move directly from the crochet portion into the finishing stages.
- Mary Maxim Sunrise — Desert, 1 skein
- 3.75mm hook
- Scissors
- Tapestry needle
The pattern uses the tapestry needle at the end for weaving in the yarn ends. No additional embellishments are specified in the source pattern, so there is no need to add buttons, beads, or other decorative elements.
Vocabulary to Know Before Starting
The pattern combines standard crochet terminology with linked crochet terminology. Reviewing the abbreviations before beginning can make the row instructions easier to scan.
- mr = magic ring
- dc = double crochet
- ch = chain
- sl st = slip stitch
- ldc = linked double crochet
- ATC = Alternative Turning Chain
The scalloped border has its own repeat: *1 sc into first st, sk 1 st, then 5 dc in the next st, sk 1 st, repeat from *.
The original notes also explain that ATC is Alternative Turning Chain, also known as stacked single crochet.
Three Details That Matter Before Row 1
There are three pattern notes worth keeping visible while you crochet.
The First CH2 Is Not a Stitch
The first CH2s in the relevant instructions do not count as stitches. They are there to help begin the LDC. Treating those chains as stitches would alter the stitch placement and could affect the triangle’s shape.
The Center Chain Space Has a Special Construction
After a chain space is created, the pattern has you crochet a DC and then connect the next LDC to that newly made DC. This linked connection is specifically part of the construction and should not be replaced with a standard unlinked stitch.
Row 6 Is a Different Kind of Row
The filet crochet row does not contain LDCs. It uses DCs and ATC instead. The pattern then instructs you to count all CH1s as one stitch before continuing the repeated Row 2 construction.
Beginning the Triangle
The first stage establishes the center of the bandana. Make a magic ring before beginning Row 1.
Row 1: Establish the Center
Row 1: CH2, 4 LDC, CH2, 1 DC, 3 LDC in the ring; tighten ring and turn.
This row places the initial stitches directly into the magic ring. Once the stitches have been worked, tighten the ring and turn.
The opening CH2 is not counted as a stitch. Keeping that point in mind from the beginning will make the later linked construction easier to understand.
Row 2: Begin the Increase Structure
Row 2: CH2, 2 LDC in the first st, 1 LDC in each LDC until ch2 sp; [2LDC, CH2, 1 DC, 1 LDC] (the ldc is connected to the dc) in ch2 sp; LDC in each dc until last LDC; 2 LDC in last LDC, turn.
This is the key repeat row for the main triangular fabric. There are increases at the beginning and end, with a specific sequence worked into the center ch2 space.
Rather than trying to memorize the entire instruction immediately, it can be useful to identify the three main zones: the first-stitch increase, the central ch2-space construction, and the final-stitch increase.
Rows 3–5: Continue the Same Construction
Rows 3–5: as row 2.
These rows repeat the Row 2 construction. Since the triangle is growing, the amount of fabric between the outer increases becomes larger as you progress.

Understanding the Filet Section
Row 6 creates a noticeable change in the construction. It is useful to slow down here rather than assuming it is another LDC row.
Row 6
Row 6: [1 ATC, CH 1, 1 DC] in the first st, *CH 1, SK 1, 1 DC, repeat from * until the ch2 sp; [1 DC, CH 1, 1 DC, CH 1] in ch2 sp; **1 DC, CH 1, SK 1, repeat from ** until last LDC, [1 DC, CH 1, 1 DC] in the last LDC, turn.
The row creates chain spaces and open areas between the double crochet stitches. The center ch2 space again receives a specific group of stitches and chains.
After completing Row 6, the instructions state: Now count all CH 1’s as 1 st. This is an important transition point for the next stage.
Following the Repeated Body Pattern
The remainder of the triangle follows a carefully defined sequence. The pattern tells you to repeat Row 2 five times, then repeat Row 6. This complete sequence is repeated three times, and the project then finishes with five repetitions of Row 2.
The finished construction therefore contains 23 rows.
For easier tracking, think of the body as alternating between a group of linked crochet rows and a single filet-style row. The important thing is not to alter the number of repeats.
- Complete the initial Rows 1–5.
- Work Row 6.
- Repeat Row 2 five times.
- Work Row 6.
- Repeat Row 2 five times.
- Work Row 6.
- Repeat Row 2 five times.
- Finish with five repetitions of Row 2.
Keeping a simple row-by-row checklist can be particularly useful here. It does not change the pattern; it simply makes it easier to identify which repeat you are currently working.
How to Maintain Consistent Crochet Tension
The stated gauge is 5 ldc x 2 rows = 1 square inch. Consistent tension helps the finished bandana remain close to the stated dimensions of 12.5 x 21 inches.
If your tension changes dramatically during the project, the fabric can become noticeably different in density. Because linked crochet relies on connections between neighboring stitches, maintaining an even rhythm can also make the technique easier to manage.
When checking your work, focus on the actual stitches rather than the starting CH2. The pattern explicitly says that the first CH2s do not count as stitches.
Reading the Linked Double Crochet Sections
The LDC rows are repetitive by design. Once you understand the role of the first-stitch increase, the center chain-space sequence, and the final-stitch increase, the repeated rows become more predictable.
One useful way to approach them is to pause briefly at the center of each row. Locate the ch2 space and confirm that the specified [2LDC, CH2, 1 DC, 1 LDC] sequence is being worked there, with the LDC connected to the DC as instructed.
At the end of the row, check that the last LDC receives 2 LDC. These checkpoints are more reliable than trying to judge the triangle by appearance alone.
Adding the Long-Edge Straps
After completing the body, the pattern moves into the finishing stage. The straps are worked as part of the same finishing process rather than being attached as separate pieces afterward.
Begin with the first strap:
Chain 40.
Starting from the second chain from the hook, work 1 sc per chain. Then continue along the long edge, working evenly at 2 sc’s per ldc.
Once that section is complete, crochet the second strap in the same way as the first one.
The repeated construction of the two straps is important because it gives both ends the same basic length and finishing method. Keep the chain-40 starting point consistent for both.
Finishing the Short Sides with Scallops
The short sides of the triangle receive the decorative scalloped border. This is where the project changes from the structural linked crochet fabric to a more decorative finishing detail.
The border repeat is:
*1 sc into first st, sk 1 st, then 5 dc in the next st, sk 1 st, repeat from *
The five double crochets grouped into one stitch create the rounded scallop. The skipped stitches separate the scallops and allow the border to develop its decorative rhythm.
Follow the sequence as written along the short sides instead of trying to estimate where each scallop should go by eye.
Final Finishing Steps
Once the straps and scalloped border have been completed, fasten off and weave in the ends.
The finishing stage may be short, but it is worth giving it attention. Loose yarn tails can detract from an otherwise neat accessory. Use the tapestry needle to secure and weave in the ends, then trim any excess yarn after the ends are properly incorporated.

Beginner-Friendly Checkpoints
If this is your first linked crochet project, use the following checkpoints while working:
- After Row 1, confirm that the magic ring has been tightened after completing the stitches.
- During Row 2, identify the first-stitch increase and the last-stitch increase.
- At the center of Row 2, confirm the special ch2-space sequence.
- For Rows 3–5, follow Row 2 exactly.
- For Row 6, switch to the DC and ATC instructions.
- After Row 6, remember that CH1s count as one stitch.
- Track the 23-row structure carefully.
- Use chain 40 for each strap.
- Work 2 sc’s per ldc along the long edge.
- Use the exact scallop repeat on the short sides.
What to Check If the Shape Looks Wrong
A triangular crochet project can make a small counting error especially noticeable. If the finished shape is not developing as expected, return to the written instructions rather than modifying the pattern to compensate.
Check the Starting Chain
Make sure the initial CH2 has not been counted as a stitch. The pattern specifically says that the first CH2s are there to help start the LDC and do not count as stitches.
Check the Center Space
The center ch2 space has a specific sequence in Row 2. Confirm that the LDC is connected to the DC as stated.
Check the Outer Increases
The first stitch receives 2 LDC and the last LDC receives 2 LDC in the Row 2 construction. These increases are important to the triangular shape.
Check Row 6 Separately
If the filet row does not resemble the surrounding fabric, that is expected. It is intentionally worked differently and contains DCs, chain spaces, skipped stitches, and ATC rather than LDCs.
How the Finished Bandana Can Be Used
The completed piece can be worn as a fun accessory or used for a practical purpose such as keeping hair away from the face. The original design was inspired by the need to keep hair under control while working outdoors in warm weather.
Because the project is small, it can also be a satisfying handmade gift. The triangular shape and scalloped border give it a finished appearance without requiring a complicated assembly process.
The straps provide the final adjustable element. Once the bandana is positioned, the straps can be tied to secure it in place.
Frequently Asked Questions
What type of yarn does the pattern use?
The pattern calls for Mary Maxim Sunrise in Desert, with 1 skein specified.
What hook size should I use?
The specified crochet hook is 3.75mm.
What is the gauge?
The stated gauge is 5 ldc x 2 rows = 1 square inch.
What are the finished measurements?
The finished bandana measures 12.5 x 21 inches.
How long are the starting chains for the straps?
Each strap begins with chain 40.
How is the long edge finished?
The finishing instructions specify 2 sc’s per ldc along the long edge.
What border is used?
The short sides receive a scalloped border made by repeating 1 sc, skipping 1 stitch, working 5 dc in the next stitch, skipping 1 stitch, and repeating.
How many rows are in the completed body?
The pattern’s repeat structure results in 23 rows, finishing with five repetitions of Row 2.
Quick Finishing Checklist
- Complete the 23-row triangle.
- Start the first strap with CH 40.
- Work 1 sc per chain from the second chain from the hook.
- Work evenly along the long edge at 2 sc’s per ldc.
- Make the second strap the same way.
- Add the scalloped border to the short sides.
- Fasten off.
- Weave in the ends.
- Check the finished size against 12.5 x 21 inches.
Enjoying the Finished Crochet Accessory
The appeal of this project is that it combines a useful finished object with focused practice in linked crochet. The body is built through repeated LDC construction, while the filet row introduces a contrasting technique and the final border adds a decorative touch.
For a crocheter learning the linked double crochet stitch, the repeated structure provides plenty of practice without becoming a very large project. For a more experienced crocheter, the pattern offers a relatively quick way to create a wearable accessory with a distinctive texture.
Once the final ends have been woven in, the bandana is ready to tie and wear. Whether you use it to keep hair away from your face on a warm day or simply add a handmade detail to an outfit, this triangular crochet project offers a practical result from a compact amount of work.