
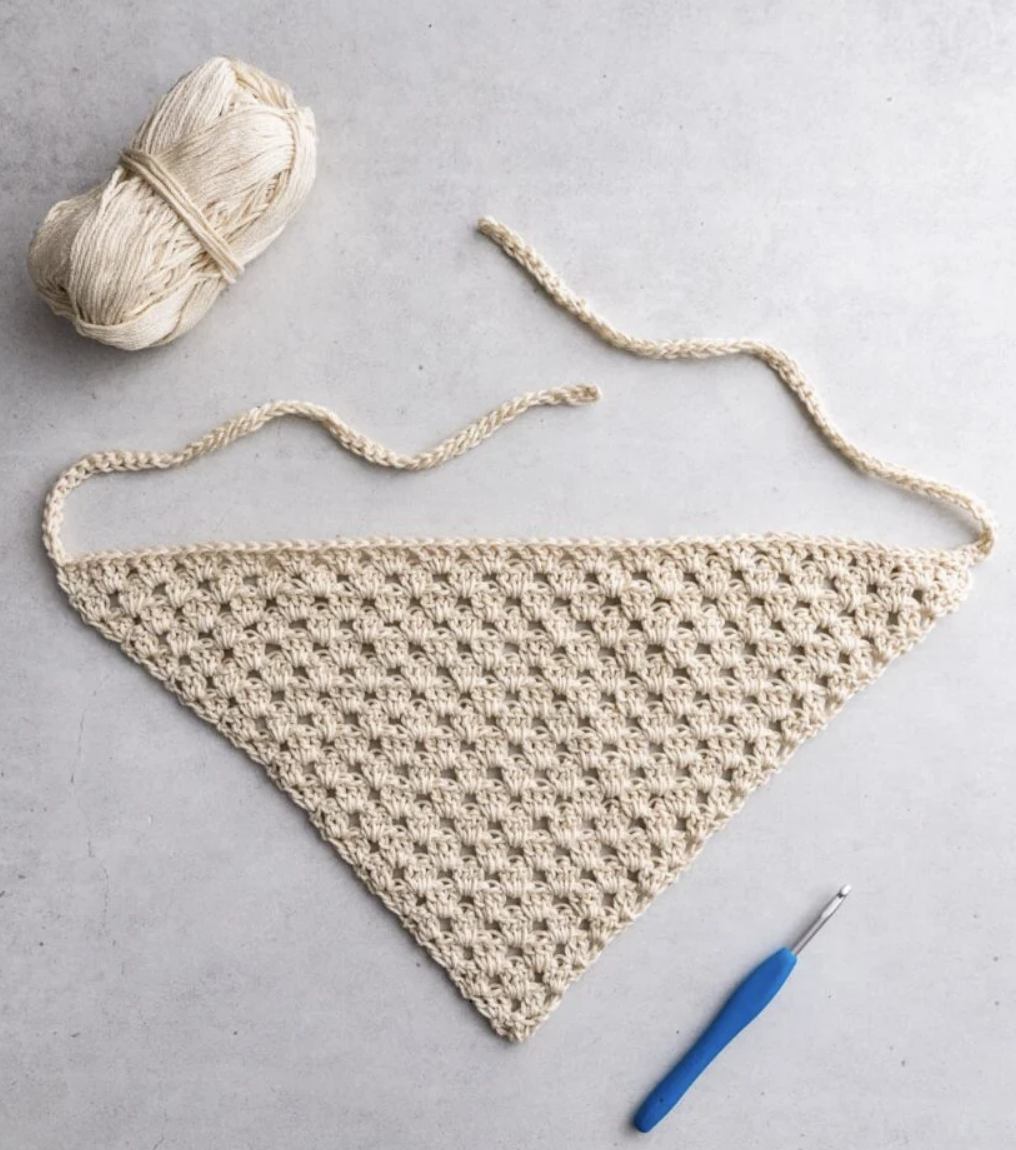
Complete Crochet Granny Bandana Guide: Easy Cotton Head Scarf Pattern from Point to Ties
A crochet bandana is one of those projects that looks more detailed than the construction actually is. This design begins with only three stitches at the tip of a triangle, expands through repeating granny-style double crochet groups, and finishes with two simple ties worked directly from the main piece. There is no complicated shaping chart, no separate pieces to sew together, and no need to work in rounds.
The entire bandana is crocheted flat in rows using US crochet terminology. The first five rows establish the construction, and after that you continue the same expanding granny-cluster logic until the triangle reaches the required size. Instead of fastening off, you keep the working yarn attached and move immediately into the first tie, the upper edge, and the second tie.
This makes the project especially useful if you want to become more comfortable recognizing spaces between crochet clusters rather than relying only on stitch-by-stitch counting. The finished fabric has an airy granny-stripe appearance, while the cotton yarn gives the accessory enough definition to show the individual clusters clearly.

How This Bandana Is Constructed
Understanding the construction before picking up your hook makes the instructions much easier to follow. The bandana is not started along its widest edge. Instead, you begin at the lower point of the triangle and increase the width with each new row.
The first row contains only three stitches. The following rows increase in a predictable way as additional 3-dc groups are added. Once the first several rows are complete, the spaces between those groups become easy to recognize and the pattern develops into a repeating granny-style structure.
The main triangle is continued for a total of 20 rows, or until it measures 8.5″ tall by 16.5″ wide. After the triangle, the working yarn remains attached. A chain of 50 creates the foundation for the first tie. Slip stitches are worked back along that chain, then across the main triangle, followed by another chain of 50 for the second tie.
The final steps are weaving in the ends and blocking the bandana to the finished measurements.
Finished Dimensions and Pattern Specifications
- Skill level: Beginner – Easy
- Pattern terminology: US terms
- Construction method: Worked flat in rows
- Finished bandana measurement: 8.5″ tall by 16.5″ wide, excluding ties
- Finished tie measurement: 14″ each
- Main triangle: A total of 20 rows, or until the required finished measurement is reached
The source notes that the ties can be made longer or shorter. The standard pattern instructions themselves begin each tie with Ch 50.
Gauge for the Granny-Stripe Fabric
For the original yarn and hook combination, the gauge is:
5 3-dc clusters and 4.5 rows = 4″ x 4″
If you substitute another yarn, your gauge may be different. The pattern accounts for that possibility by instructing you to measure the triangle while working. The important finished target is 8.5″ tall by 16.5″ wide.
Gauge matters here not because the bandana requires complicated fitted shaping, but because changes in yarn weight, hook size, and personal tension can affect both width and height. Measuring during construction gives you a practical way to compare your triangle with the intended finished size.
Yarn, Hook, and Notions
Original Yarn
1 ball Lion Brand 24/7 Cotton in Ecru
The project uses Lion Brand 24/7 Cotton, described in the source as a mercerized 100% natural fiber yarn. The general yarn recommendation is DK or light-worsted weight yarn.
Lightweight cotton and cotton-blend yarns work particularly well for this type of accessory because the open clusters remain visible and the fabric can stay comfortable enough for a head scarf.
Crochet Hook
G-6 (4.0 mm) crochet hook
If you use a different yarn, use the hook size recommended on that yarn’s label.
Additional Supplies
- Tapestry needle
- Scissors
- Ruler or tape measure
- Stitch marker, if desired
A stitch marker is optional, but it can be useful if you are still becoming familiar with the beginning and ending points of crochet rows.
Pattern Language at a Glance
- ch = chain
- dc = double crochet
- sl st = slip stitch
- st/sts = stitch/stitches
What Is a Granny Cluster?
In this pattern, a granny cluster is defined as:
3 dc worked into the same space or stitch.
The bandana’s texture comes from repeating these groups and placing new clusters into the open spaces created in the previous row.
Working Into a Space
When the instructions tell you to work between granny clusters, do not insert the hook beneath the two top loops of an individual stitch. Insert the hook into the open space between the posts of the designated stitches.
The middle clusters in this bandana are worked into those spaces between the granny clusters of the row below.
The Turning Chain Rule
The ch-3 at the beginning of each row counts as a dc stitch. This applies throughout the pattern. Remembering this rule is essential when reading both the beginning and ending instructions for each row.
Building the Triangle: The Foundation Rows
The first five rows show exactly how the triangle expands. They are worth working carefully because they establish the structure that you will continue later.
Row 1: Form the Point
Row 1: Ch 4. 2 dc in the 4th chain from the hook (3 skipped ch count as dc). Turn. [3 sts]
The three skipped chains count as a double crochet, so the row finishes with the required total of three stitches.

Row 2: Create the First Expansion
Row 2: Ch 3 (counts as dc here and throughout pattern), 2 dc in same st, skip next st, 3 dc in the top of the turning ch-3 in the row below. Turn. [6 sts]
The piece now begins to open into a triangle. At this stage, make sure you can identify the top of the previous turning chain because that location continues to matter throughout the pattern.

Row 3: Add the First Center Cluster
Row 3: Ch 3, 2 dc in same st, 3 dc in the space between the 3-dc clusters in the row below, 3 dc in the top of the turning ch-3 in the row below. Turn. [9 sts]
This is the row where the center-space construction becomes important. The new middle 3-dc group is placed into the space between the two groups below.

Row 4: Two Interior Spaces
Row 4: Ch 3, 2 dc in same st, 3 dc in the first space, 3 dc in the next space, 3 dc in the top of the turning ch-3 in the row below. Turn. [12 sts]
The triangle now has more than one interior space. Work one 3-dc cluster in each specified space and maintain the final 3 dc in the top of the turning ch-3.

Row 5: The Repeating Logic Is Established
Row 5: Ch 3, 2 dc in same st, 3 dc in each space across, 3 dc in the top of the turning ch-3 in the row below. Turn. [15 sts]
By the end of Row 5, you have the essential formula for continuing the triangle: establish the beginning cluster, fill each space across with a 3-dc cluster, and finish in the top of the turning chain.

Expanding the Bandana to Full Size
After completing Row 5, continue following the same pattern.
Continue following this pattern for a total of 20 rows, or until the triangle measures 8.5″ by 16.5″.
The widening shape becomes increasingly easy to read because every completed row creates new spaces for the next row. Rather than rushing through the longer rows, visually check that every space across the center has received a 3-dc cluster.
At the sides, continue paying close attention to the beginning and ending placements. Consistent edge construction is what keeps the triangle balanced.

A Useful Measurement Check Before the Ties
Before moving into the tie section, compare your piece with the target dimensions:
8.5″ tall by 16.5″ wide.
If you are using the original yarn and achieving the original gauge, this corresponds with the stated total of 20 rows. If your gauge differs, follow the source instruction to measure as you work and crochet as many rows as needed to meet the finished measurement.
Do not confuse blocking with major size correction. It is still best to confirm the triangle is close to the intended dimensions before starting the ties.
The Most Important Transition: Keep the Yarn Attached
Do not cut yarn or fasten off. Continue to the next section.
This is a key construction detail. The ties and upper edge are worked continuously from the main triangle. Keeping the yarn attached avoids creating an unnecessary join between the triangle and the first tie.
Constructing the First Tie
Make the first tie: Ch 50. Skip the first chain, then sl st in each ch across. (I inserted the hook into the back bump of the chain.)
Begin by chaining 50. The source notes that the hook was inserted into the back bump when working the slip stitches back across the chain.
Using slip stitches turns the simple chain into a more defined tie and leads the working yarn back toward the triangle.

Finish the Upper Edge
When you come to the main triangle, sl st in each stitch across.
Continue directly from the first tie onto the top edge of the triangle. Work one slip stitch in each stitch across.
Try to keep these stitches comfortable rather than pulling the yarn excessively tight. A very tight slip-stitch edge can behave differently from the softer granny-cluster fabric beneath it.
Constructing the Second Tie
Make the second tie: Ch 50. Skip the first chain, then sl st in each ch across. (I inserted the hook into the back bump of the chain.)
This repeats the same construction used for the first tie. When complete, the bandana has a tie positioned at each side of its upper edge.
Finish, Weave, and Block
Cut yarn, leaving a 6-8″ tail. Weave in the ends. Block the bandana to the finished measurements.
Use your tapestry needle to weave the remaining yarn tails securely into the crochet fabric. After the ends are finished, block the triangle to the specified dimensions.
Blocking helps the triangle settle into its final outline and can make the open spaces between the clusters appear more consistent.

Construction Checkpoints for Accuracy
The first several stitch counts provide convenient checkpoints while you are learning the pattern:
- Row 1: [3 sts]
- Row 2: [6 sts]
- Row 3: [9 sts]
- Row 4: [12 sts]
- Row 5: [15 sts]
If the count or shape is already different during these early rows, review the previous row before continuing. The small size of the beginning section makes corrections easier at this stage.
How to Read the Growing Granny Structure
One advantage of this pattern is that it becomes increasingly visual. After the first few rows, you can see distinct groups of three double crochet stitches separated by open spaces.
The pattern uses those spaces as guides for later clusters. When a row instructs you to work 3 dc in each space across, identify the gaps rather than inserting the hook into random stitch tops.
The side construction is different from the middle because the edges are responsible for expanding the triangle. This is why the beginning ch-3, the 2 dc in the same stitch, and the final placement into the turning chain are important.
Tension Tips for a Cleaner Result
Keep the Starting Chains Comfortable
If your chains are extremely tight, it can be difficult to insert the hook cleanly into them. This becomes especially noticeable in the tie section, where you create Ch 50 and then return across the chain with slip stitches.
Avoid Tightening Slip Stitches Excessively
Slip stitches naturally create a compact fabric. Pulling them even tighter can shorten or stiffen the edge and ties.
Compare the Two Sides of the Triangle
Lay the piece on a flat surface periodically. The two sloping sides should develop in a reasonably balanced way. If one side begins looking noticeably different, check whether the final cluster has been placed correctly into the turning chain.
Common Construction Mistakes to Watch For
Forgetting That Ch-3 Counts as a Double Crochet
The ch-3 at the beginning of the row counts as a dc. Forgetting that rule can make it difficult to understand the stitch totals or identify the correct final location.
Working Into Stitch Tops Instead of the Open Spaces
The center granny clusters are worked between the clusters from the previous row. Insert the hook into the space between the posts rather than under the two top loops of a stitch.
Missing an Interior Space
As the rows become wider, there are more spaces across the triangle. Scan the row before turning to confirm that every intended space received its cluster.
Fastening Off After the Main Triangle
Do not fasten off when the triangle is complete. The pattern specifically requires you to continue directly into the tie section.
Making Only a Chain for the Tie
The tie is not finished after Ch 50. Skip the first chain and sl st in each ch across before returning to the triangle.
Why the First Five Rows Matter So Much
The first five rows contain the complete logic of the bandana. Row 1 establishes the point. Row 2 creates the first increase. Row 3 introduces the first center space. Row 4 adds another interior space, and Row 5 establishes the instruction to work 3 dc in each space across.
Once those stages make sense, the later rows are less about learning a new technique and more about repeating the same construction accurately over a larger area.
This is one reason the project is suitable for beginners: it provides repetition without requiring a long list of unrelated stitch combinations.
Quick Technical Reference
- Yarn: 1 ball Lion Brand 24/7 Cotton in Ecru
- Hook: G-6 (4.0 mm)
- Gauge: 5 3-dc clusters and 4.5 rows = 4″ x 4″
- Triangle: 8.5″ tall by 16.5″ wide
- Ties: 14″ each
- Main construction: Worked flat in rows
- Pattern language: US terms
- Beginning ch-3: Counts as a dc
- Main triangle: Total of 20 rows, or until finished measurement is reached
- First tie: Ch 50
- Second tie: Ch 50
- Final yarn tail: 6-8″
Questions Crocheters Often Have About This Bandana
Do I need advanced crochet stitches?
No. The main techniques used are chain stitch, double crochet, slip stitch, turning the work, working into cluster spaces, and weaving in the ends.
Is this a row-based pattern?
Yes. The bandana is worked flat in rows rather than in rounds.
How do I know where to put the middle granny clusters?
They are worked into the spaces between the granny clusters in the row below.
What exactly counts as one granny cluster?
For this pattern, one granny cluster is 3 dc worked into the same space or stitch.
What should I do if my yarn produces a different gauge?
Measure the triangle as you work. The source instructs you to crochet as many rows as needed to reach the finished measurement of 8.5″ by 16.5″.
What happens after the twentieth row?
Once the main triangle is finished at the correct size, do not cut the yarn. Continue immediately into the first tie.
How is each tie formed?
Ch 50, skip the first chain, and sl st in each chain across. The source notes inserting the hook into the back bump of the chain.
Is there a separate border row before the ties?
The pattern instructs you to make the first tie and then, when you return to the main triangle, sl st in each stitch across before starting the second tie.
How much yarn should I leave before weaving in the final end?
Leave a 6-8″ tail.
Final Construction Sequence
- Work Row 1 and finish with [3 sts].
- Complete Row 2 and finish with [6 sts].
- Work Row 3 with the first cluster in the space between the clusters below and finish with [9 sts].
- Complete Row 4 and finish with [12 sts].
- Complete Row 5 and finish with [15 sts].
- Continue the established structure for a total of 20 rows, or until the triangle measures 8.5″ by 16.5″.
- Do not fasten off.
- Ch 50 for the first tie, skip the first chain, and sl st in each chain across.
- Sl st in each stitch across the main triangle.
- Ch 50 for the second tie, skip the first chain, and sl st in each chain across.
- Cut the yarn with a 6-8″ tail.
- Weave in the ends.
- Block the bandana to the finished measurements.
A Simple Project with a Clear Construction Path
This granny-stripe bandana is a good example of how a small number of crochet techniques can produce a complete wearable accessory. Rather than relying on complicated shaping instructions, the triangle grows through a clear sequence of repeated 3-dc clusters.
The pattern also teaches several useful habits. You learn to recognize a turning chain as part of the stitch count, distinguish spaces from stitch tops, compare gauge with actual measurements, and transition from a main crochet section directly into finishing details without unnecessarily cutting the yarn.
For the cleanest result, focus first on accurate cluster placement. Check the first five stitch counts, keep the triangle edges balanced, and measure the main piece before beginning the ties. Once you reach the tie section, preserve the original sequence: first tie, slip stitches across the triangle, second tie, and only then cut the yarn.
After weaving in the final 6-8″ tail and blocking the bandana to 8.5″ by 16.5″, the project is complete and ready to wear.
